Completed
Make a production of beams?
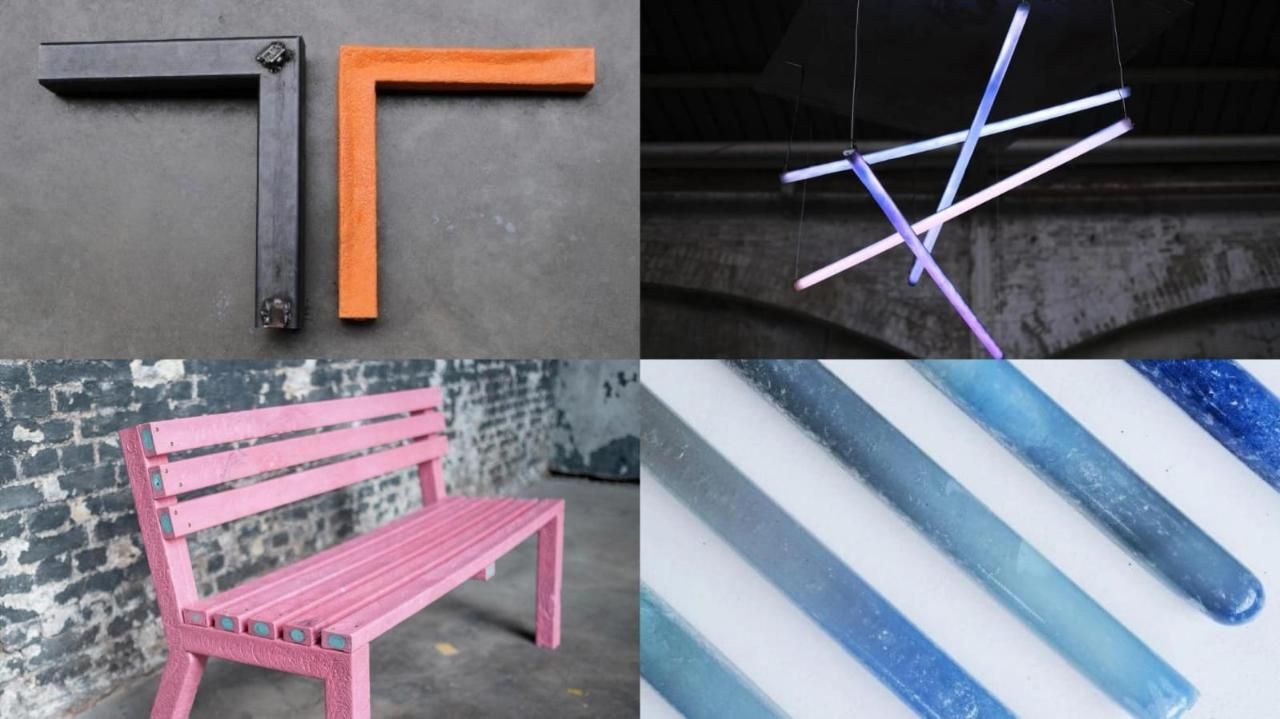
Hello! We’ve been cranking hard at the Precious Plastic HQ with the development of v4.. The focus for the beginning of the year is on exploring and developing techniques for the Extrusion machine. This research will be focused on Beam Production, with all the successes, failures and set backs along the way. Stay tuned for further topics as the development continues..More Information
%20--%3e%3c!DOCTYPE%20svg%20PUBLIC%20'-//W3C//DTD%20SVG%201.1//EN'%20'http://www.w3.org/Graphics/SVG/1.1/DTD/svg11.dtd'%3e%3csvg%20version='1.1'%20id='Layer_1'%20xmlns='http://www.w3.org/2000/svg'%20xmlns:xlink='http://www.w3.org/1999/xlink'%20x='0px'%20y='0px'%20width='165px'%20height='131px'%20viewBox='0%200%20165%20131'%20enable-background='new%200%200%20165%20131'%20xml:space='preserve'%3e%3ctitle%3eGroup%203%3c/title%3e%3cdesc%3eCreated%20with%20Sketch.%3c/desc%3e%3cg%20id='Page-1'%3e%3cg%20id='Group-3'%20transform='translate(1.000000,%201.000000)'%3e%3cpolygon%20id='Path'%20fill='currentColor'%20points='100,107.853%2044,107.853%200,64.853%2014,19.853%2081.5,-0.147%20142,7.853%20163,30.853%20163,74.853%20138,95.853%20152,124.853%20146.848,129.147%20'/%3e%3cg%20id='Group-2'%20transform='translate(35.000000,%2059.000000)'%3e%3cpath%20id='o'%20fill='%23FFFFFF'%20d='M11.792,0.286c-1.267,0-3.003,0.267-5.208,0.8c-3.989,0.966-5.983,3.017-5.983,6.15%20c0,1.566,0.985,2.949,2.956,4.15c1.971,1.199,4.153,1.799,6.546,1.799c0.798,0,70.776,0.135,71.386,0%20c1.642-0.299,9.854-12.152,2.815-12.899c-3.764-0.399-29.779-0.112-47.863,0C20.7,0.384,12.404,0.286,11.792,0.286z'/%3e%3cpath%20id='o-copy-2'%20fill='%23FFFFFF'%20d='M88.105,1.136c-1.268-0.566-2.557-0.85-3.871-0.85c-1.268,0-3.004,0.267-5.209,0.8%20c-3.988,0.966-5.982,3.017-5.982,6.15c0,1.566,0.985,2.949,2.956,4.15c1.971,1.199,4.153,1.799,6.546,1.799%20c0.798,0,1.502-0.066,2.111-0.199c1.643-0.301,3.262-1.041,4.857-2.225c1.595-1.184,2.533-2.326,2.814-3.426%20c0.047-0.166,0.07-0.416,0.07-0.75c0-1-0.41-2.025-1.23-3.075C90.346,2.461,89.326,1.669,88.105,1.136z'/%3e%3c/g%3e%3cg%20id='Group'%20transform='translate(35.000000,%2038.000000)'%3e%3cpath%20id='o-copy'%20fill='%23FFFFFF'%20d='M9.433,0.27c-1,0-2.37,0.267-4.11,0.8C2.175,2.037,0.601,4.087,0.601,7.22%20c0,1.566,0.777,2.95,2.333,4.15c1.555,1.2,3.277,1.8,5.166,1.8c0.629,0,55.853,0.133,56.334,0c1.296-0.3,7.775-12.153,2.222-12.9%20c-2.97-0.399-23.5-0.112-37.771,0C16.462,0.368,9.915,0.27,9.433,0.27z'/%3e%3cpath%20id='o-copy-3'%20fill='%23FFFFFF'%20d='M69.654,1.12c-1-0.566-2.018-0.85-3.055-0.85c-1,0-2.37,0.267-4.11,0.8%20c-3.147,0.966-4.722,3.017-4.722,6.15c0,1.566,0.777,2.95,2.334,4.15c1.555,1.2,3.276,1.8,5.165,1.8%20c0.63,0,1.185-0.067,1.666-0.2c1.296-0.3,2.573-1.042,3.833-2.225c1.259-1.183,2-2.325,2.222-3.425%20c0.037-0.167,0.056-0.417,0.056-0.75c0-1-0.324-2.025-0.973-3.075C71.423,2.445,70.617,1.653,69.654,1.12z'/%3e%3c/g%3e%3c/g%3e%3c/g%3e%3c/svg%3e)
Polystyrene Beams
Created about 4 years ago
Objective: Create transparent beams and explore the control of colour with PS.
Process:
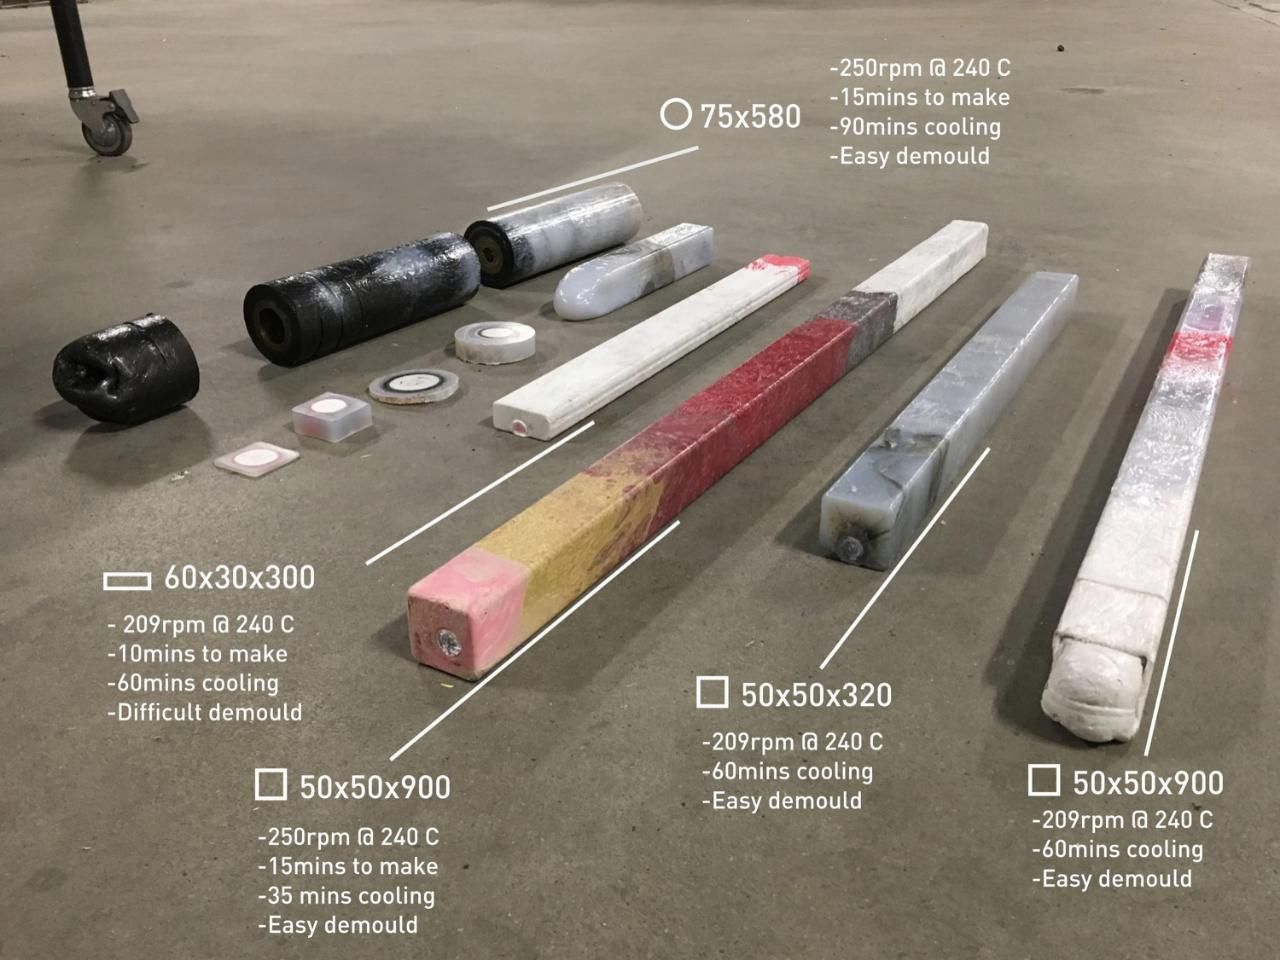
We've tried various beam moulds attached to the extrusion machine. The machine is in good state and using it is very friendly. We screw on each mould, fill the hopper and turn the motor on. The machine was set to 240 C and motor speed varied between 210~250 rpm. Demoulding the beams can sometimes be very hard with PS as it doesn’t shrink as much as PP or PE.
Conclusions:
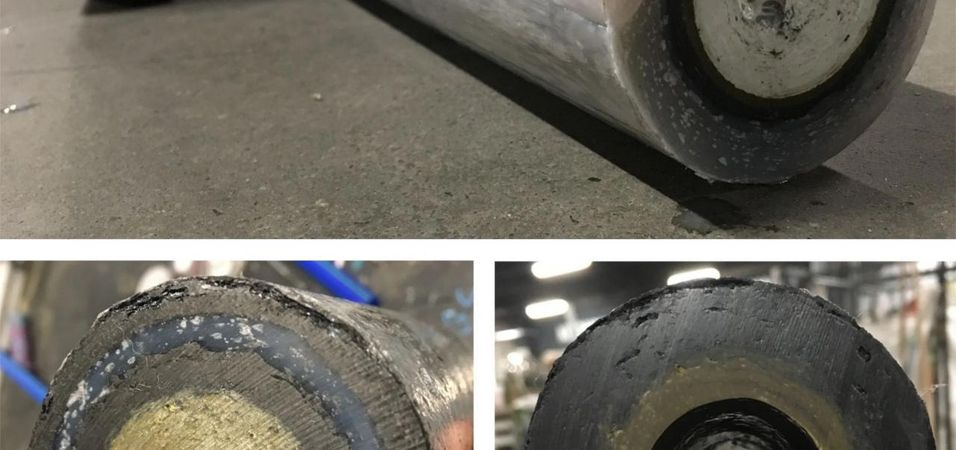
-PS can remain transparent with the extrusion process.
-Quality of finish is high.
-Beams are very hard. (Sound like a peice of rock and take long to cut through)
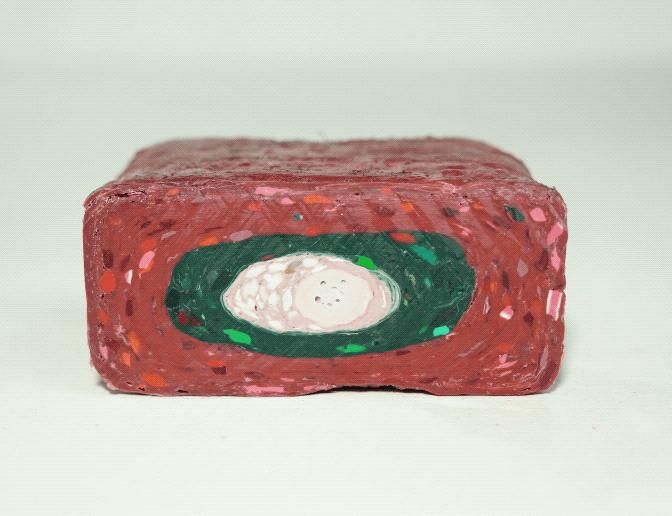
-One beam developed a large cavity and was completely hollow. We think this could be from the thin gold flakes (coffee cup lids) shrinking rapidly and drawing to the outer layer of black.

Polypropylene Beams
Created about 4 years ago
Objective: Create large, strong beams
Process:
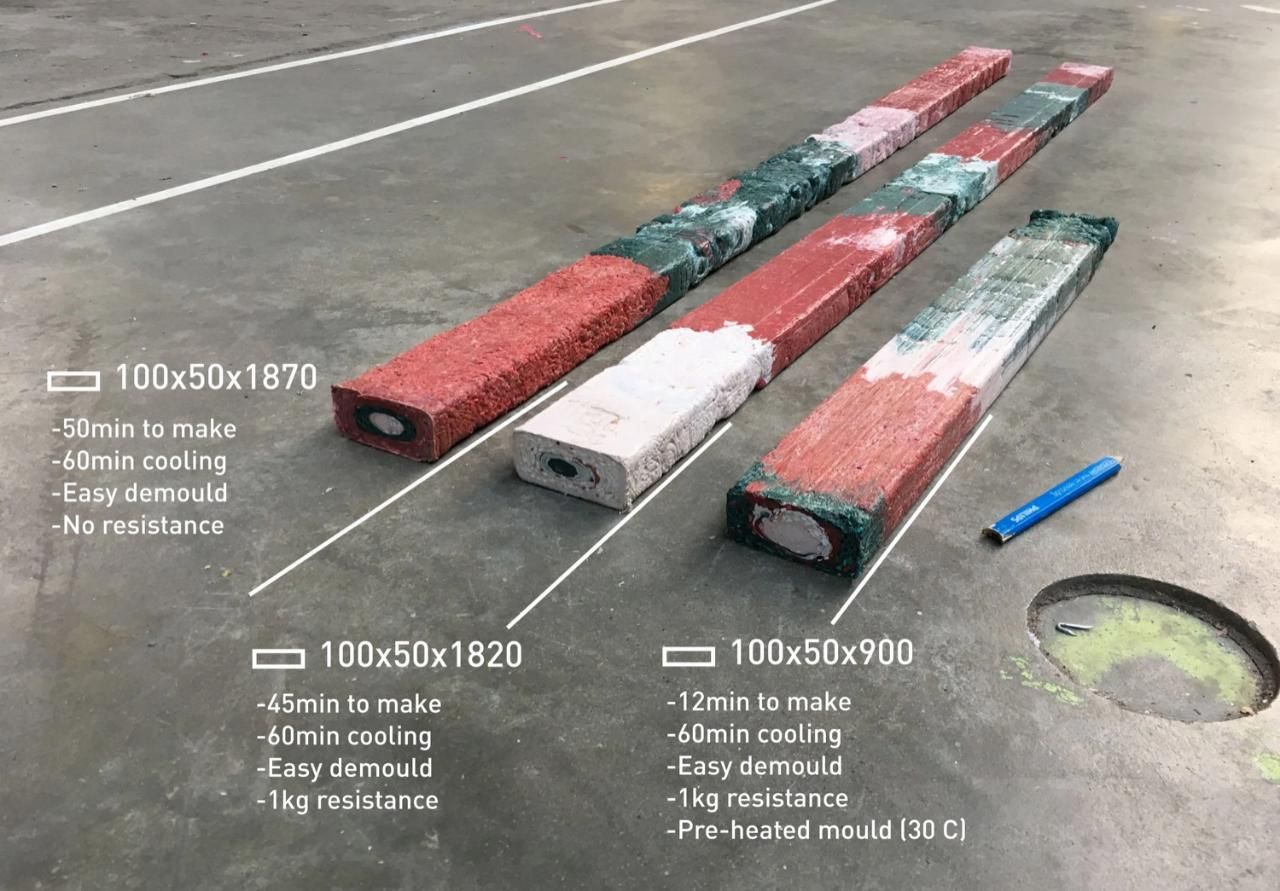
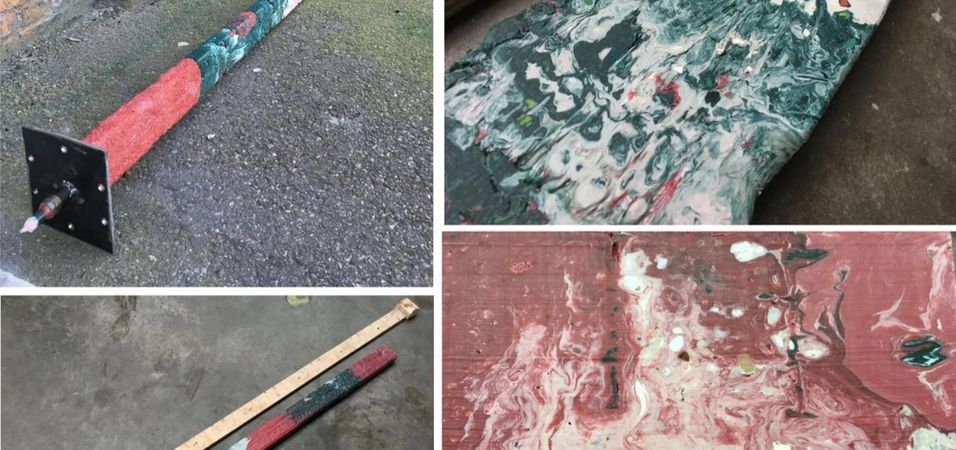
Shred large flakes into smaller bits. The machine was set to 200 C and the motor speed was varied. For most tests, I used a wooden block attached to a longer piece of wood (plunger). I hung a 1kg bucket onto the end of this plunger to create some relatively consistent pressure to the extruding beam.
Conclusions:
-Smoother surfaces can be obtained by using a weighted plunger.
-Smoother surfaces can also be obtained with a warm mould.
-Smaller granules work better than large.
-The end of a beam seems to have better consistency and surface. Possibly due to the heat of mould and surrounding plastic.

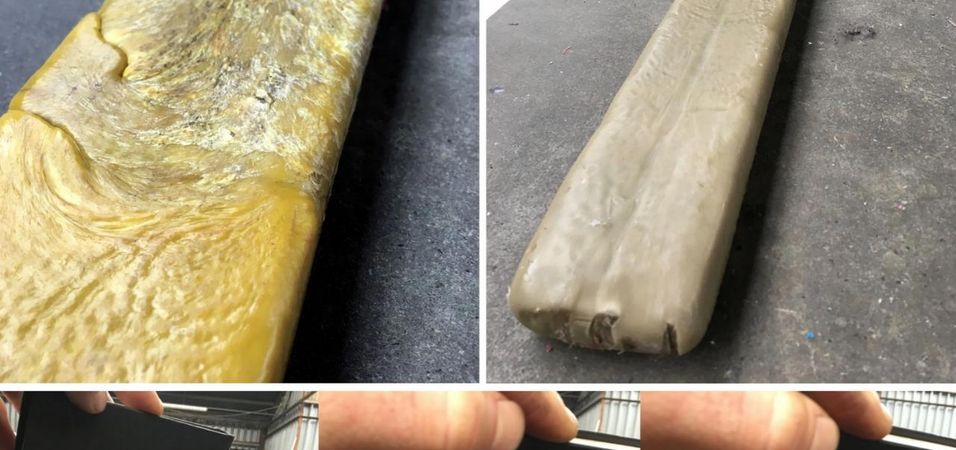
Testing PP Beam consistency and speed
Created about 4 years ago
Objective: Discover the optimal machine settings
Process:
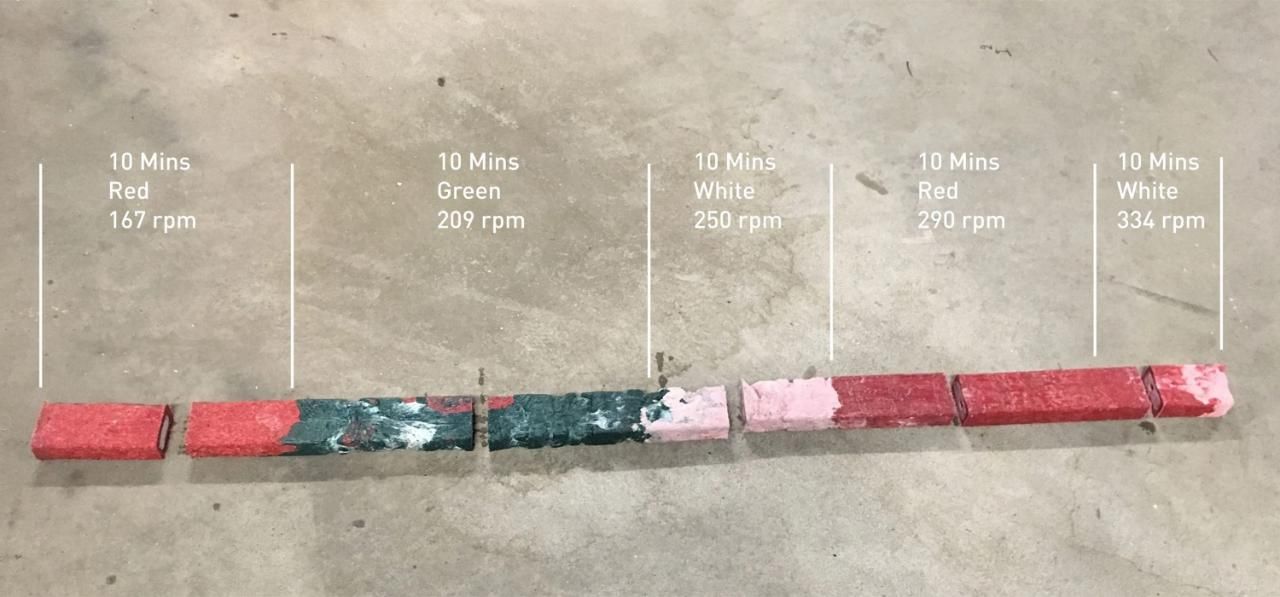
There is an image of this beam above, and I went through the same process however did not use any plunger/resistance and the mould was cold (4 C). I set the machine to a constant temperature of 200 C and ramped up the rpm and changed colour every 10 minutes. Starting with Red@167rpm, Green@209rpm, White@250rpm, Red@292rpm and White@334rpm.
Conclusions:
-Initial section of beam was very rough, did not fill mould cavity or fully melt.
-Consistency improved with length. Plastic has more time to melt inside the beam core.
-There was a hollow channel at the end of the beam. Possibly from letting machine run with no plastic.
-With a cold mould, it may be better to start off even slower and ramp up the speeds thereafter.


Polyethylene Beams
Created about 4 years ago
Objective: Create stronger beams. I’ve found PE to be an elusive material for the hand powered machines due to it’s viscosity even in molten state. These experiments were to learn about ease of production and the differences between PP and PE beams.
Process:
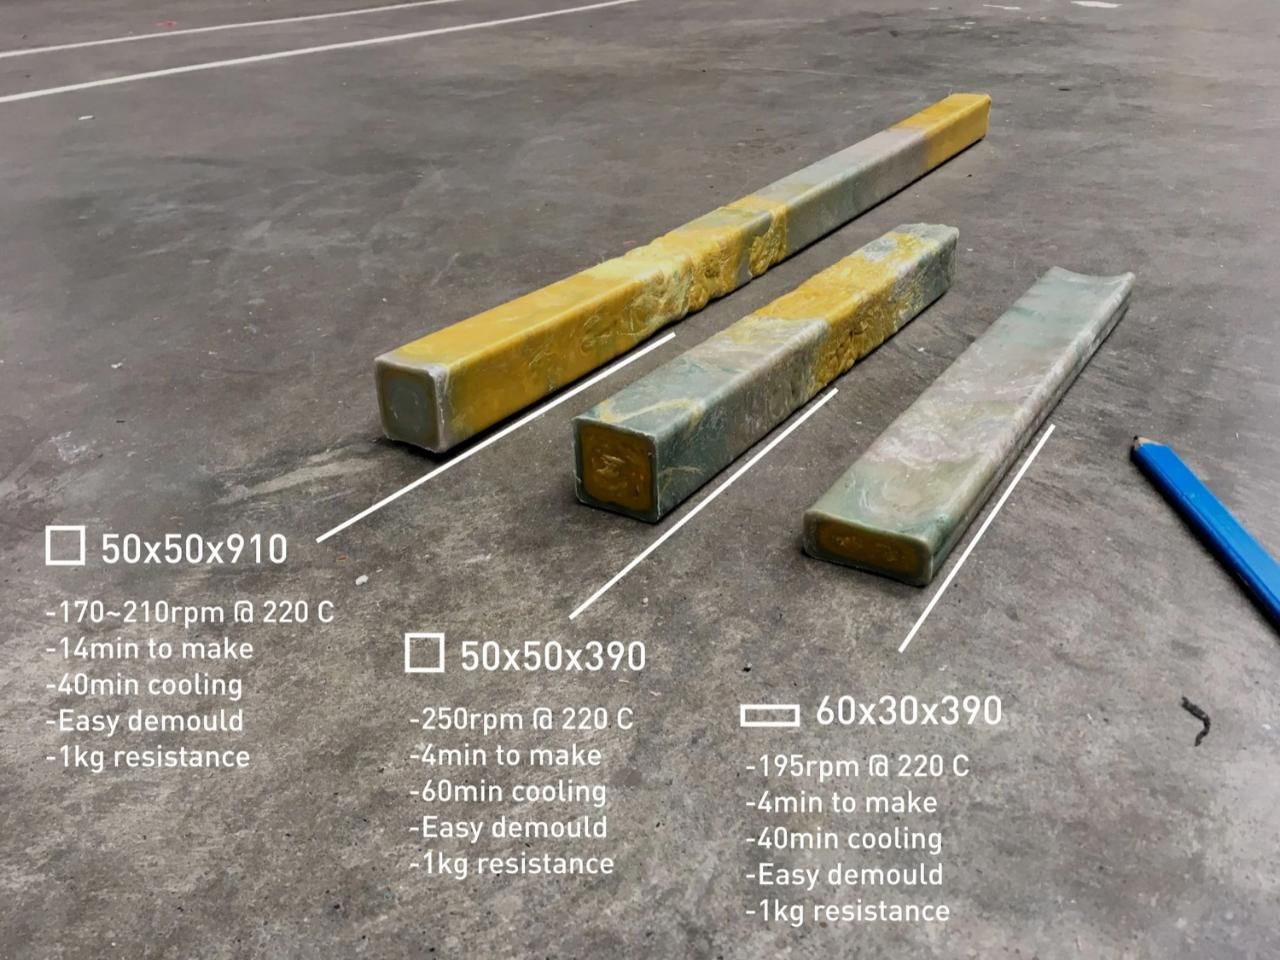
Shred larger flakes into smaller bits. The machine was set to 220 C and speeds were adjusted according to the rising and falling barrel temperatures. The plunger was weighted with 1kg.
Conclusions:
-PE can be used to make strong beam.
-After enough time, demoulding is easy.
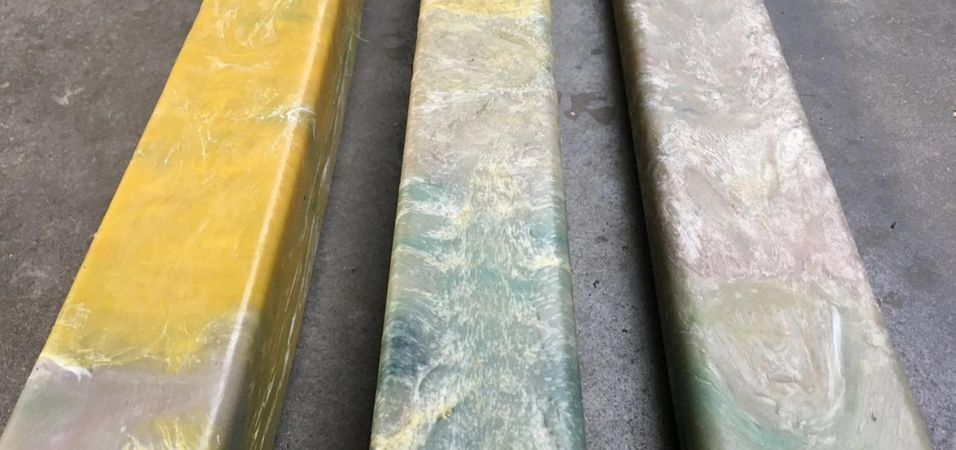
-Surfaces feel more slippery/waxy than PP or PS.

Large PE Beams
Created about 4 years ago
Objective: Make the biggest PE beam possible.
Process:
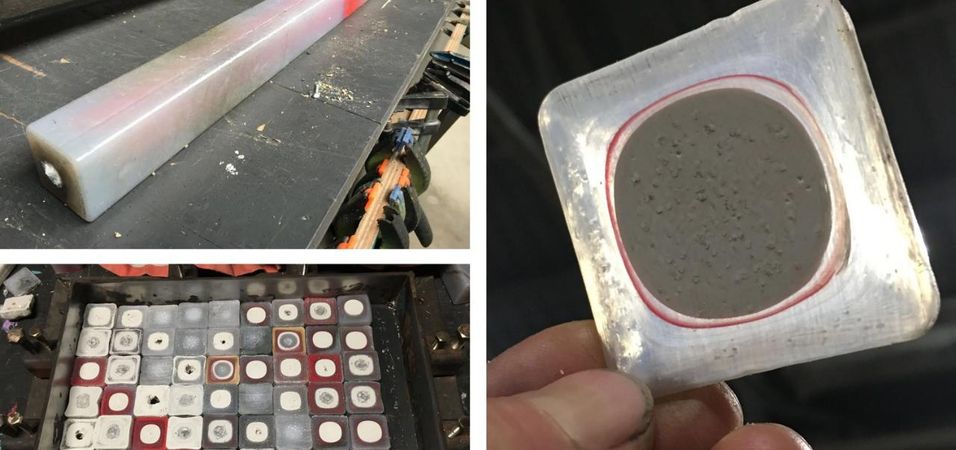
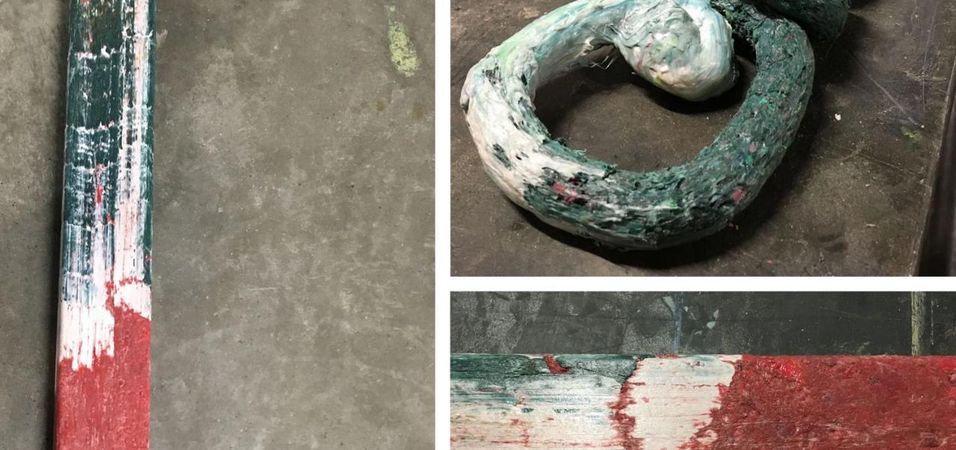
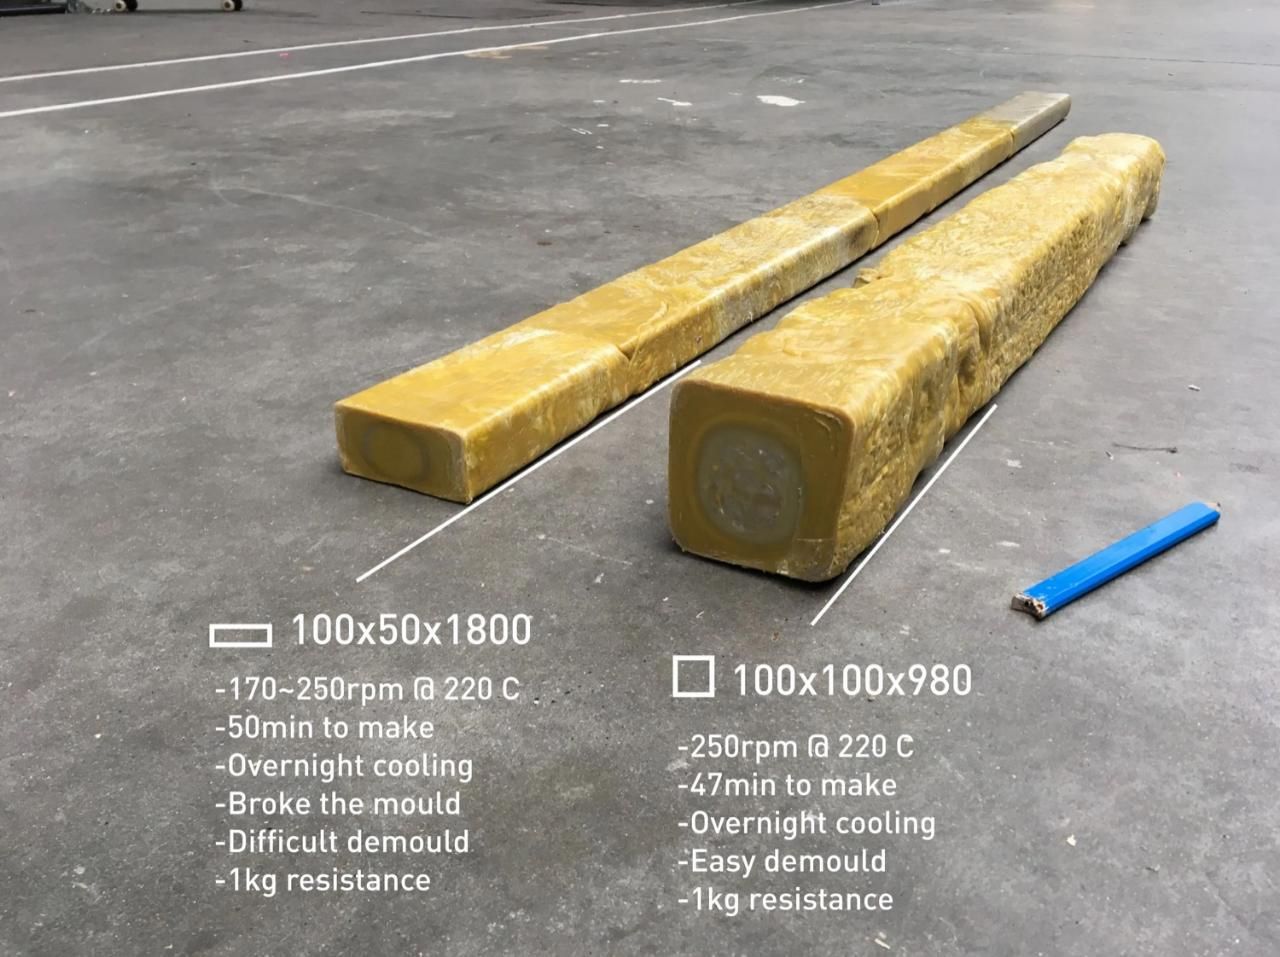
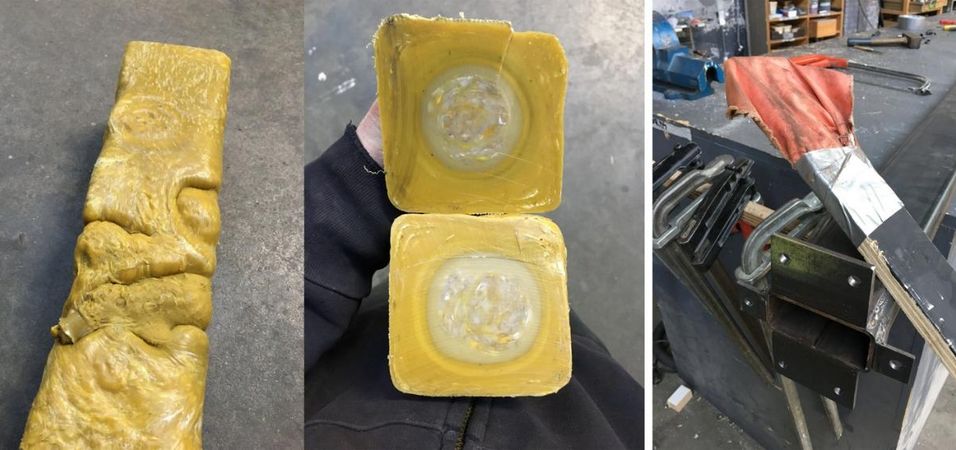
We had some large rectangle and square tubes in the workshop onto which we welded angle iron brackets for connecting to the extruder. It is helpful to clean the inside of the tube before use (image 3). The process of extrusion follows the same steps as before. Machine set to 220 C and speed varied according to the temperature of the barrel. A 1kg bucket was used for resistance on the plunger.
Findings:
-The rectangular tube mould broke while extruding. This happened when the resistance of the plunger rose as the weight moved further away from the mould. The temperatures spiked to 270 C and the mould bulged (image 2). Closeup of the swollen area of beam also pictured in image 2.
-The square shape worked well too. You can see the shape of the nozzle and initial plastic section in image 3.
-Cooling takes far longer with such large shapes.
-There is a fine line between too much pressure and too little. Only some sections took the shape of the mould, others remained round/organic.
-Temperature on average was 30~40 C hotter than the machine was set.

Implementation
Created over 1 year ago
Here's some ways you can build recycled plastic beams:
1) Make a mould to extrude beams
https://community.preciousplastic.com/how-to/make-a-mould-to-extrude-beams
2) Make glass-like beams
https://community.preciousplastic.com/how-to/make-glass-like-beams
3) Make angled beams
https://community.preciousplastic.com/how-to/make-angled-beams
And here's some products built with recycled plastic beams:
1) Make a shelf with sheets & beams
https://community.preciousplastic.com/how-to/make-a-shelf-with-sheets--beams
2) Create a bench with 2x4 beams
https://community.preciousplastic.com/how-to/create-a-bench-with-2x4-beams
3) Make a bench with beams
https://community.preciousplastic.com/how-to/make-a-bench-with-beams
4) Make outdoor furniture with beams
https://community.preciousplastic.com/how-to/make-outdoor-furniture-with-beams
5) Make a lamp with beams
https://community.preciousplastic.com/how-to/make-a-lamp-with-beams
