
Converting a small milling machine to CNC for molds making.
researchother machinehackmould
More Information


%20--%3e%3csvg%20version='1.1'%20id='Layer_1'%20xmlns='http://www.w3.org/2000/svg'%20xmlns:xlink='http://www.w3.org/1999/xlink'%20x='0px'%20y='0px'%20viewBox='0%200%2064%2063'%20style='enable-background:new%200%200%2064%2063;'%20xml:space='preserve'%3e%3cstyle%20type='text/css'%3e%20.st0{fill:%23231F20;}%20%3c/style%3e%3cdesc%3eCreated%20with%20Sketch.%3c/desc%3e%3cg%20id='Page-1'%3e%3cg%20id='OA-Logo-Black-Background'%3e%3cpath%20id='Shape'%20class='st0'%20d='M14.1,30.1c-1.5-0.8-8.6-3.8-14.1-7.8c1.8-3.4,3.1-5.6,5-9.1c2.7,1.1,1.9,0.5,4.6,1.7%20c0.8,0.4,10.1,4.5,13.8,6.2c2.4,1.1,4.7,2.2,7,3.3L43,30.5l8.1,3.9c4,2,7.2,3.5,11.3,5.5c0.5,0.3-3.7,9.4-3.7,9.4%20c-1.7-0.6-3.9-1.8-5.5-2.5c-4.7-2.1-9-3.9-13.7-6c-4-1.8-6.7-2.9-10.8-4.5C25,34.9,17.1,31.6,14.1,30.1z'/%3e%3cpath%20id='Shape_1_'%20class='st0'%20d='M12.1,54.9c-0.8,0.6-1.6,1.2-2.5,1.6c-0.4-0.5-0.9-1-1.3-1.5c-0.3-1.2-2.3-4.9-2.7-6.2%20c-0.1-0.4-0.7-2.2-0.8-2.6c0,0,5-3.4,8.2-5.9c3.2-2.6,6.2-5,9.3-7.5c1.4-1.1,3.9-2.5,5.3-3.5c2.5-1.7,13-9.1,15.6-10.5%20c5.4-3.3,11.1-6.3,16.8-9c1.7,3.5,1.8,3,3.8,6.9c0,0-17.8,13.5-22.7,17.1c-3.8,2.8-7.5,5.7-11.3,8.5c-1.7,1.3-3.5,2.4-5.2,3.7'/%3e%3cpath%20id='Shape_2_'%20class='st0'%20d='M20.8,2.9l-0.2-0.8C25,0,31.2-0.3,31.4,0.2c0.4,1.1,0.9,2.2,1.2,3.4c1.4,4.4,2.7,8.7,4,13.1%20c0.4,1.4,2.8,10,2.9,10.5c0.5,2.8,1.2,5.6,1.6,8.4c0.8,4.7,1.4,8.6,2.3,13.3c0.6,3.1,1.3,6.3,2.3,11.3c0,0-5.8,1.4-7.5,1.8%20c-0.8,0.2-1.5,0.4-2.4,0.6c-0.3-1.1-0.2-1.2-0.5-2.1c-0.9-3.7-1.8-7.3-2.6-11c-1.5-6.4-3-12.9-4.4-19.3%20c-1.2-5.4-2.6-10.7-4.4-15.9c-1-3.1-1.8-6.3-2.7-9.5C21.1,3.8,21,3.8,20.8,2.9z'/%3e%3c/g%3e%3c/g%3e%3c/svg%3e)


1
Some pics and videos
Published 1y. Edited 1yPublished almost 2 years ago. Last edit almost 2 years ago
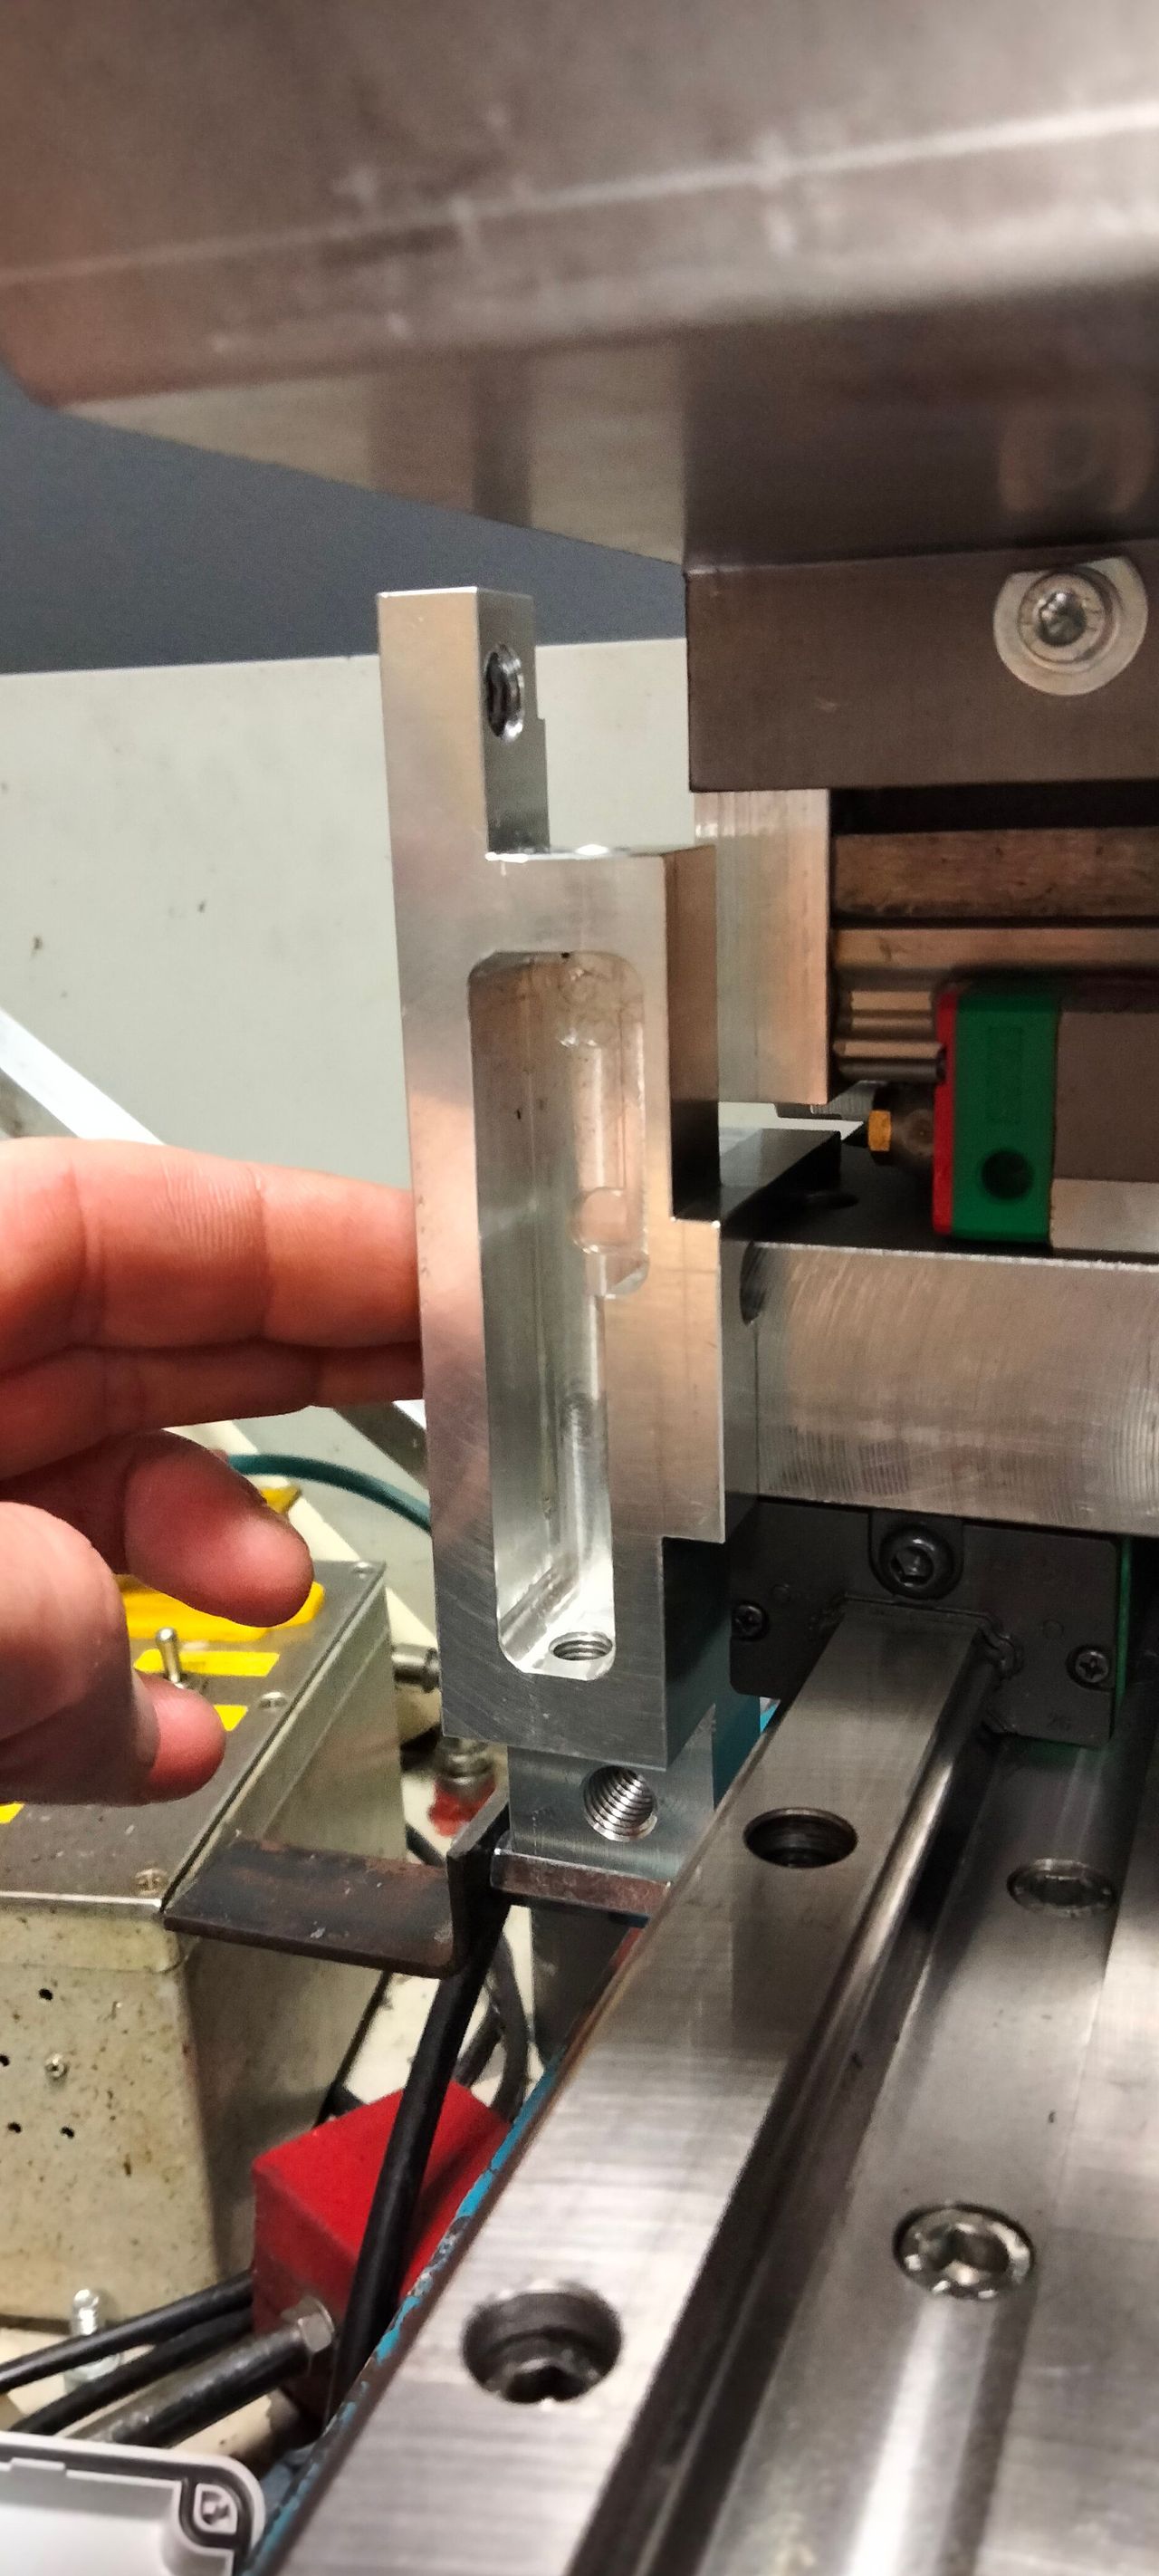
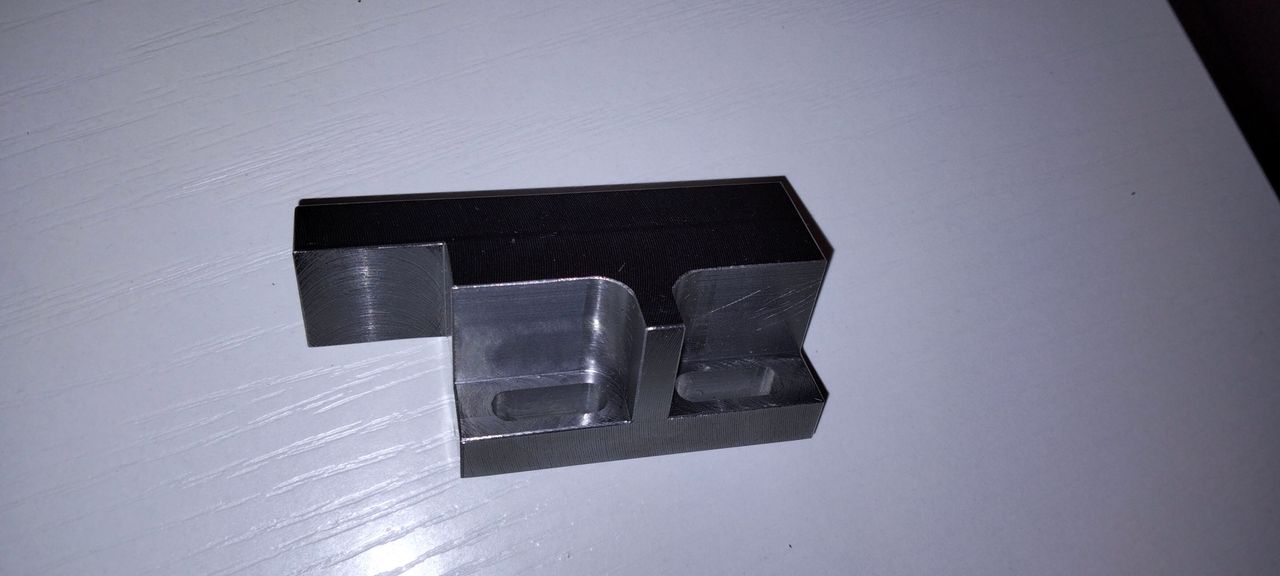
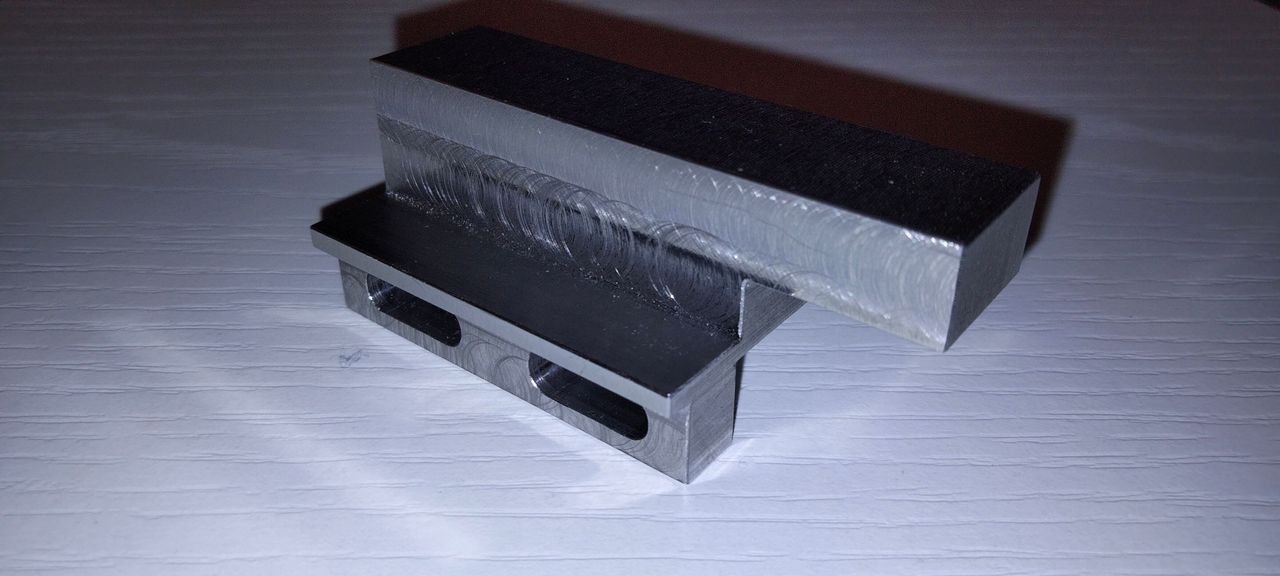
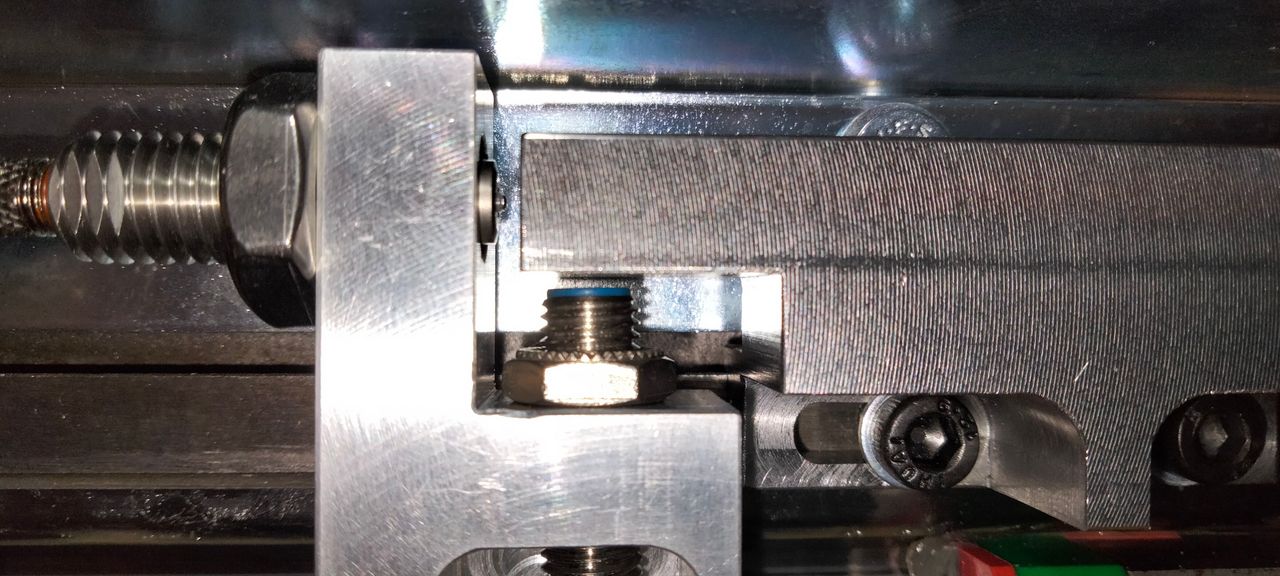
Photos of the machine parts adapted or made from scratch in last months, plus the speed multiplier collet holder.

%20--%3e%3csvg%20version='1.1'%20id='Calque_1'%20xmlns='http://www.w3.org/2000/svg'%20xmlns:xlink='http://www.w3.org/1999/xlink'%20x='0px'%20y='0px'%20viewBox='0%200%2027.2%2027.8'%20style='enable-background:new%200%200%2027.2%2027.8;'%20xml:space='preserve'%3e%3ctitle%3eicon%20redirect%20new%3c/title%3e%3cg%3e%3cpath%20d='M27.2,26.5c-0.1-5-0.3-10-0.4-15c0-0.7-0.6-1.2-1.2-1.2s-1.2,0.6-1.2,1.2c0.1,4.6,0.3,9.1,0.4,13.7%20c-3.9-0.2-7.7-0.6-11.6-0.4c-3.3,0.2-6.7,0.5-10,0.4C2.8,19.5,2.7,13.7,2.5,8c2.9-0.1,5.8-0.8,8.6-0.7c1.6,0.1,1.6-2.4,0-2.5%20C7.8,4.6,4.5,5.7,1.2,5.5c-0.6,0-1,0.3-1.1,0.7C0,6.3,0,6.4,0,6.6c0,0,0,0.1,0,0.1c0,0,0,0,0,0.1c0.2,6.6,0.4,13.2,0.5,19.7%20c0,0.6,0.4,1.3,1.2,1.4c3.8,0.1,7.5-0.2,11.3-0.4c4.4-0.3,8.6,0.2,12.9,0.4c0.6,0,1-0.3,1.1-0.7C27.1,26.9,27.2,26.7,27.2,26.5z'/%3e%3cpath%20d='M12,12.6c-0.2,0.7,0.2,1.4,0.9,1.5c0.7,0.2,1.4-0.2,1.5-0.9v0c0.6-2.2,1.4-4.5,3.1-6c1.3-1.2,3-1.9,4.7-2.7%20c-0.4,1.3-0.8,2.6-1.4,3.8c-0.6,1.5,1.8,2.1,2.4,0.7c0.8-1.9,1.5-3.9,2-5.9c0-0.1,0-0.2,0-0.3c0.3-0.6,0.1-1.5-0.7-1.8%20C22.3,0.4,20,0,17.7,0c-0.7,0-1.2,0.6-1.2,1.2s0.6,1.2,1.2,1.2c0.9,0,1.7,0.1,2.6,0.2c-1.7,0.8-3.4,1.7-4.8,3%20C13.6,7.6,12.7,10.1,12,12.6z'/%3e%3c/g%3e%3c/svg%3e)
2
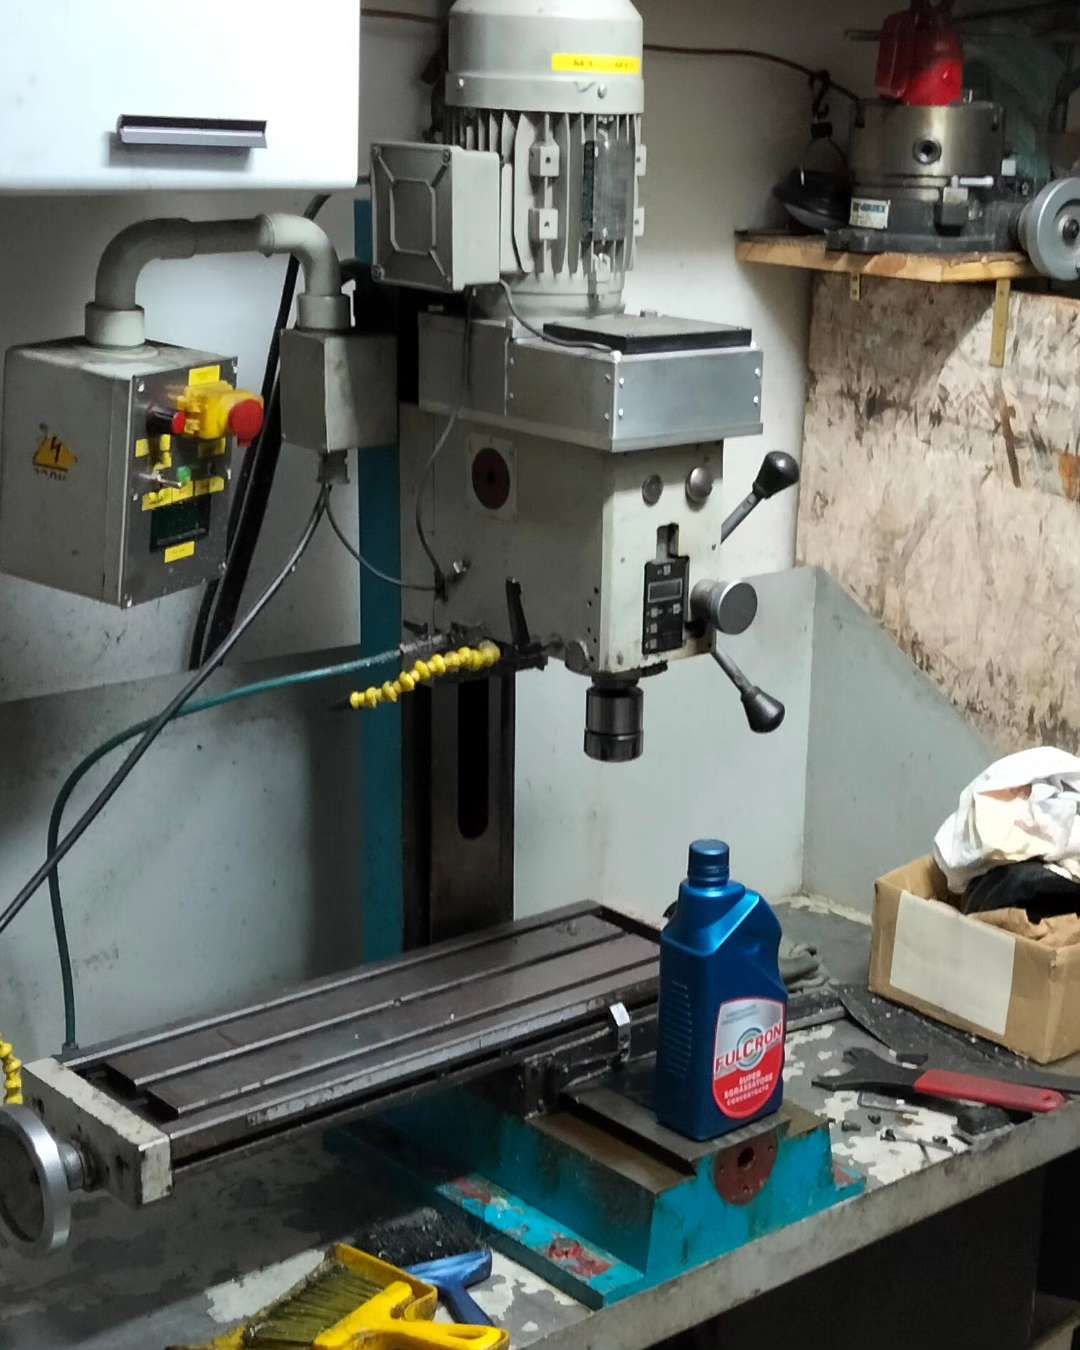
The original machine
Published 1y. Edited 1yPublished almost 2 years ago. Last edit about 1 year ago
That's the machine I'm modifying.
3
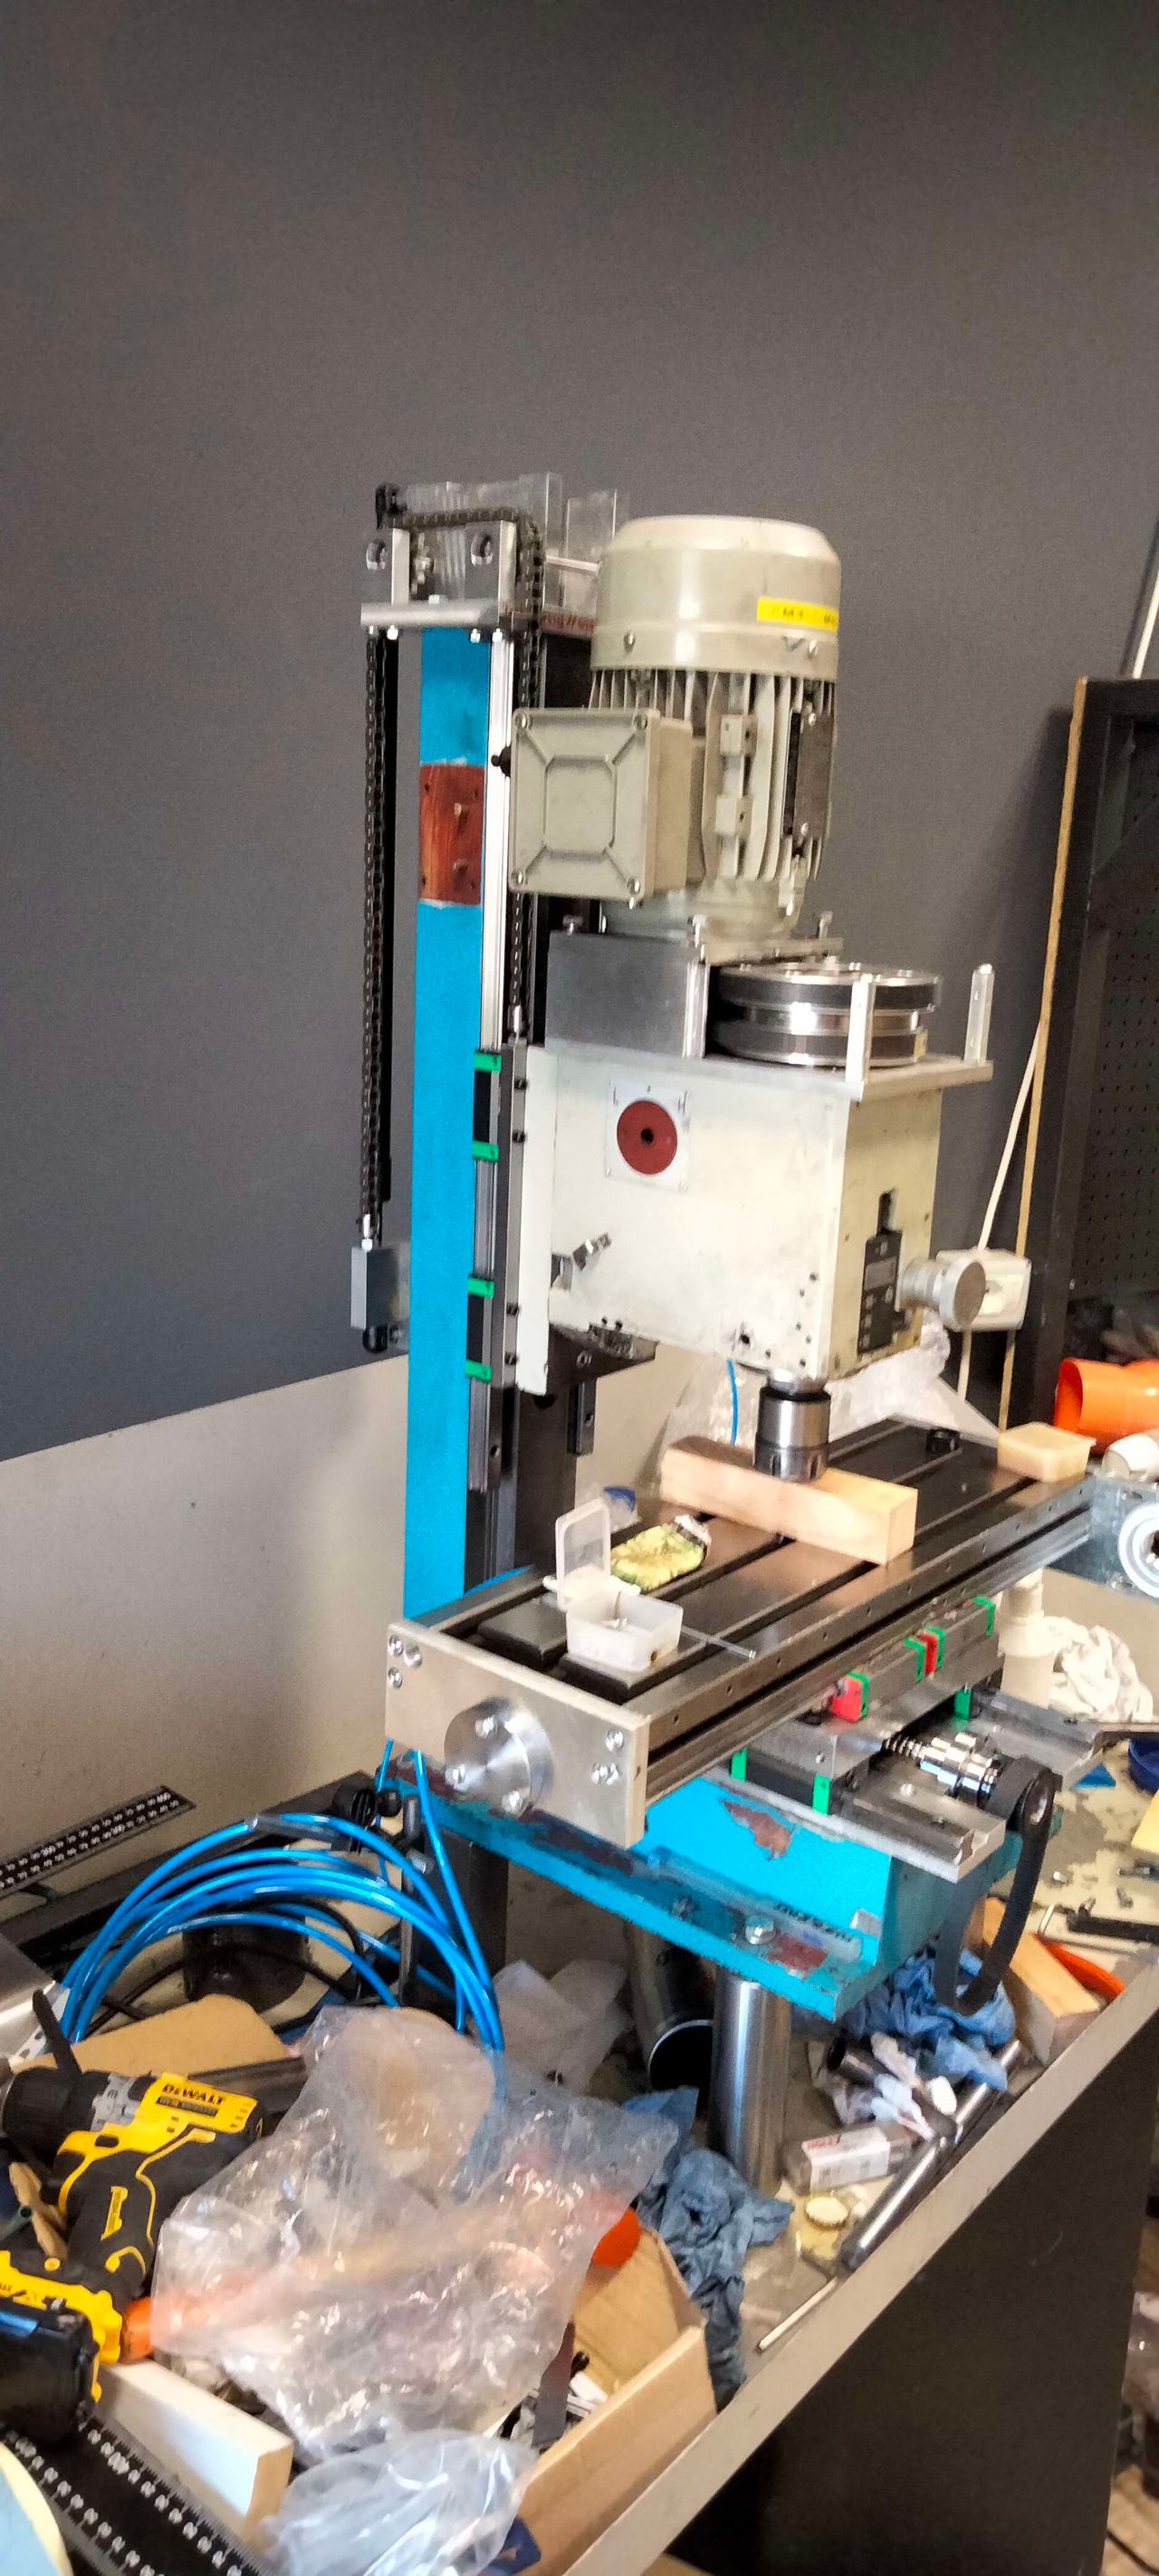
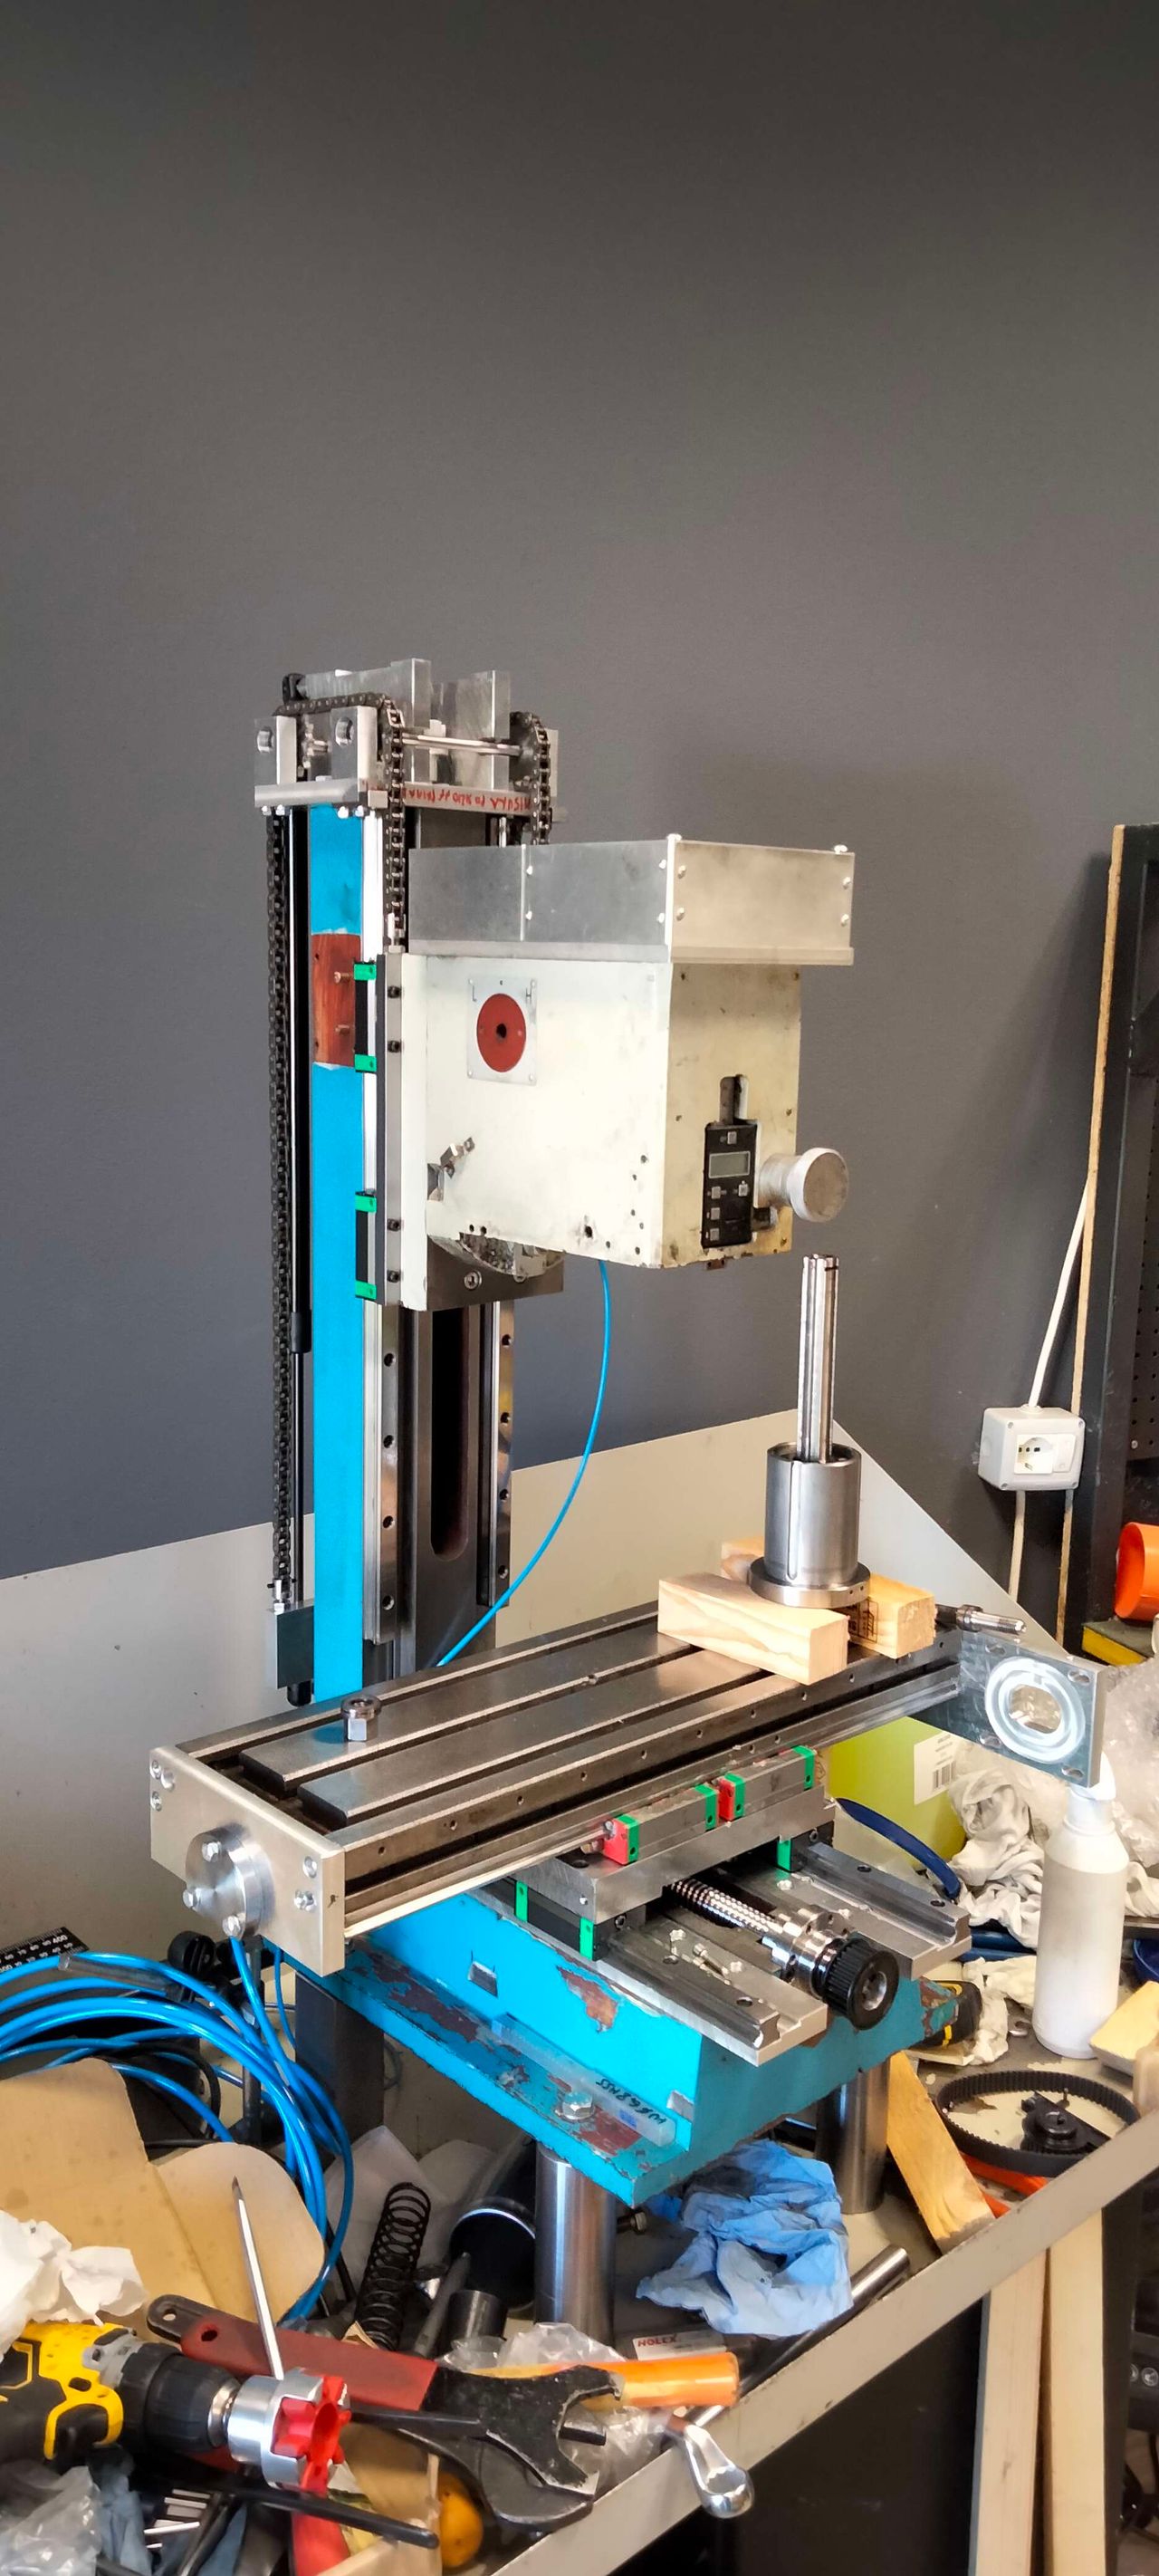
Self-ejecting drawbar, machine head, and gas springs tested
Published 1y. Edited 1yPublished almost 2 years ago. Last edit almost 2 years ago
Self cone ejecting drawbar made, machine head installed, weight balancing gas springs tested.
When I lift the head, I'm not really lifting its weight, since it's lifted by the gas springs in the back via the chains, but I'm forcing the ballscrew to rotate, overcoming the friction from its tapered rollee bearings and seals (since they're almost new they also need some break-in period).
The goal here is to avoid the weight of the head being supported by the ballscrew, since the force on it is every time upwards, I eliminated the ballscrew axial play, to have better precision.
Also when I shut the machine off, the head doesn't fall down.
4
Regulation of force applied by gas springs
Published 1yPublished almost 2 years ago
Gas springs have a fixed force.
They have something like double the amount of force than the head weight (~75kg for ~40kg head).
The friction between the parts is keeping the head resting in position, remember there's a ball screw with tapered roller bearings connected to the head, when I'm lifting the head by hand I'm also forcing the ball screw to rotate.
There's no need to compensate the weight difference for tooling and holder, the main goal is to keep the ball screw loaded in the upward direction to eliminate backlash, and to avoid the head to fall down when the axis motor is turned off, especially when when the tapered roller bearings and their grease seals are run in and friction decreased.
I searched the web for affordable gas springs, and I decided to use automotive ones from the boot lid of a common van here in Europe, the Fiat Doblò cargo, since two of them cost a tenth of a single commercial one.

5
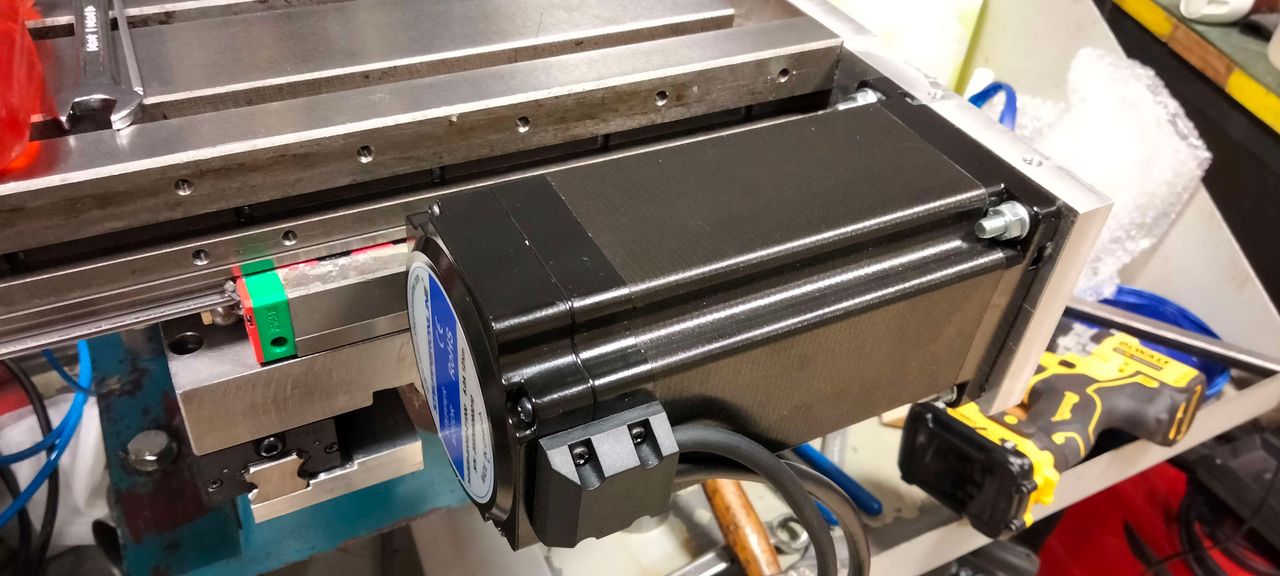
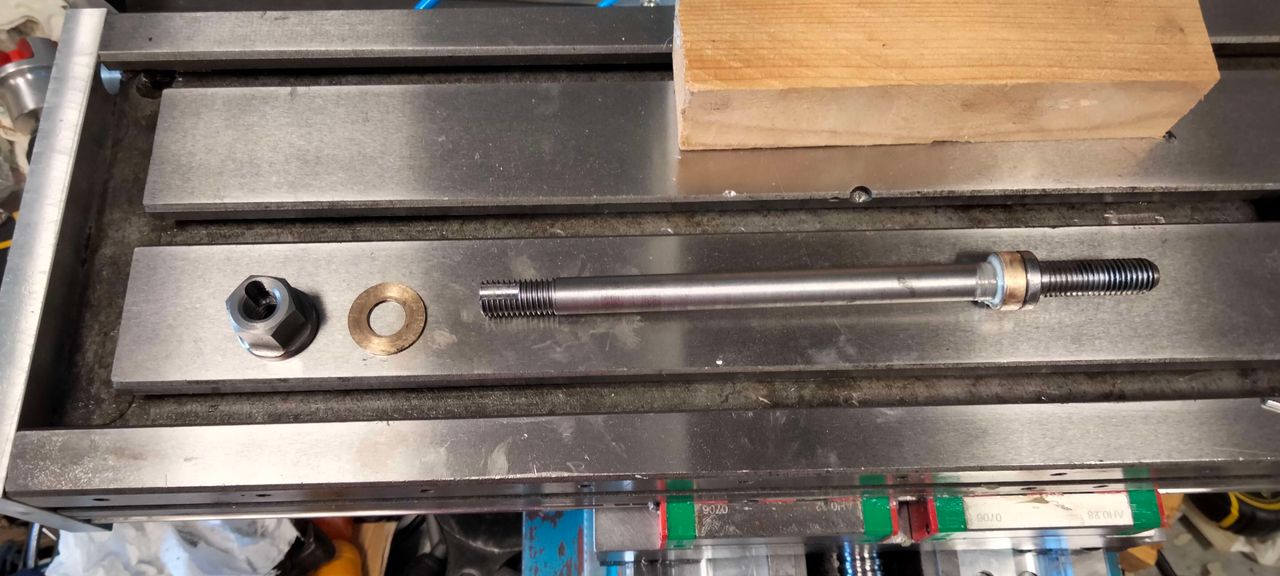
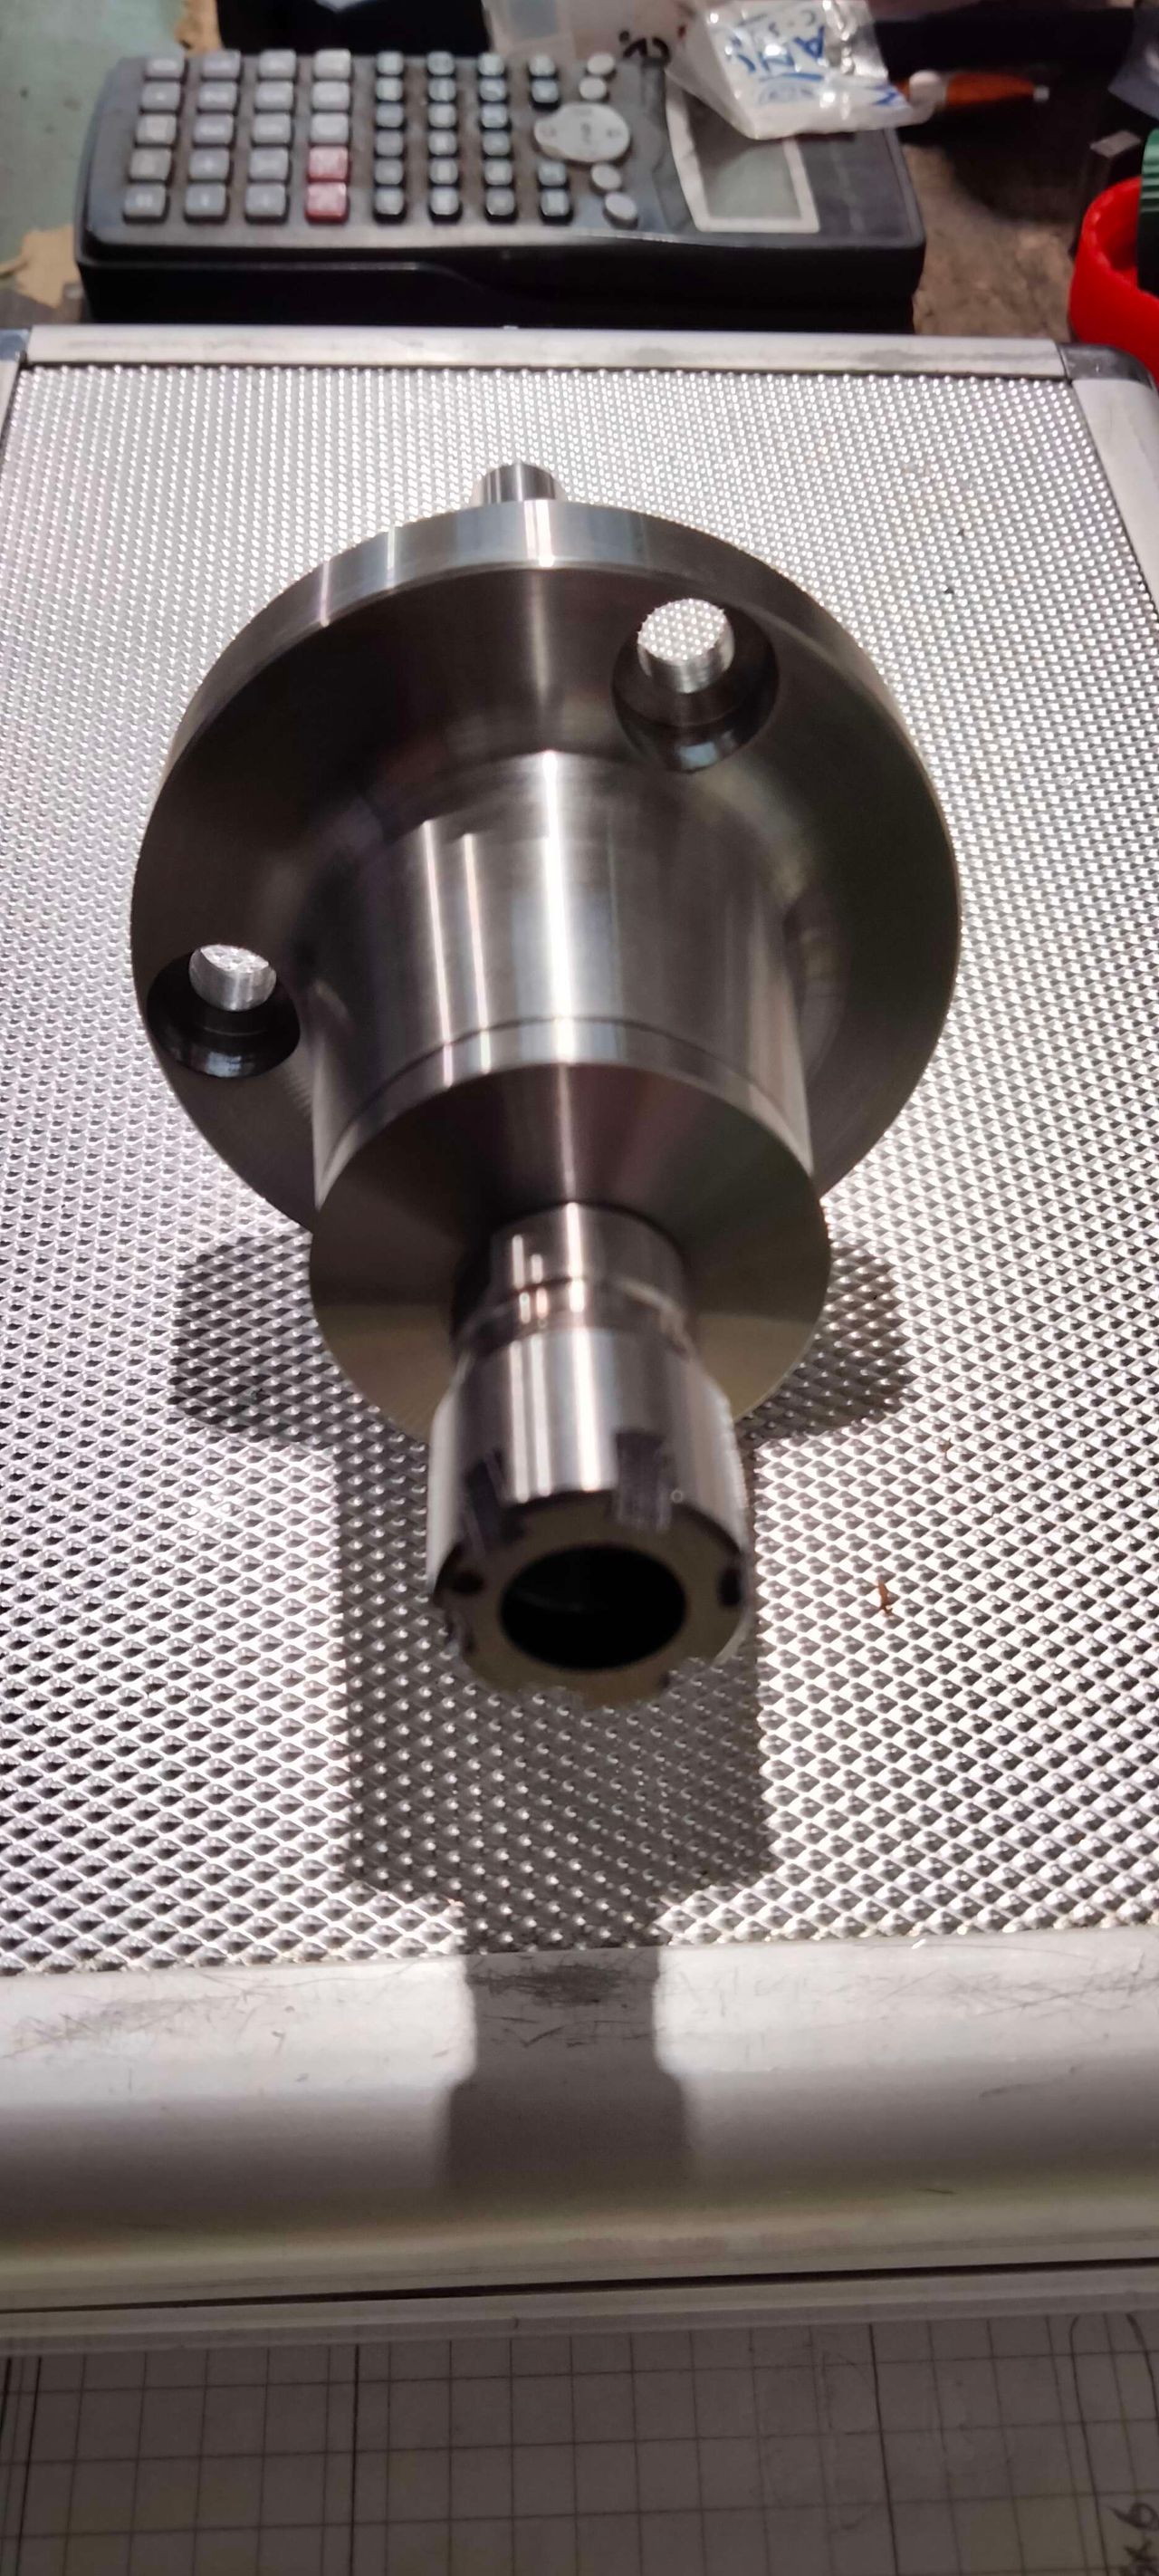
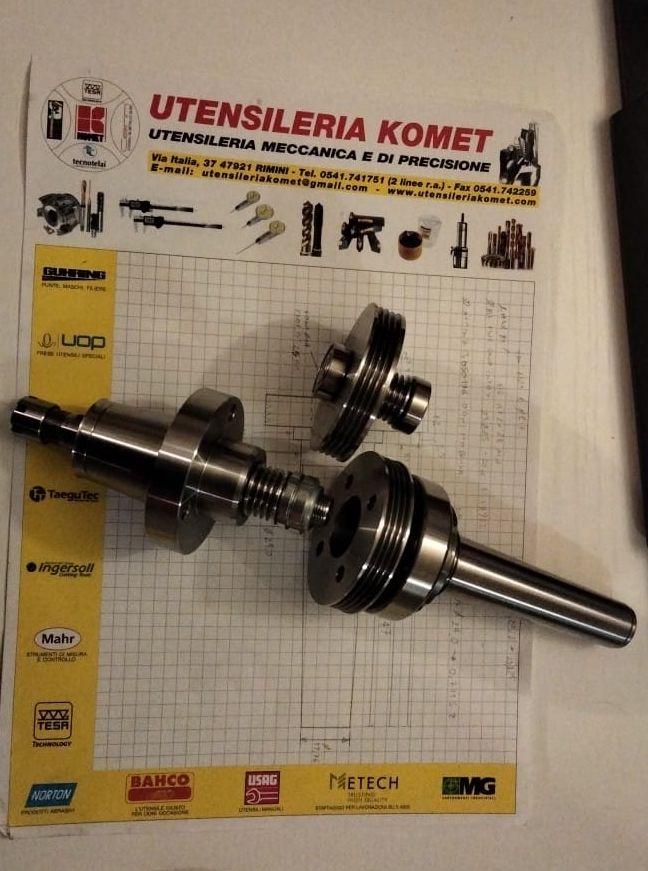
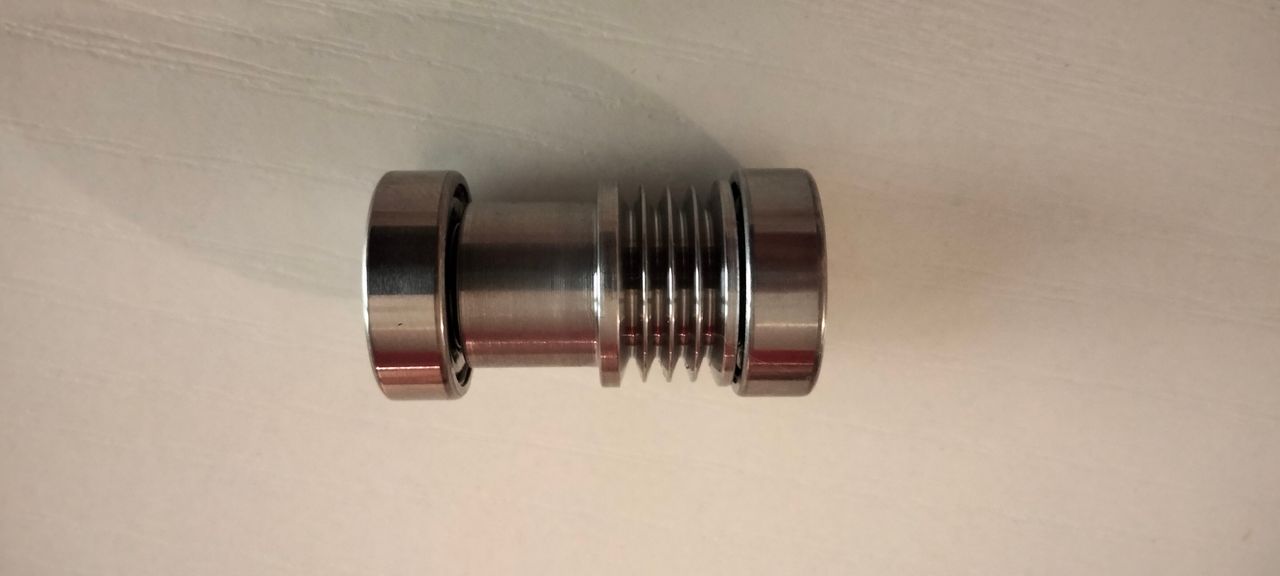
Spindle speed multiplier for small mills: first parts made
Published 1y. Edited 1yPublished almost 2 years ago. Last edit almost 2 years ago
Since that milling machine isn't capable of running over 3000rpm, and since I need to use very small mills (even under 0.8mm in diameter for some molds), as I said in the first post I need a spindle speed multiplier.
Those are the first part I made for it.
The collet holder is a commercial one (ER11, 12mm shank) I bought for the project, the bearing holder is made from quench hardened 39NiCrMo3 steel, I chose to use cheap (compared to the angular contact ones) 61801 deep grove ball bearings since the axial load with those small mills is negligible, they're small and they doesn't build up high heat even at high rpm.
We'll see if I'm right.
High speed spindles are made with a small diameter rotor to reduce inertia, unbalance and centrifugal forces.
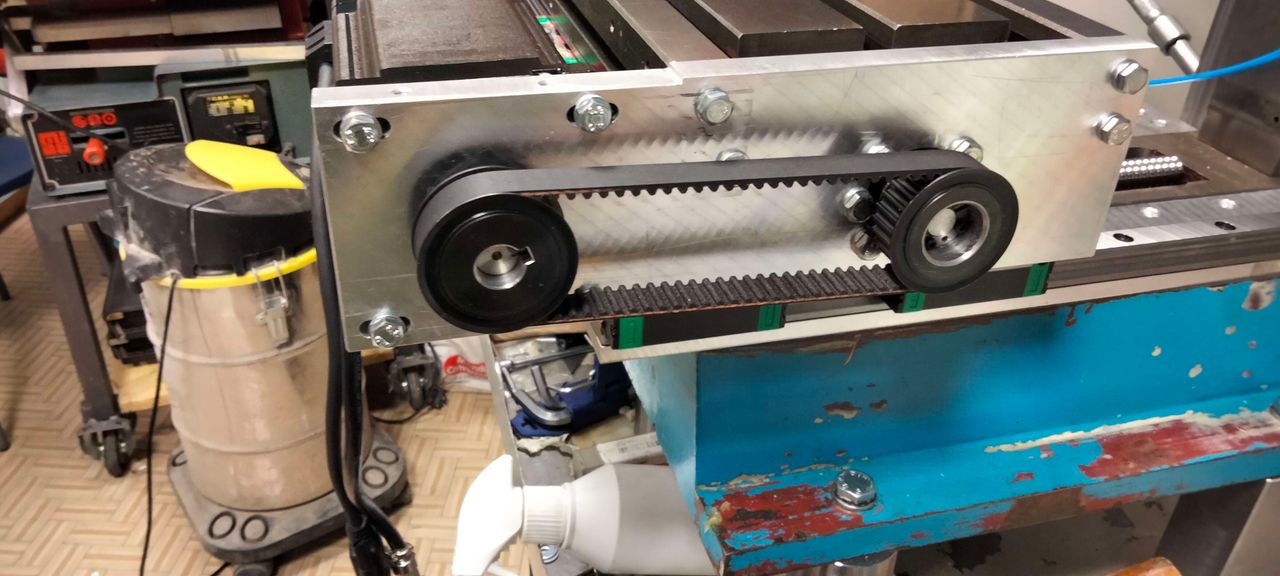
My modified machine head, with the 1.5kw 3 phase motor, with the 5:1 belt reduction, allowed me to tap up to 3/8"gas on 304 stainless steel in the past.
6
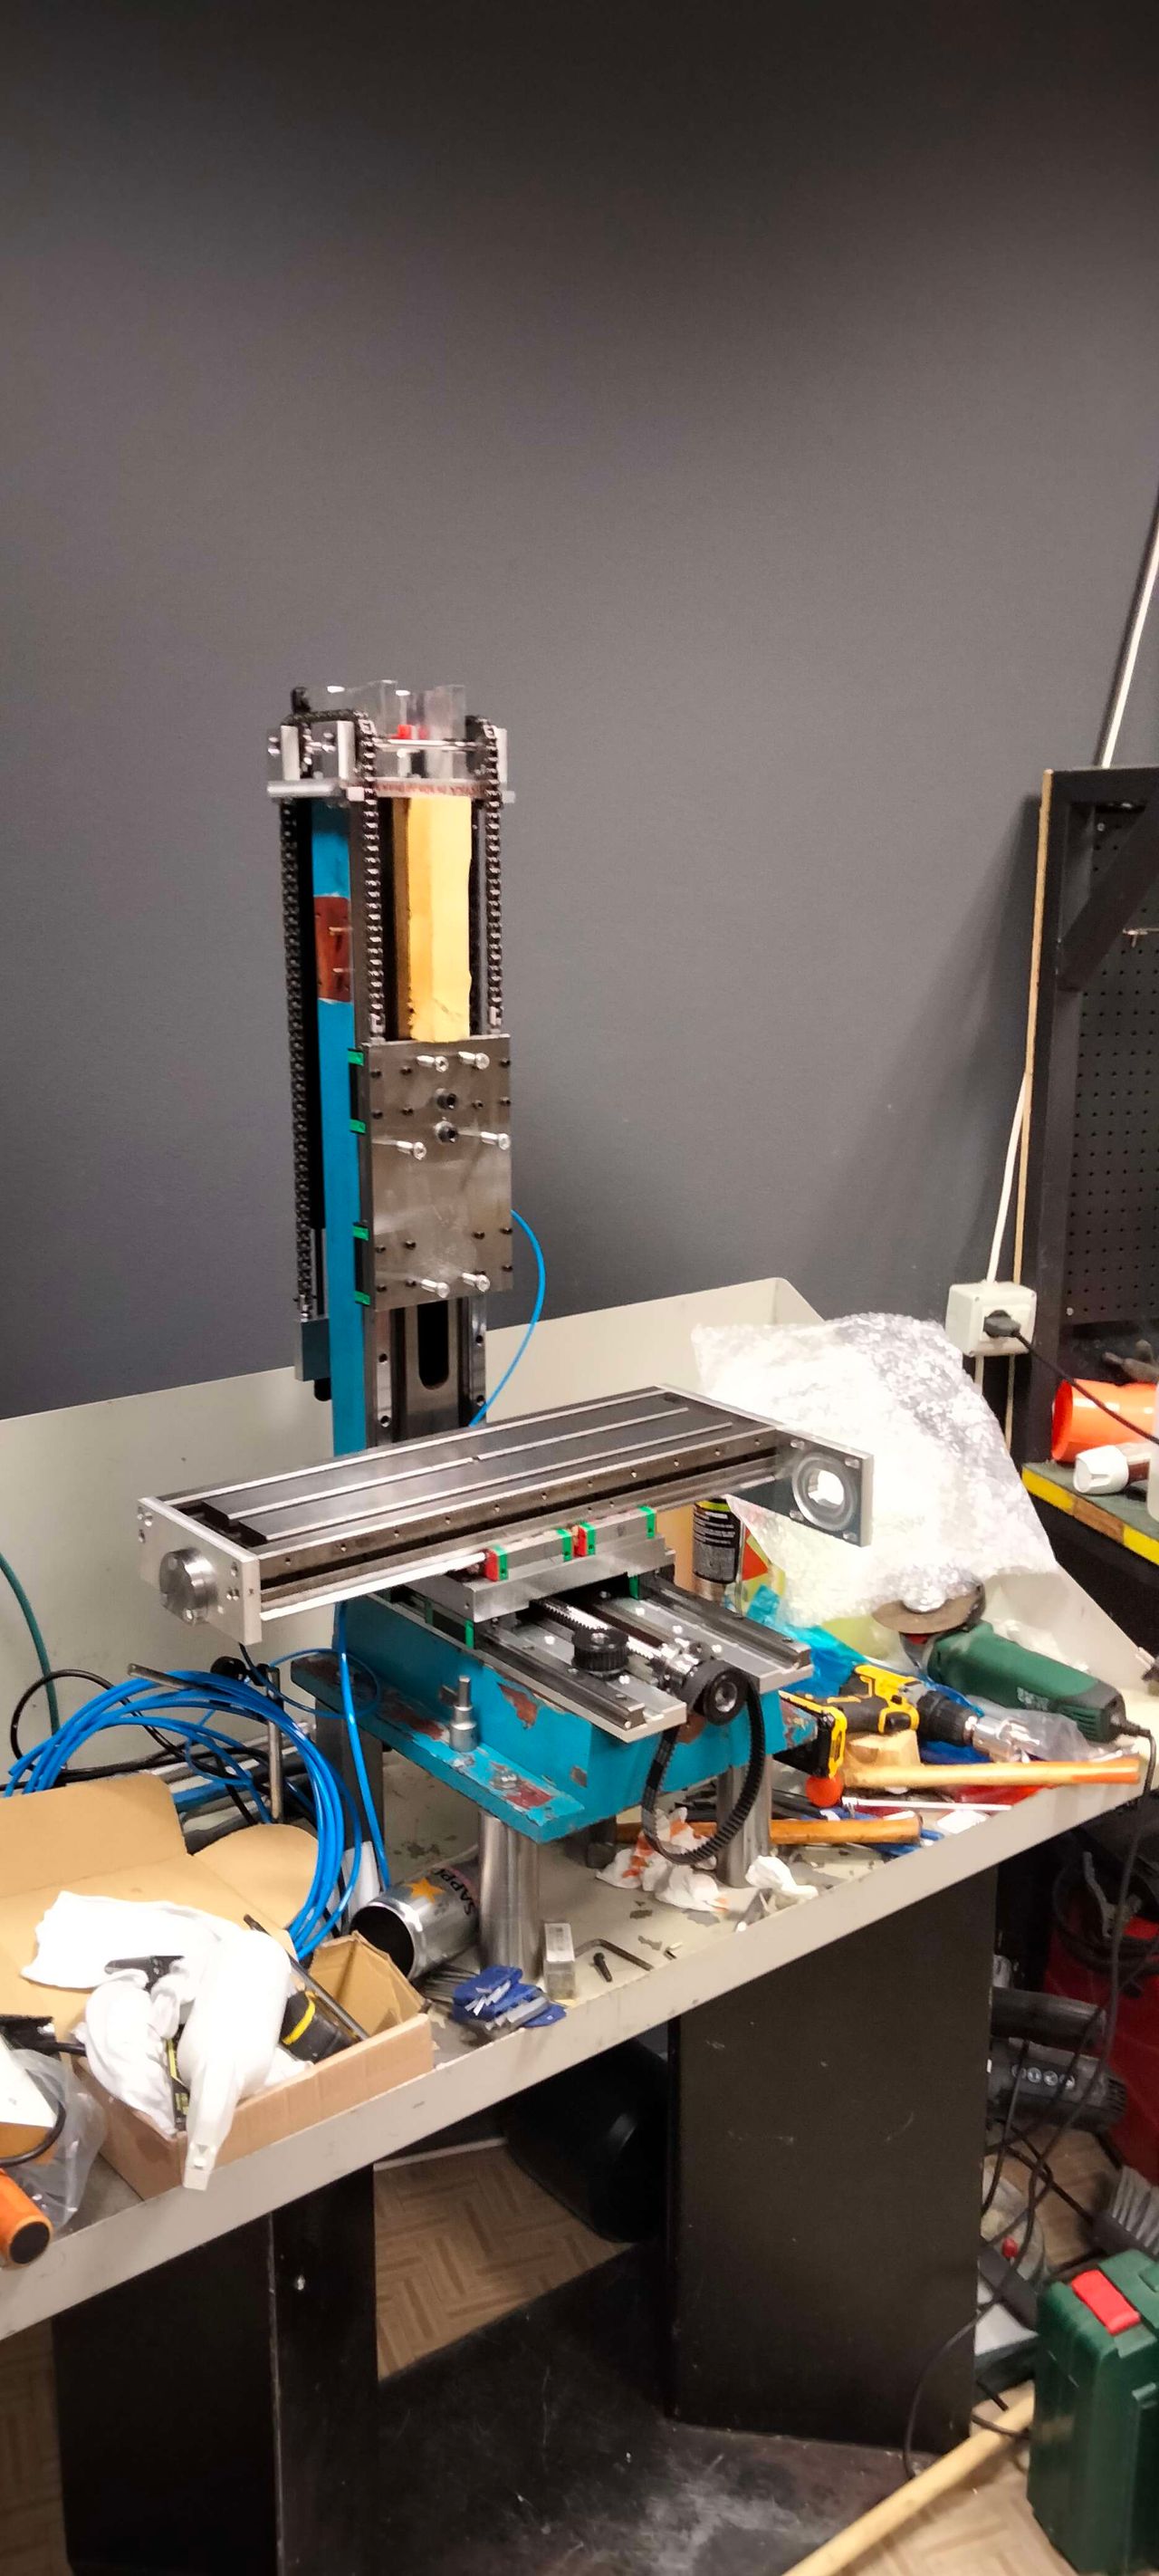
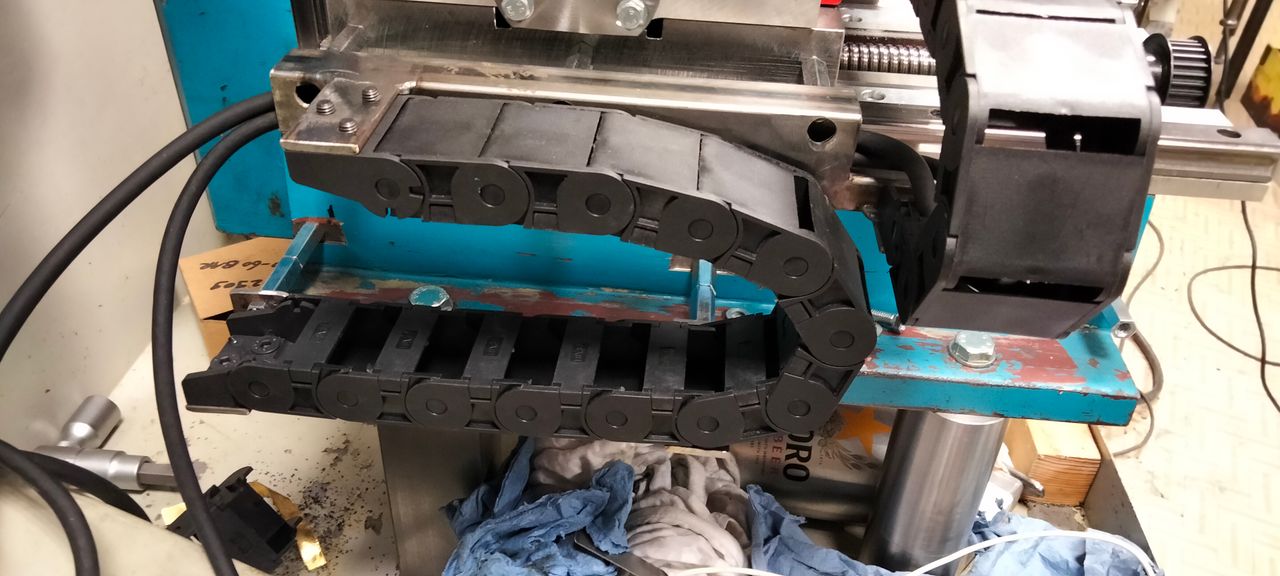
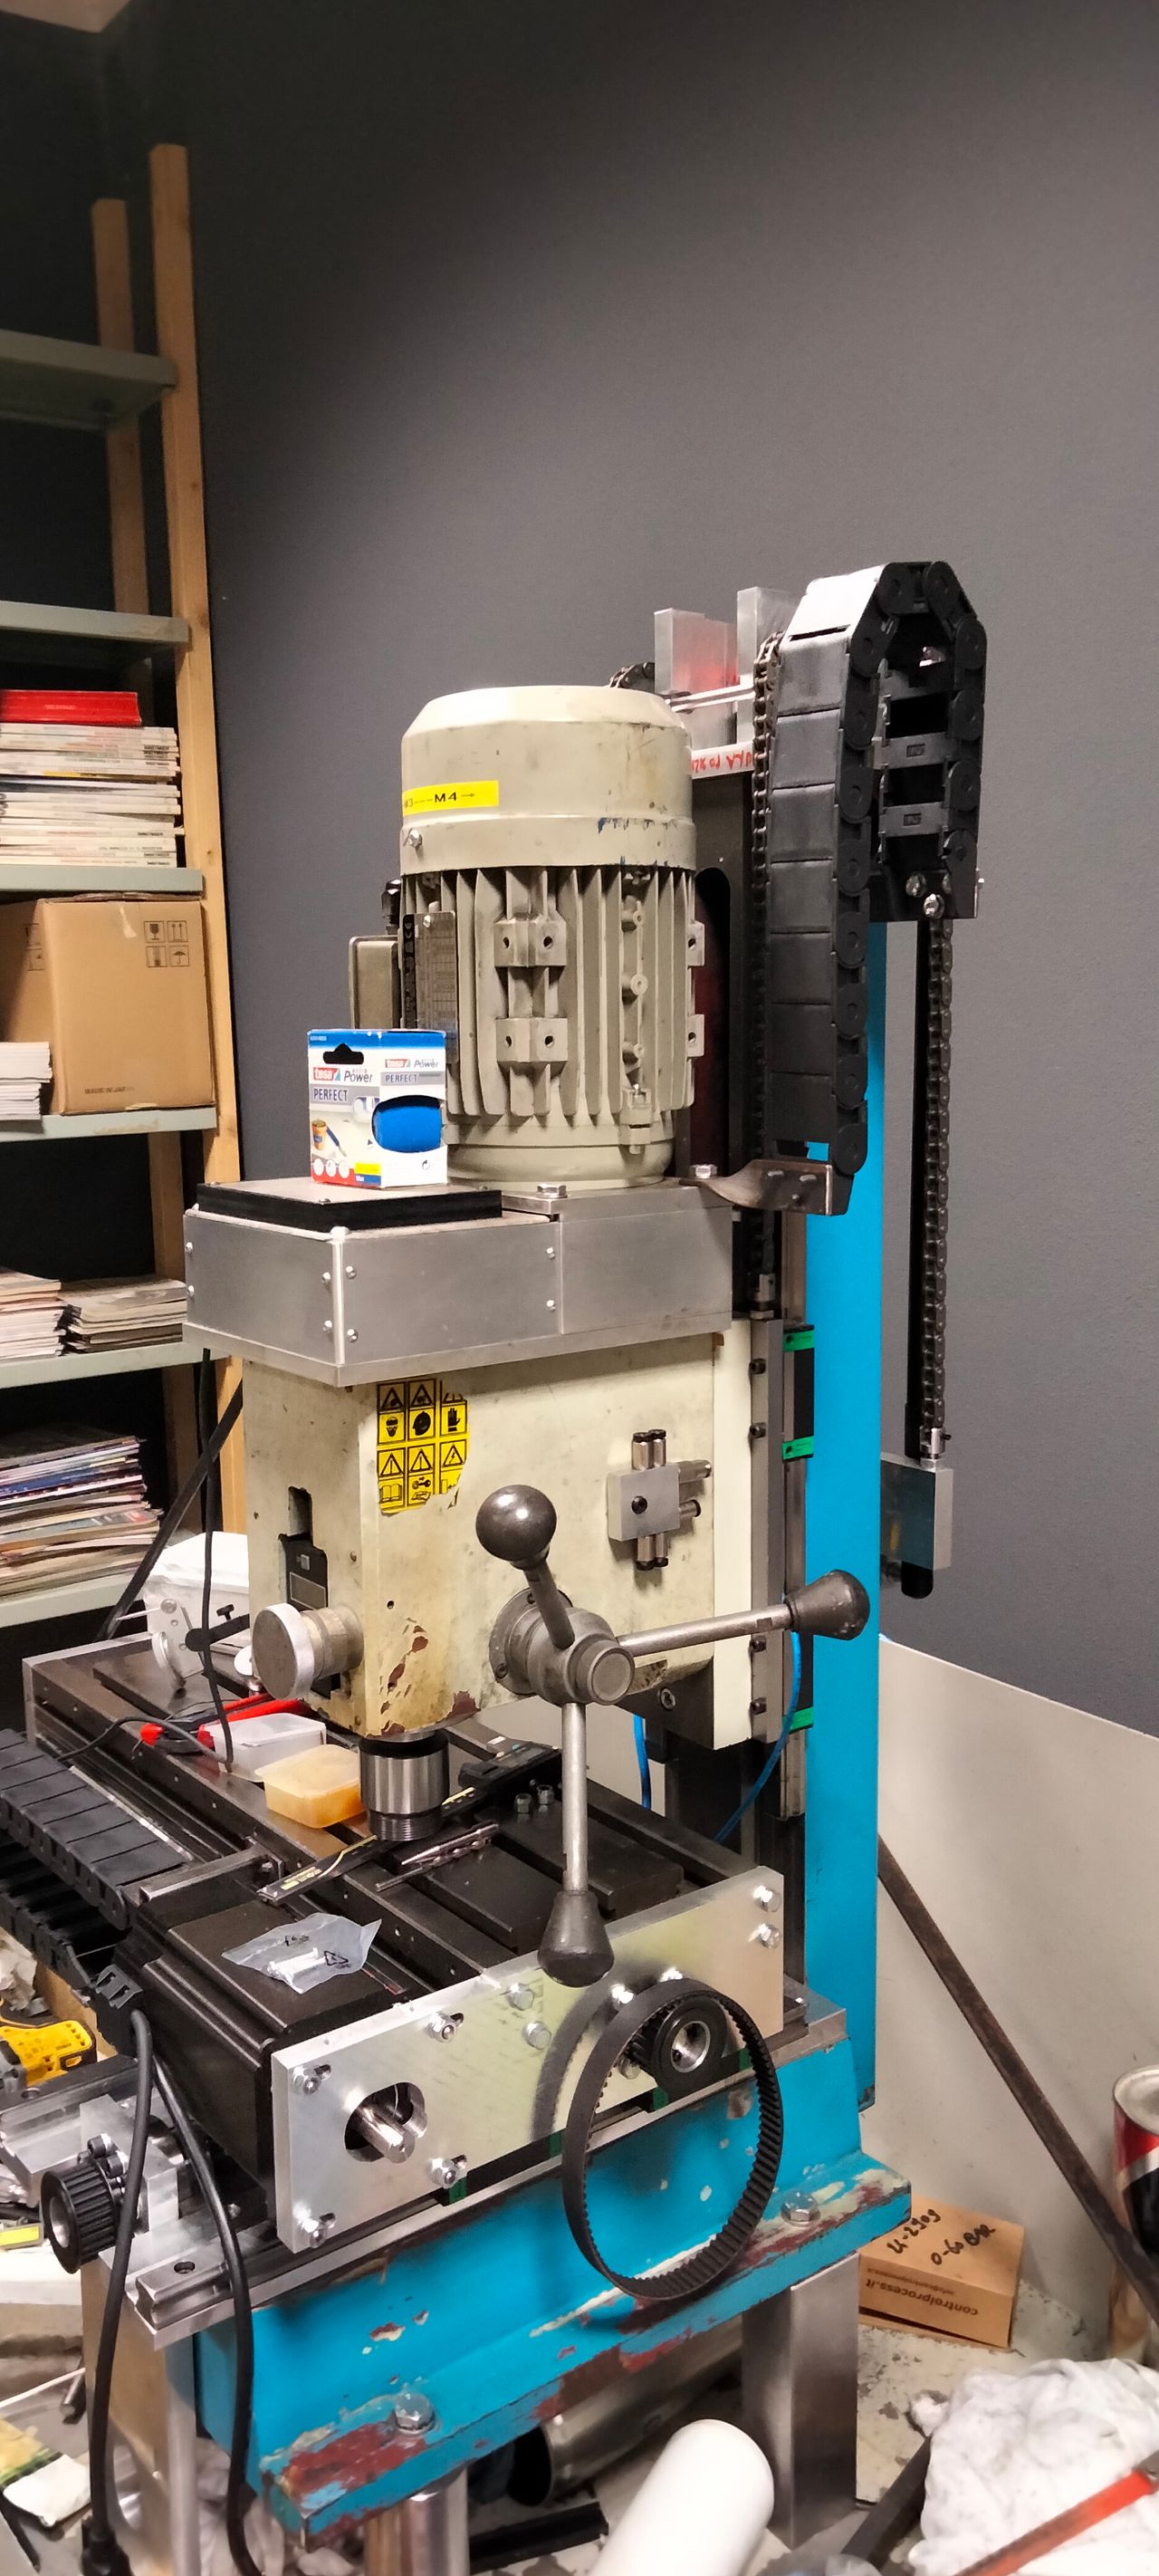
Cable chains supports almost finished.
Published 1yPublished almost 2 years ago
Today (despite the hot weather here in Italy and in the lab!) I managed to put together some steel to make the cable chain supports, at least for the cross table.
Z axis ones coming next.

7
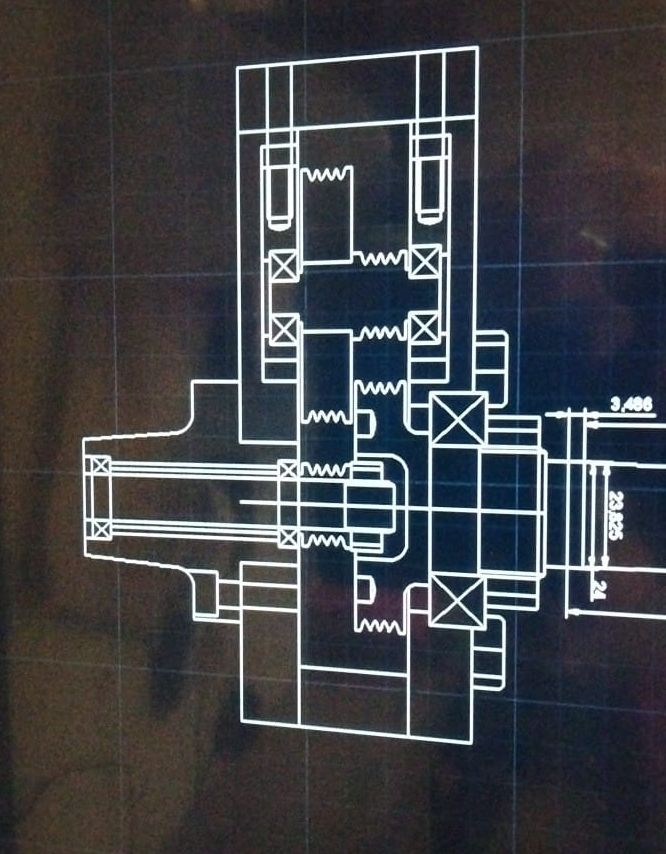
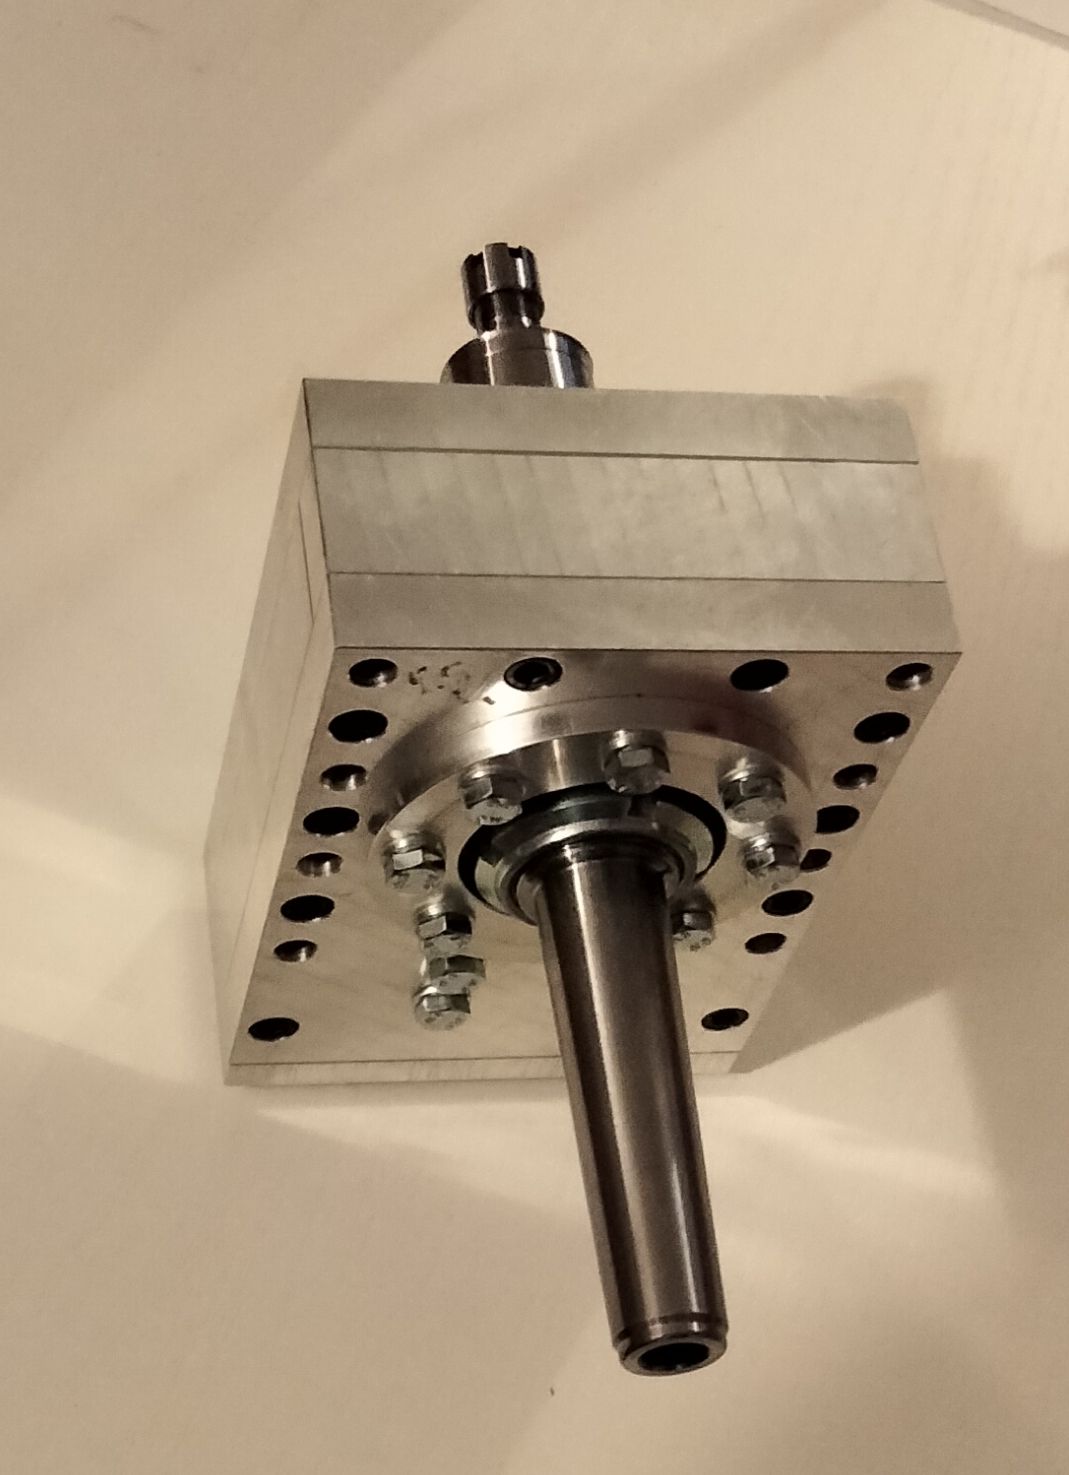
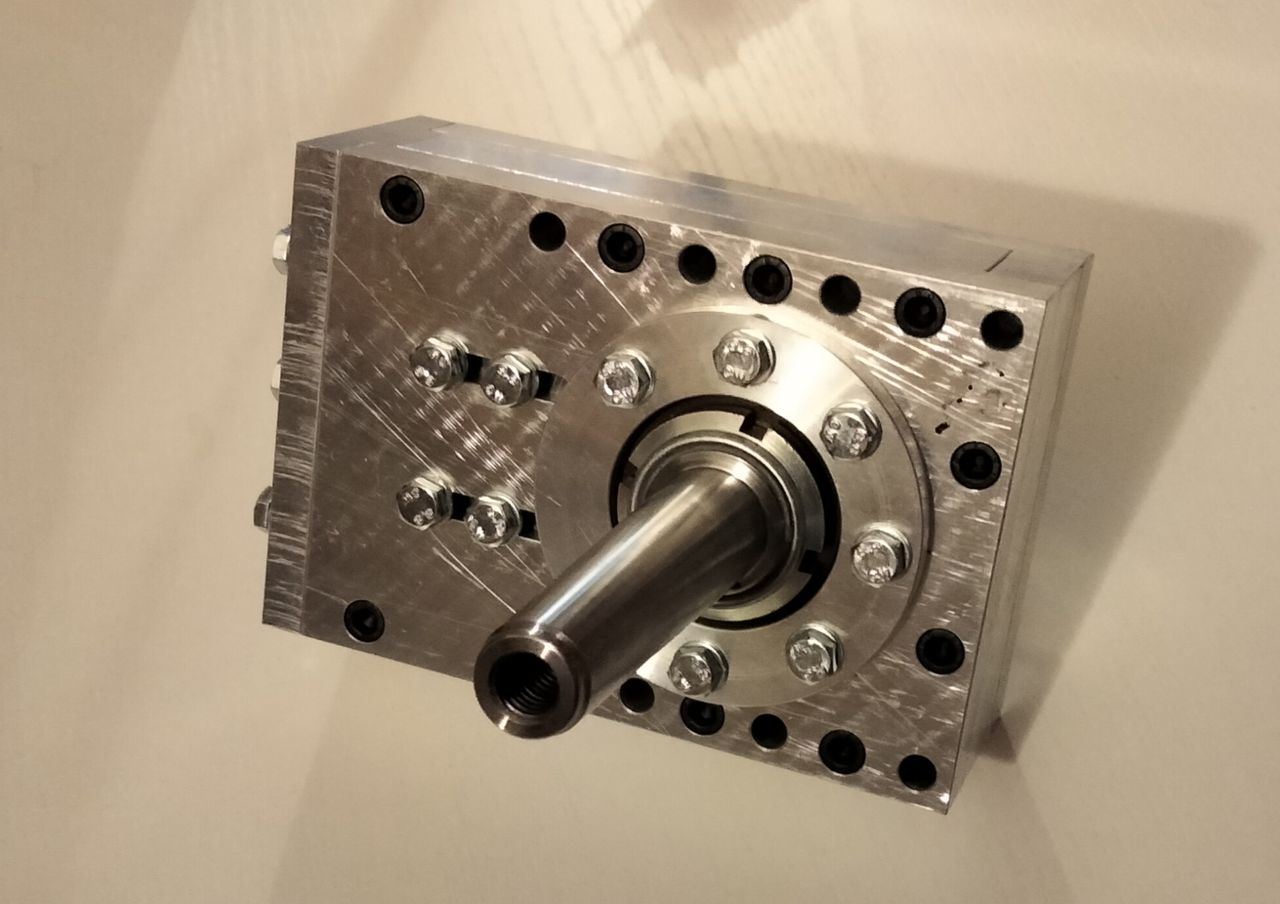
Last lathe machined parts for the spindle speed multiplier
Published 1y. Edited 1yPublished almost 2 years ago. Last edit almost 2 years ago
Last week I managed to survive the hot temperatures (>35° in the factory) and I finished the lathe parts for the multiplier.
For the "box" I asked a fellow worker for making them on the horizontal machining center he use.
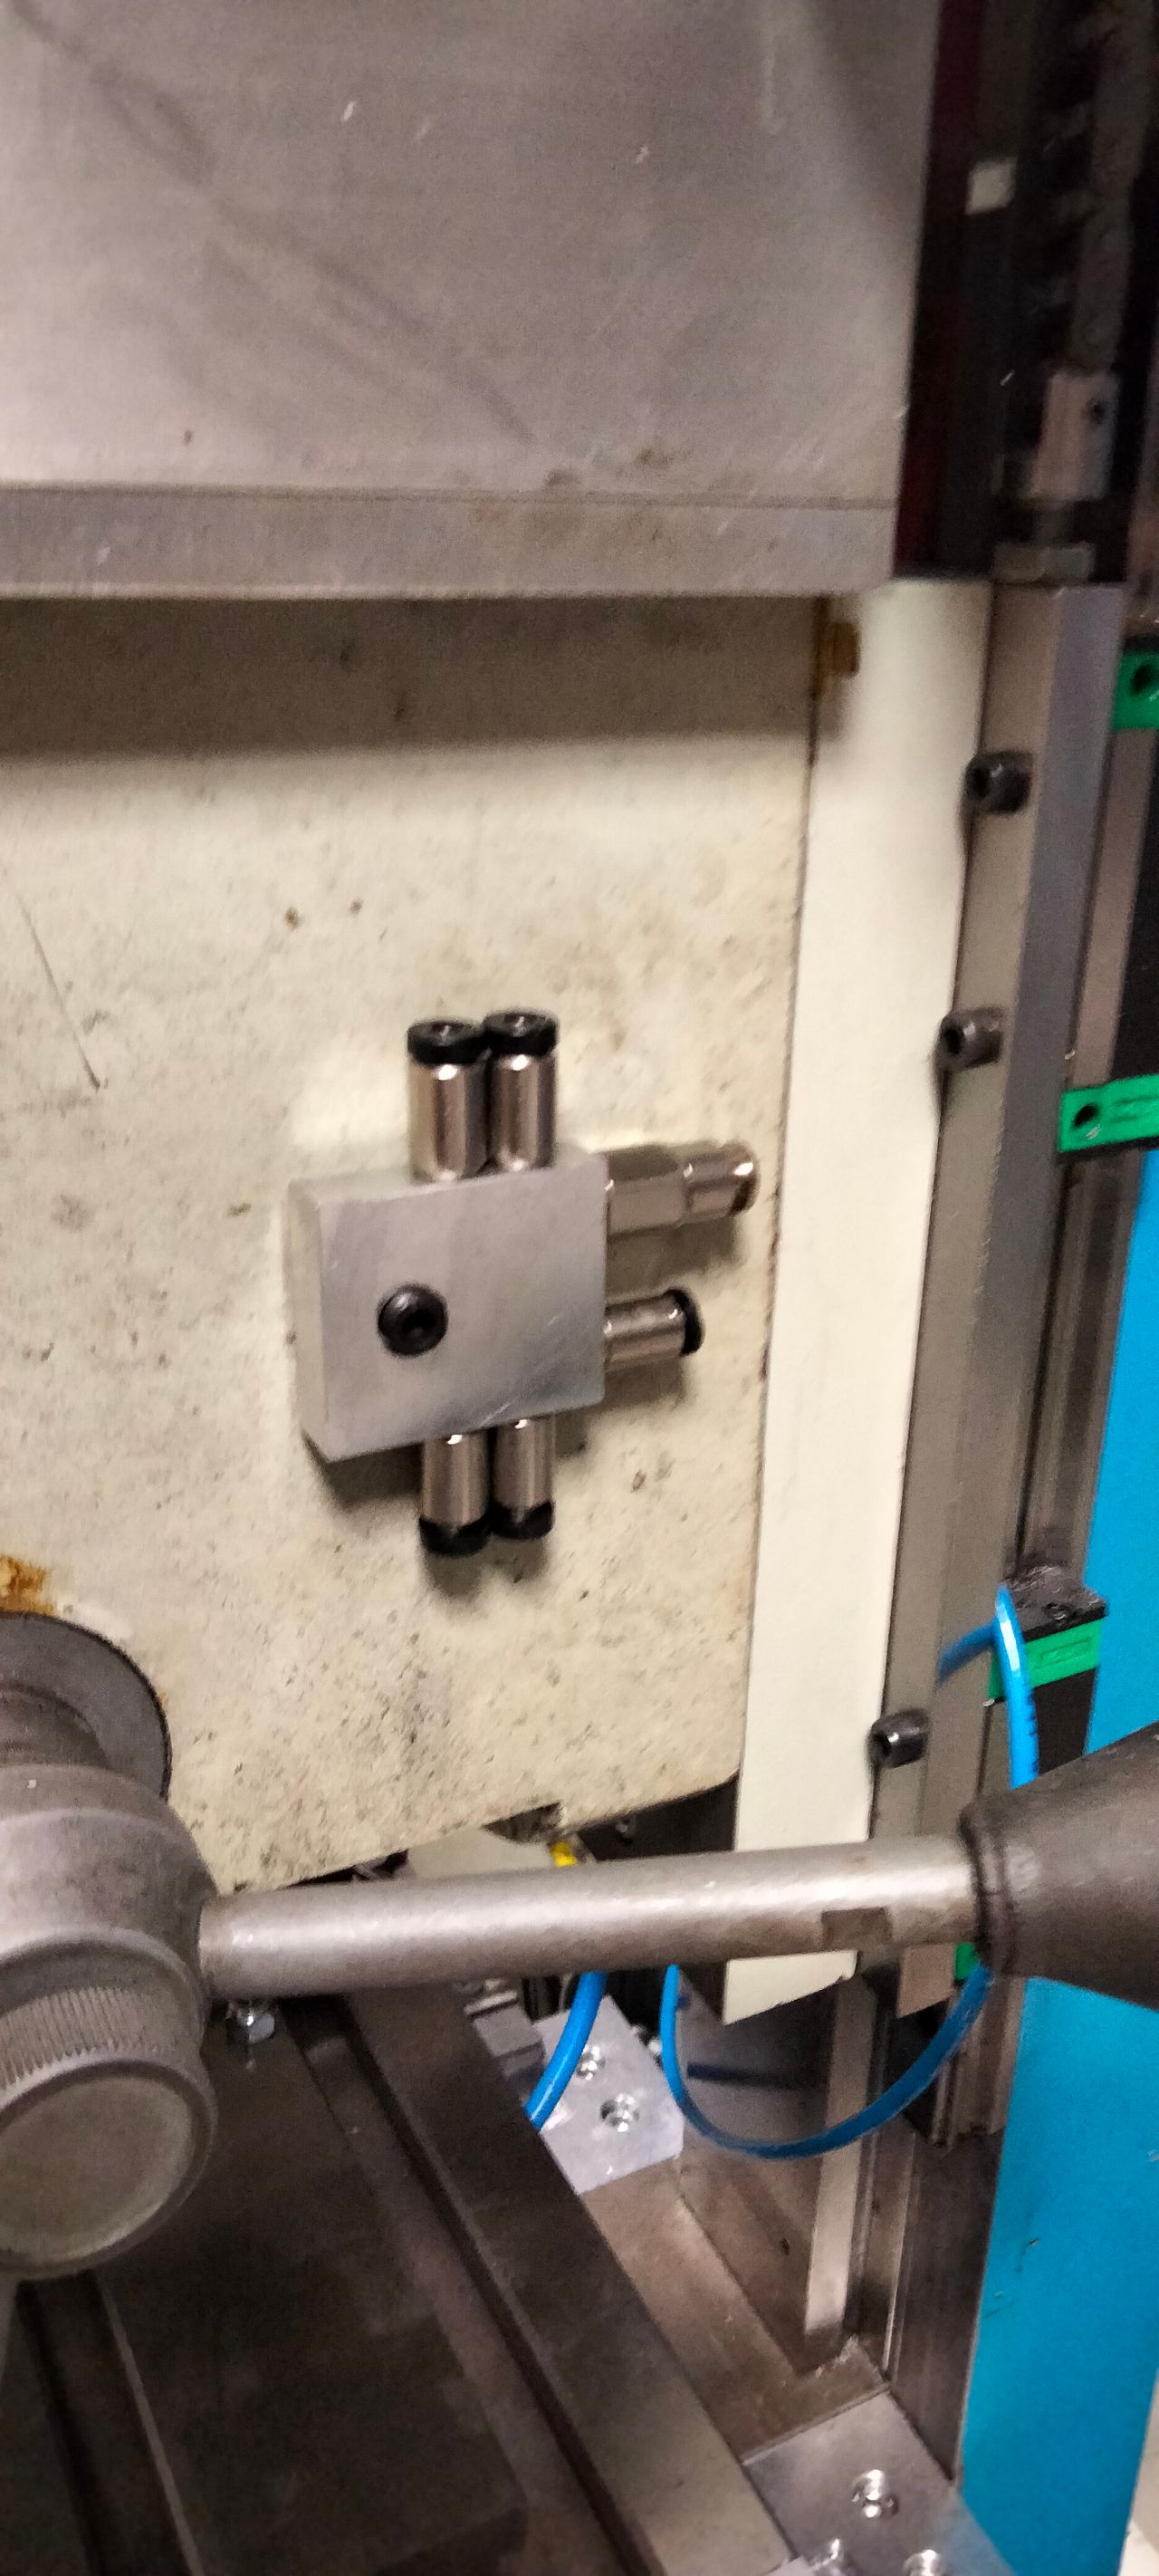
I also finished the Z axis cable chain supports, added the lube manifold for it and an electrical box for the motor cables (not in photo).
8
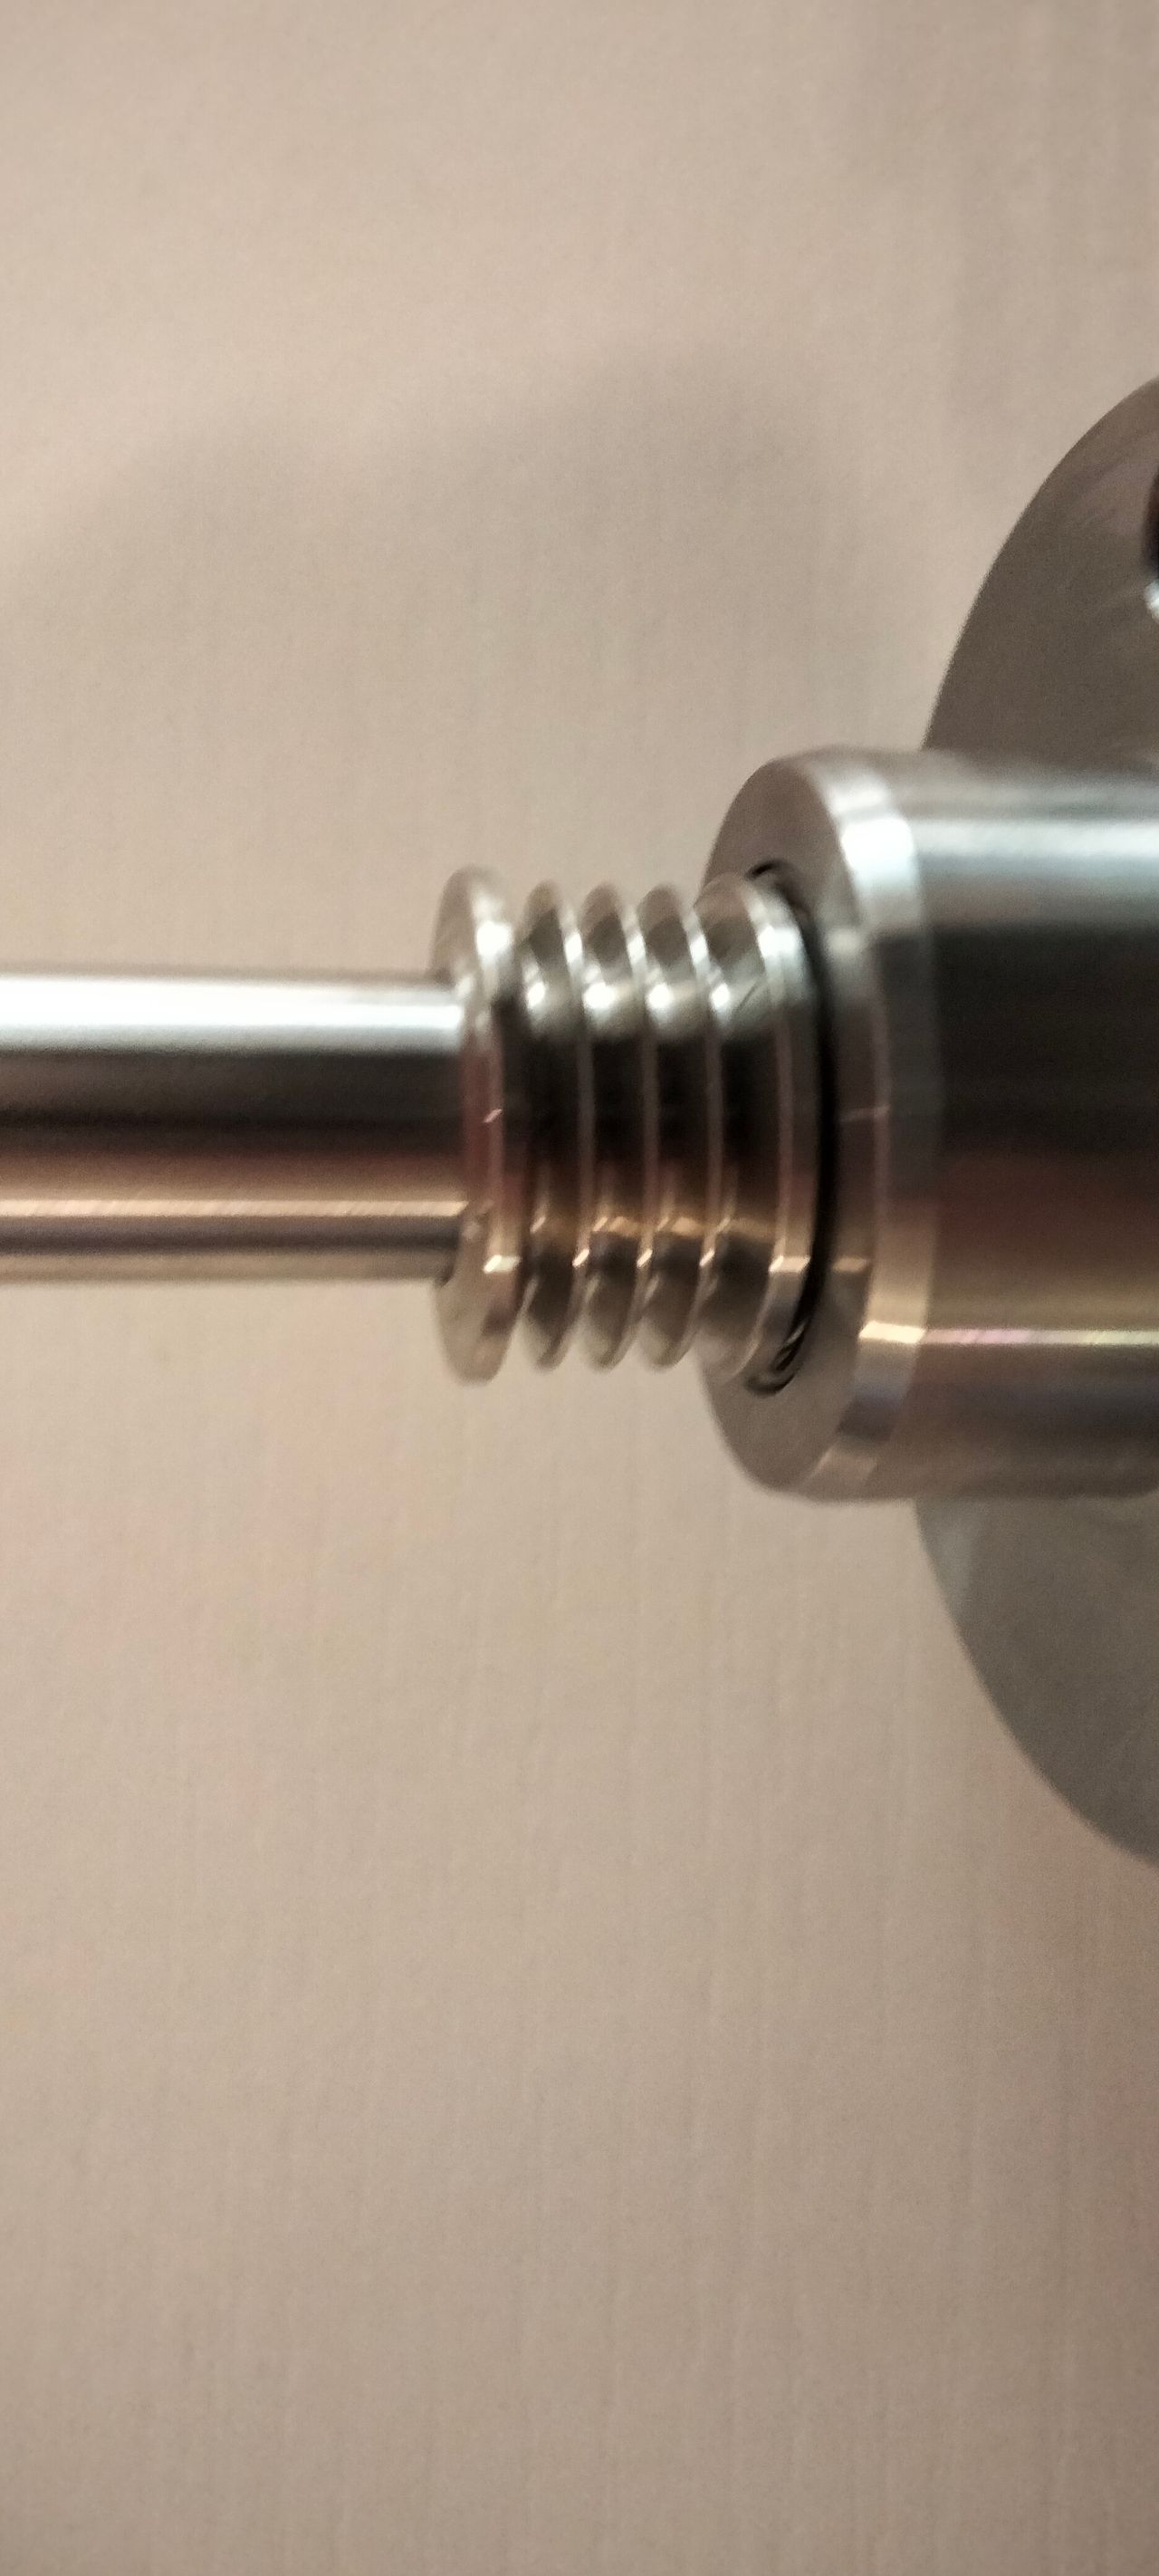
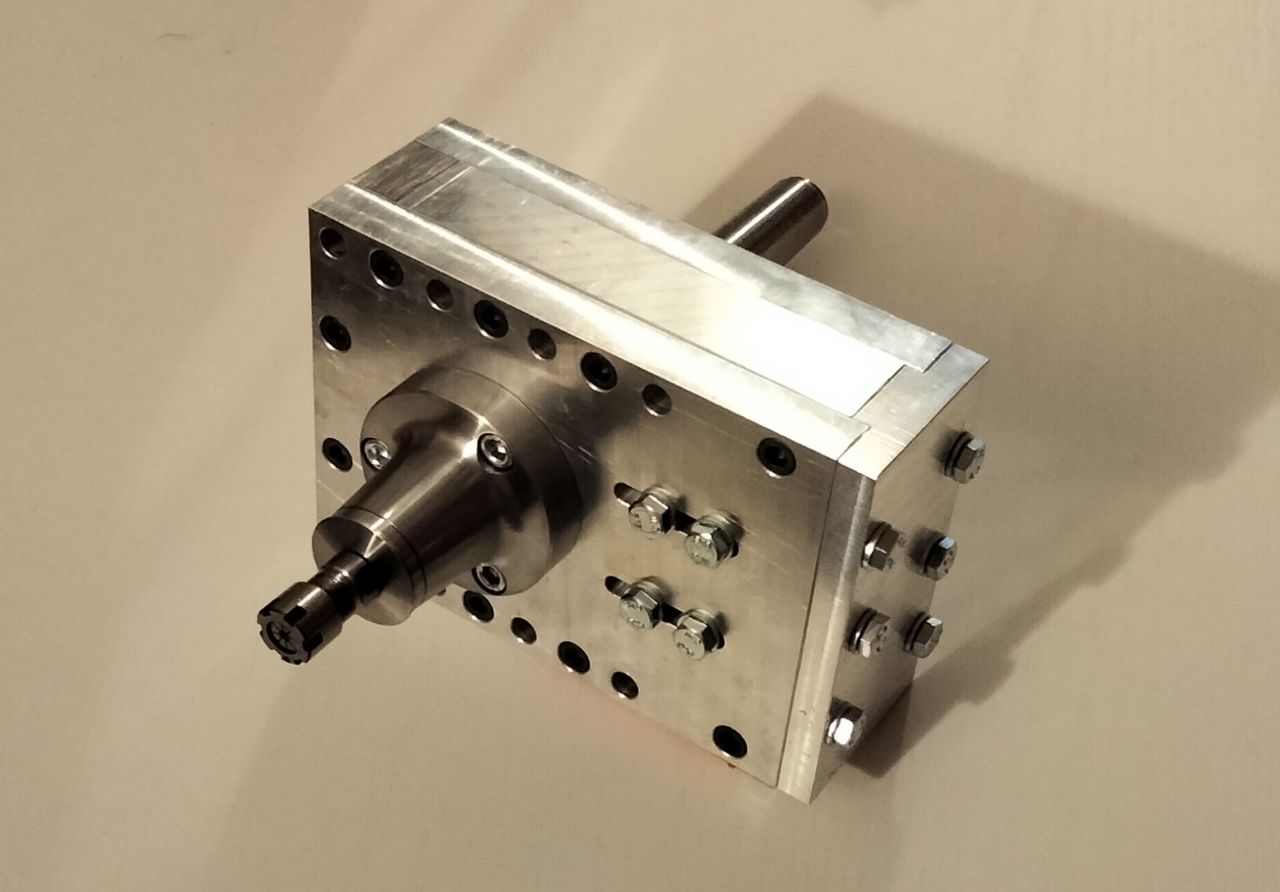
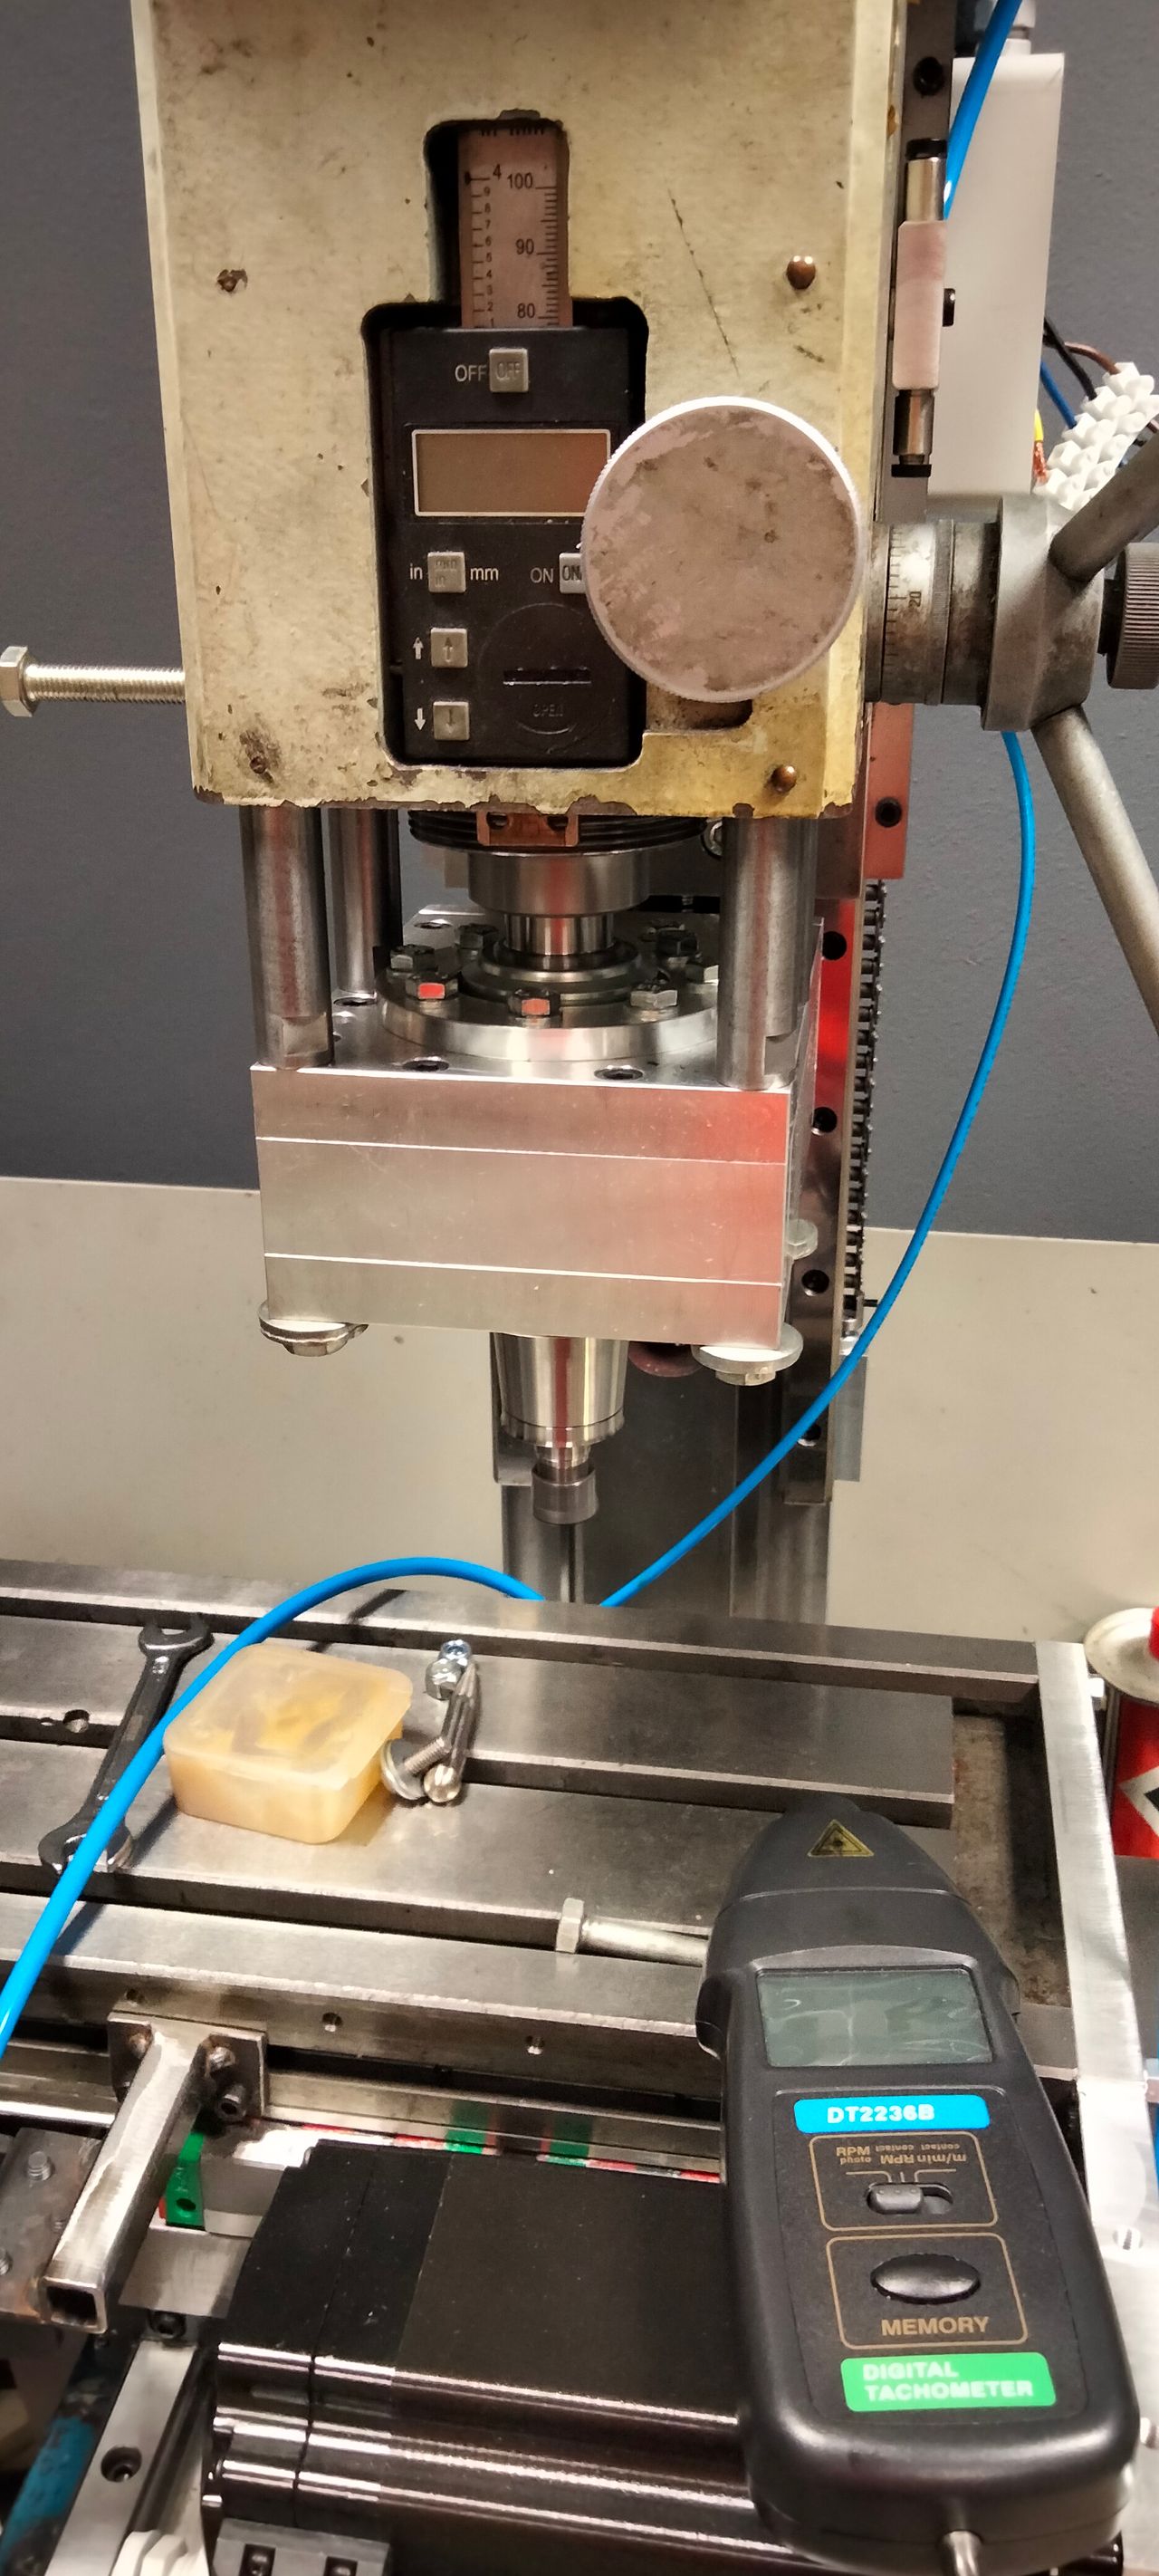
Speed multiplier ready
Published 1y. Edited 1yPublished almost 2 years ago. Last edit almost 2 years ago
I finished the speed multiplier, tested from 12.000 up to 33.000rpm, it's running smoothly and cool enough to be reliable.
We'll see when the rest of the machine is ready!
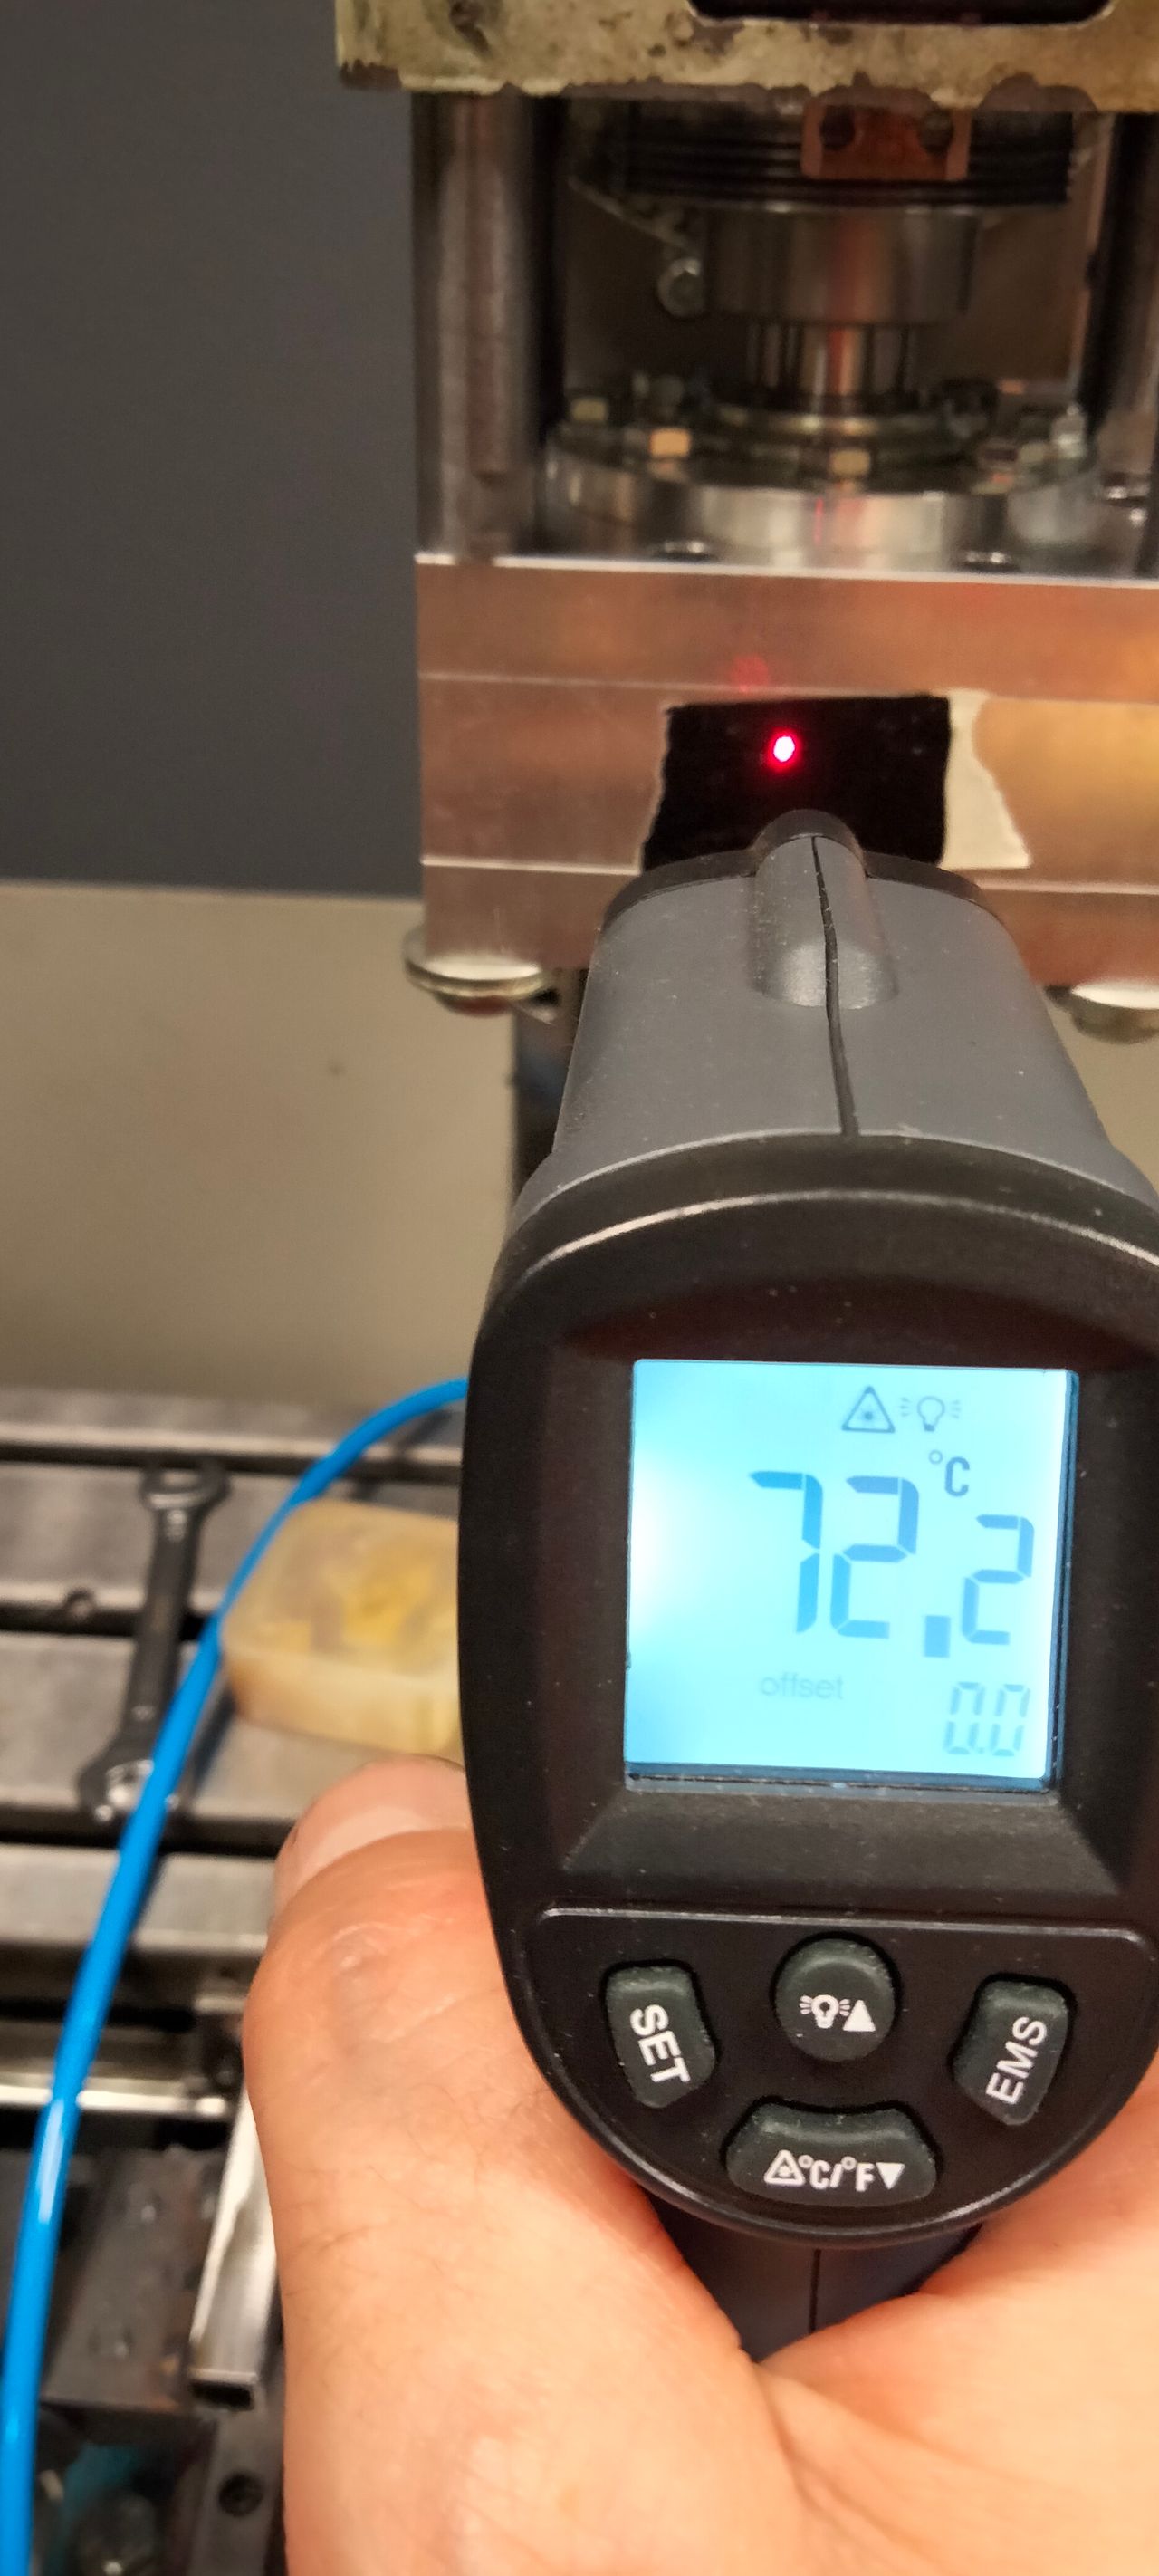
9
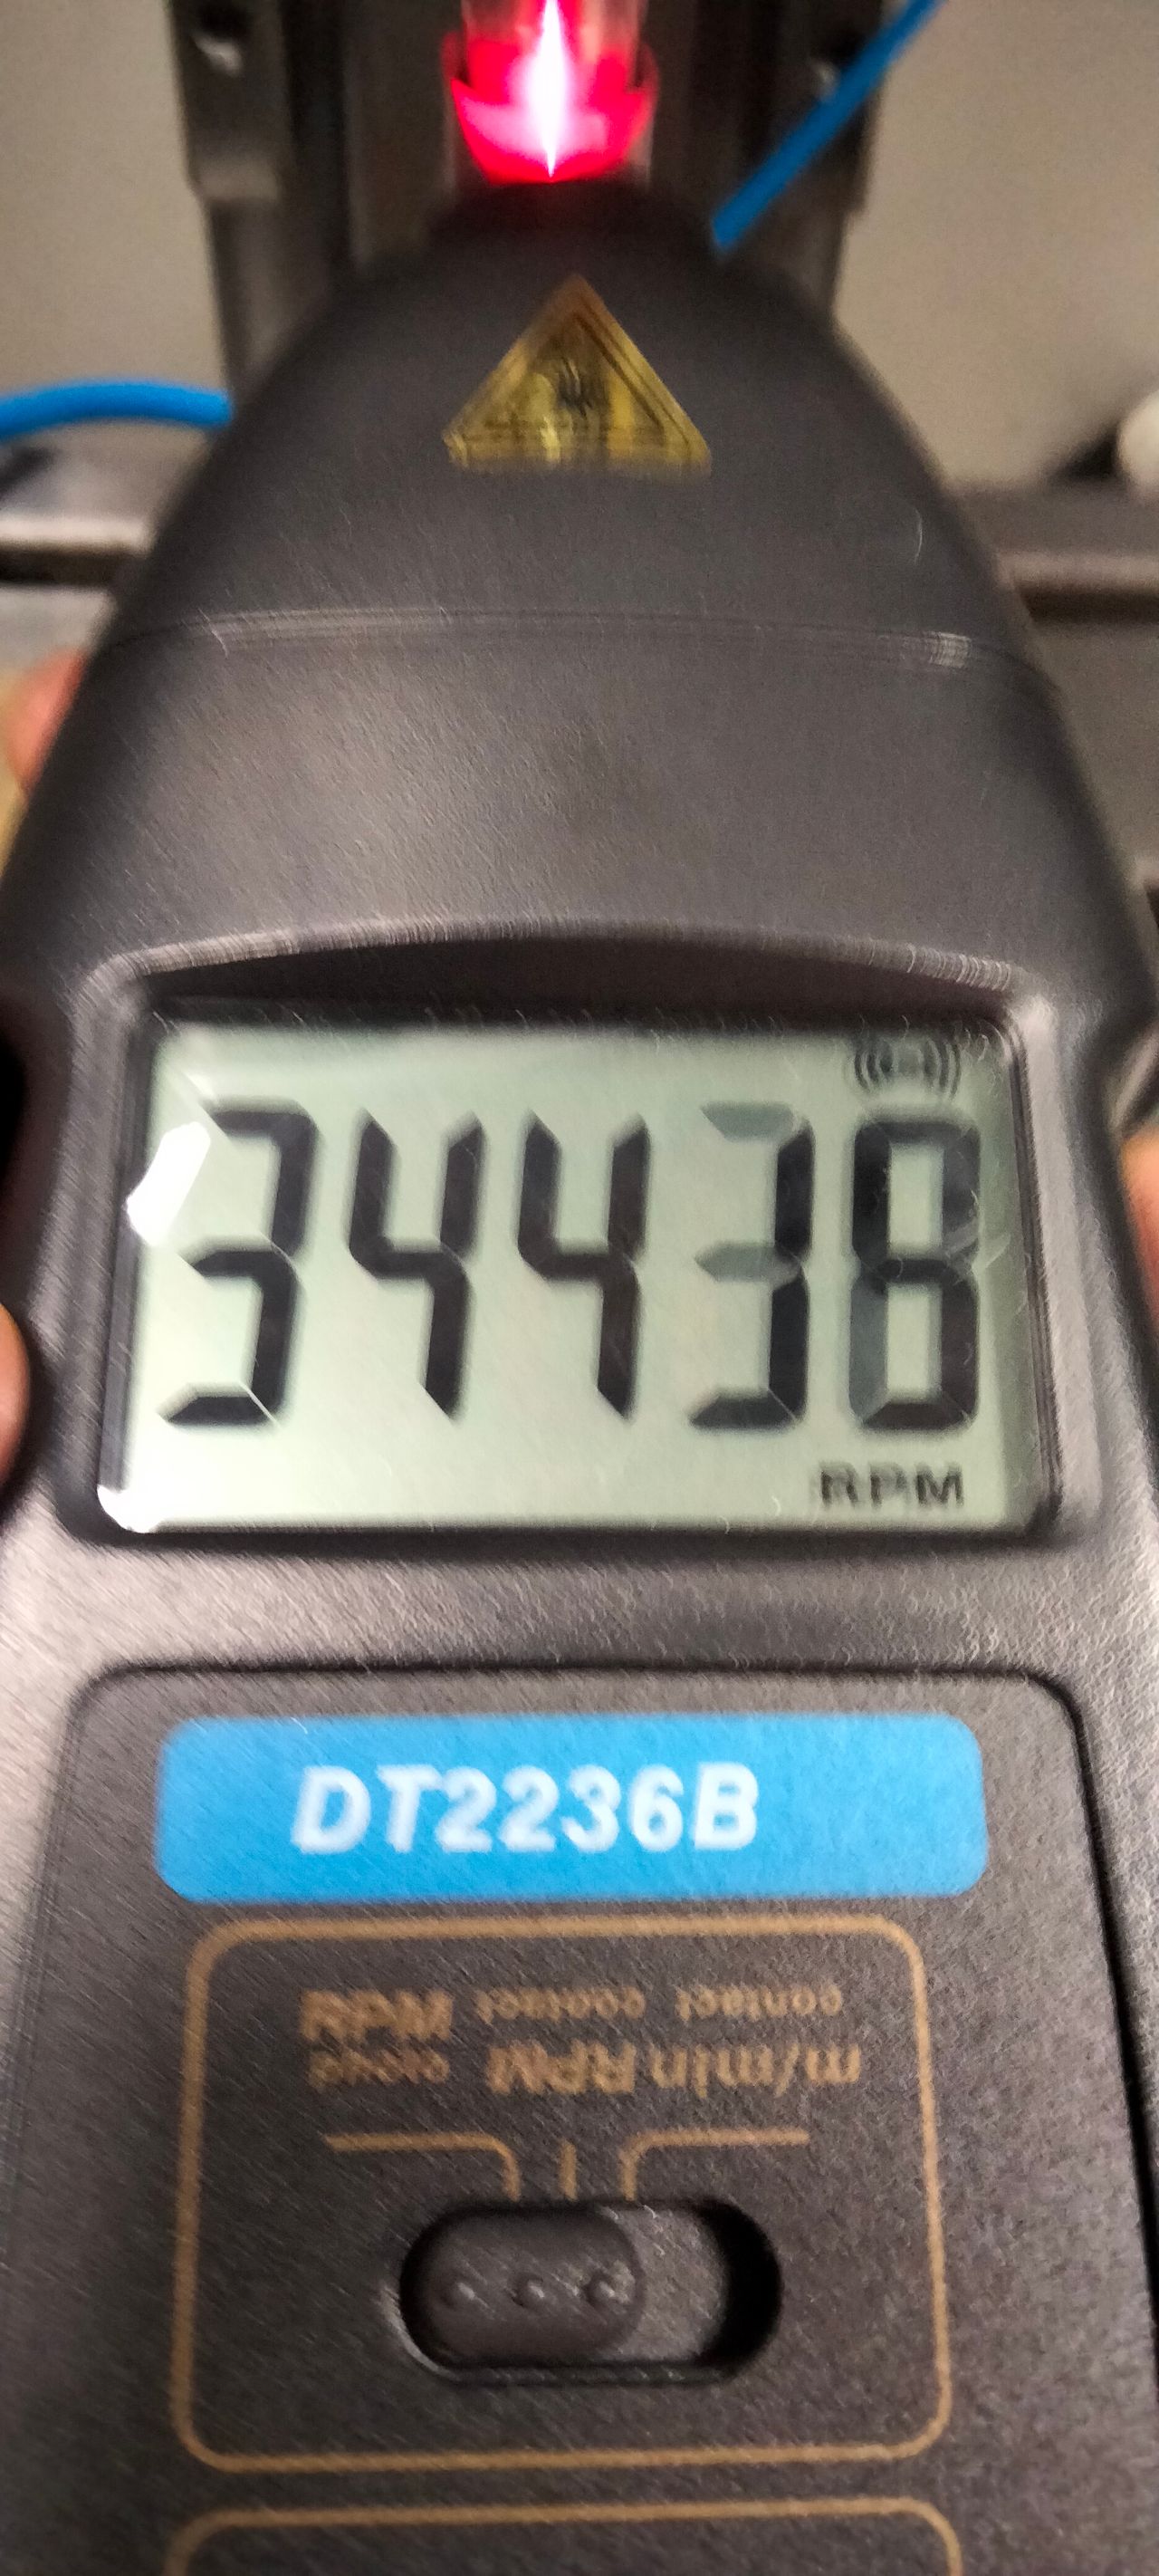
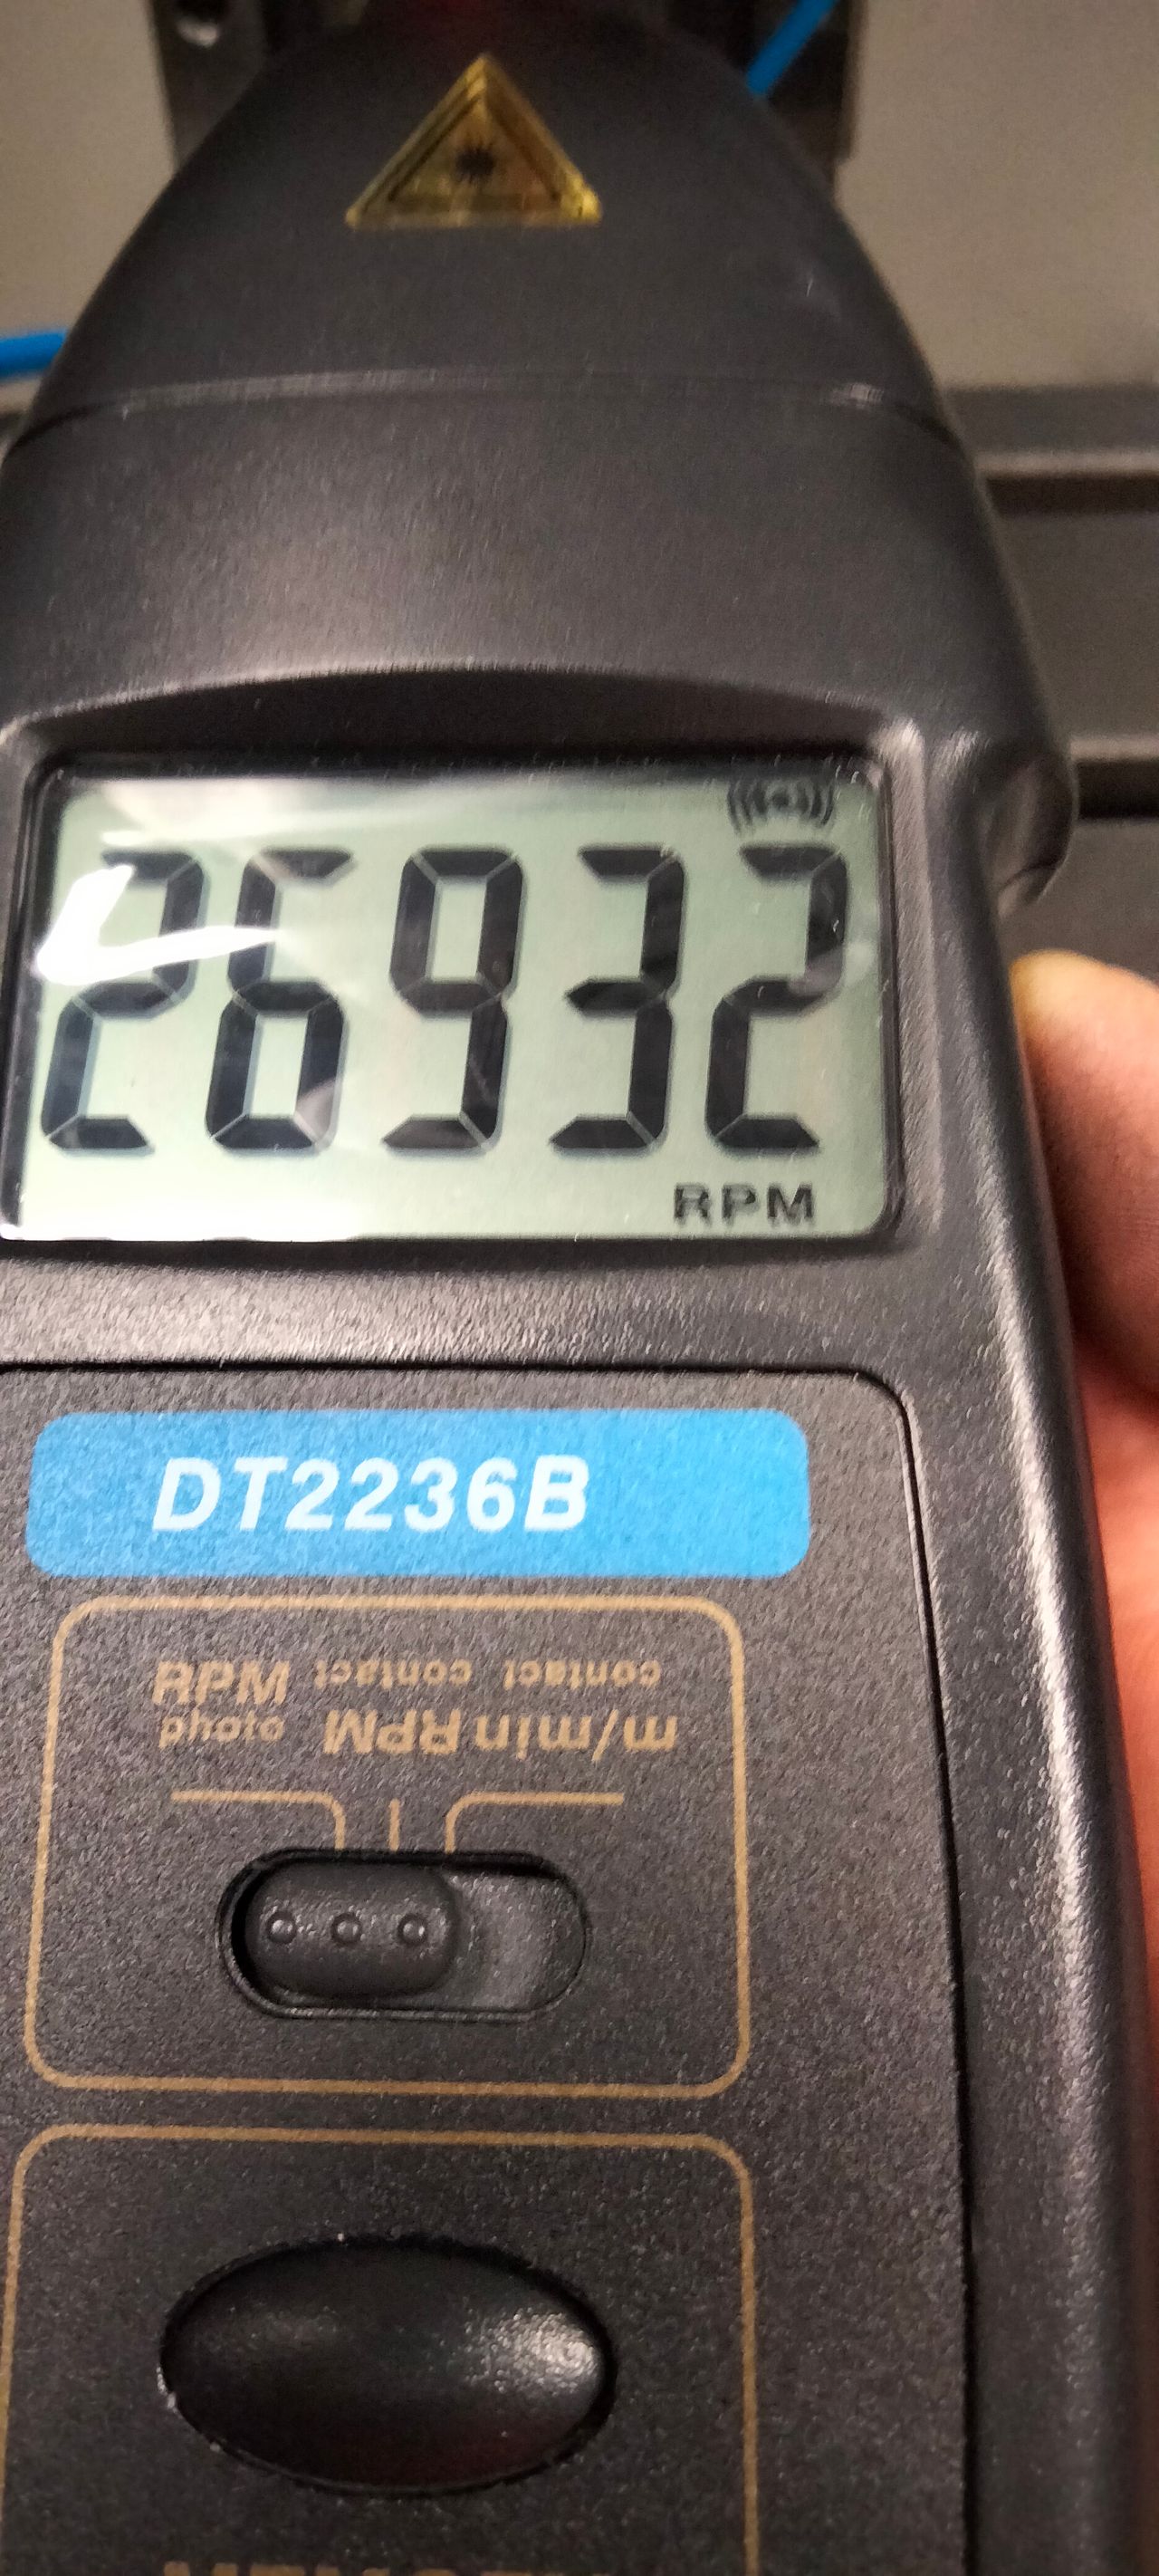
Pics from yesterday test.
Published 1y. Edited 1yPublished almost 2 years ago. Last edit almost 2 years ago
Peak speed (to test it), max speed, temperatures.
10
Slow but steady progress in last months
Published 1y. Edited 1yPublished over 1 year ago. Last edit over 1 year ago
Last update in july, after that it started to be too hot in the laboratory to working on the machine (especially since I make the parts needed after 8 working hours at 30+°C on the lathe), and then I was busy, after the summer vacations, in repairing the shredder and making other things for the Rome Maker Faire.
In the meantime I made other parts mainly for the axis sensors, planned how to make the enclosure and solved some issues on the electric and lubrification system.
I also installed some chip guards (and have them zinc plated to avoid having to paint them with oil resistant paint).
In next weeks I'm going to continue...
11
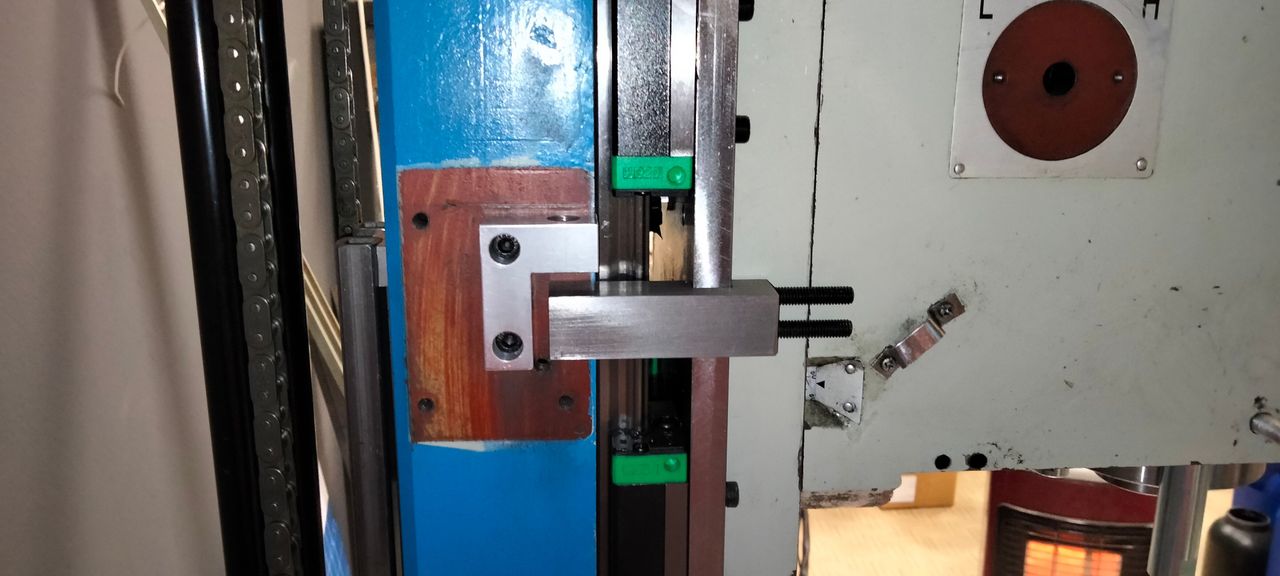
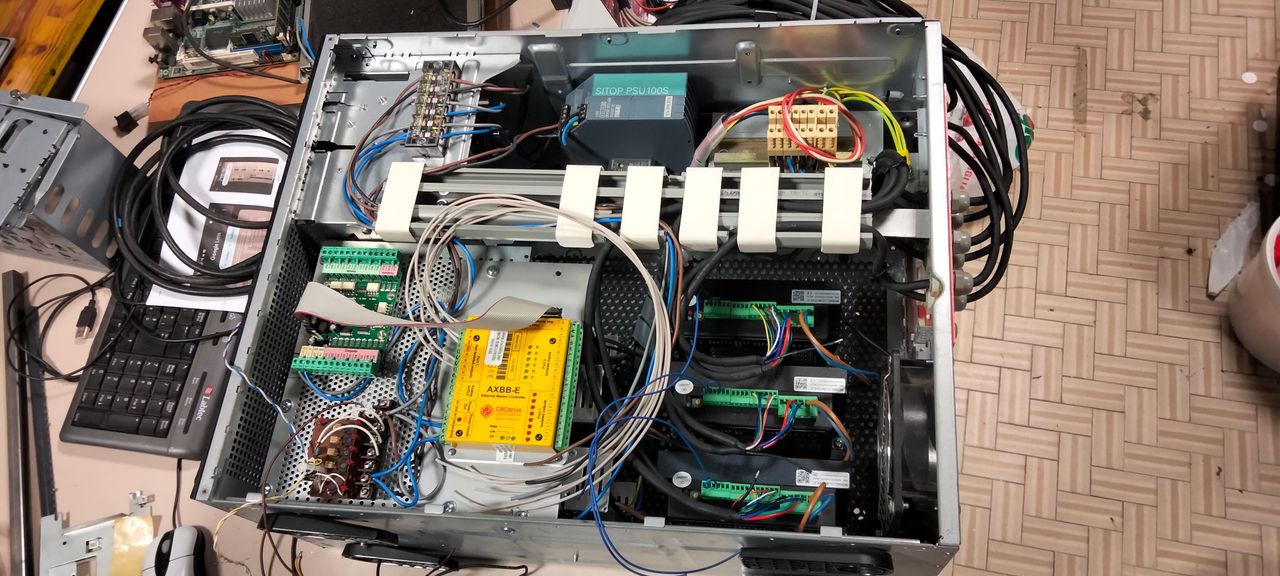
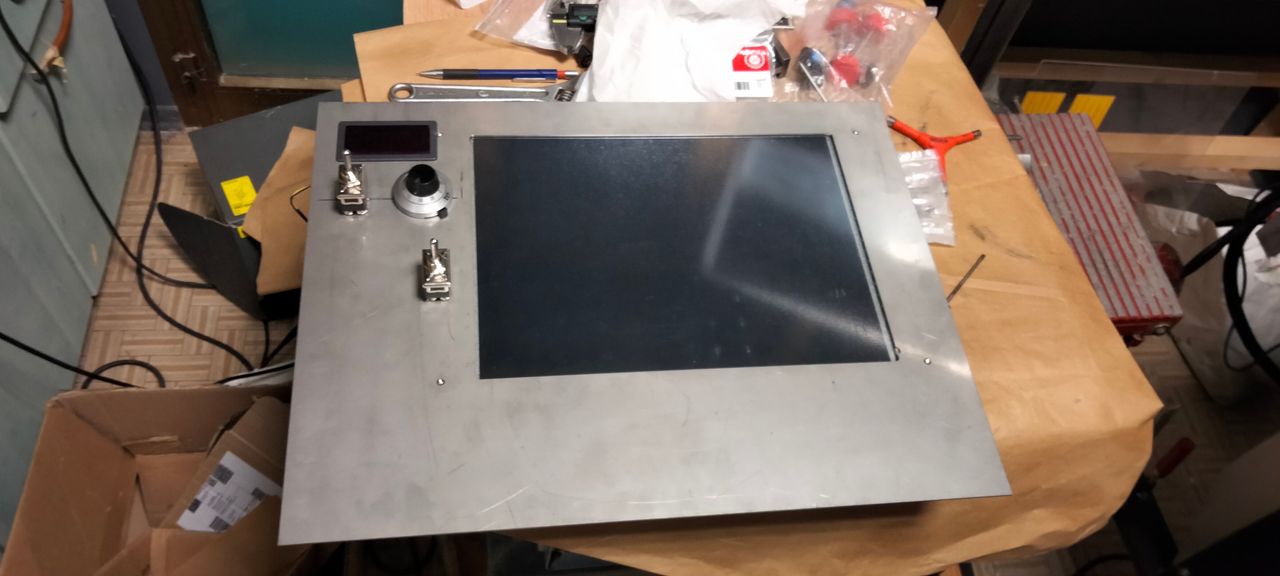
Limit switches installed and control unit box in progress
Published 1yPublished over 1 year ago
Last week I installed all the limit switches and started making the control box.
Im going to use a touch screen for the machine control

12
Busy with electricity and electronics
Published 1yPublished about 1 year ago
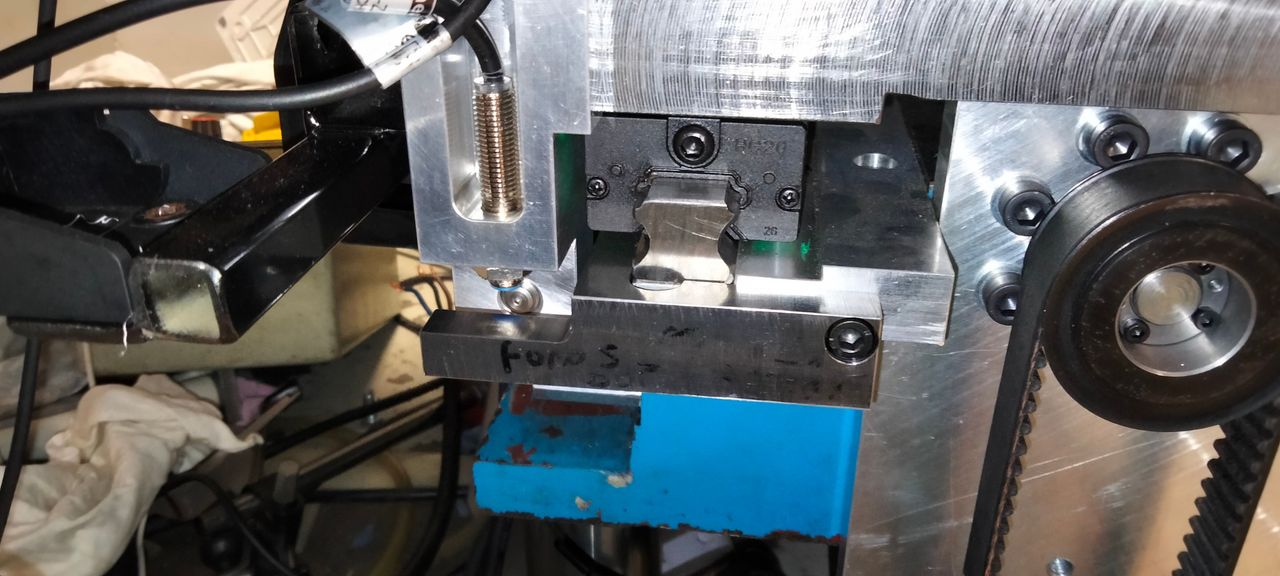
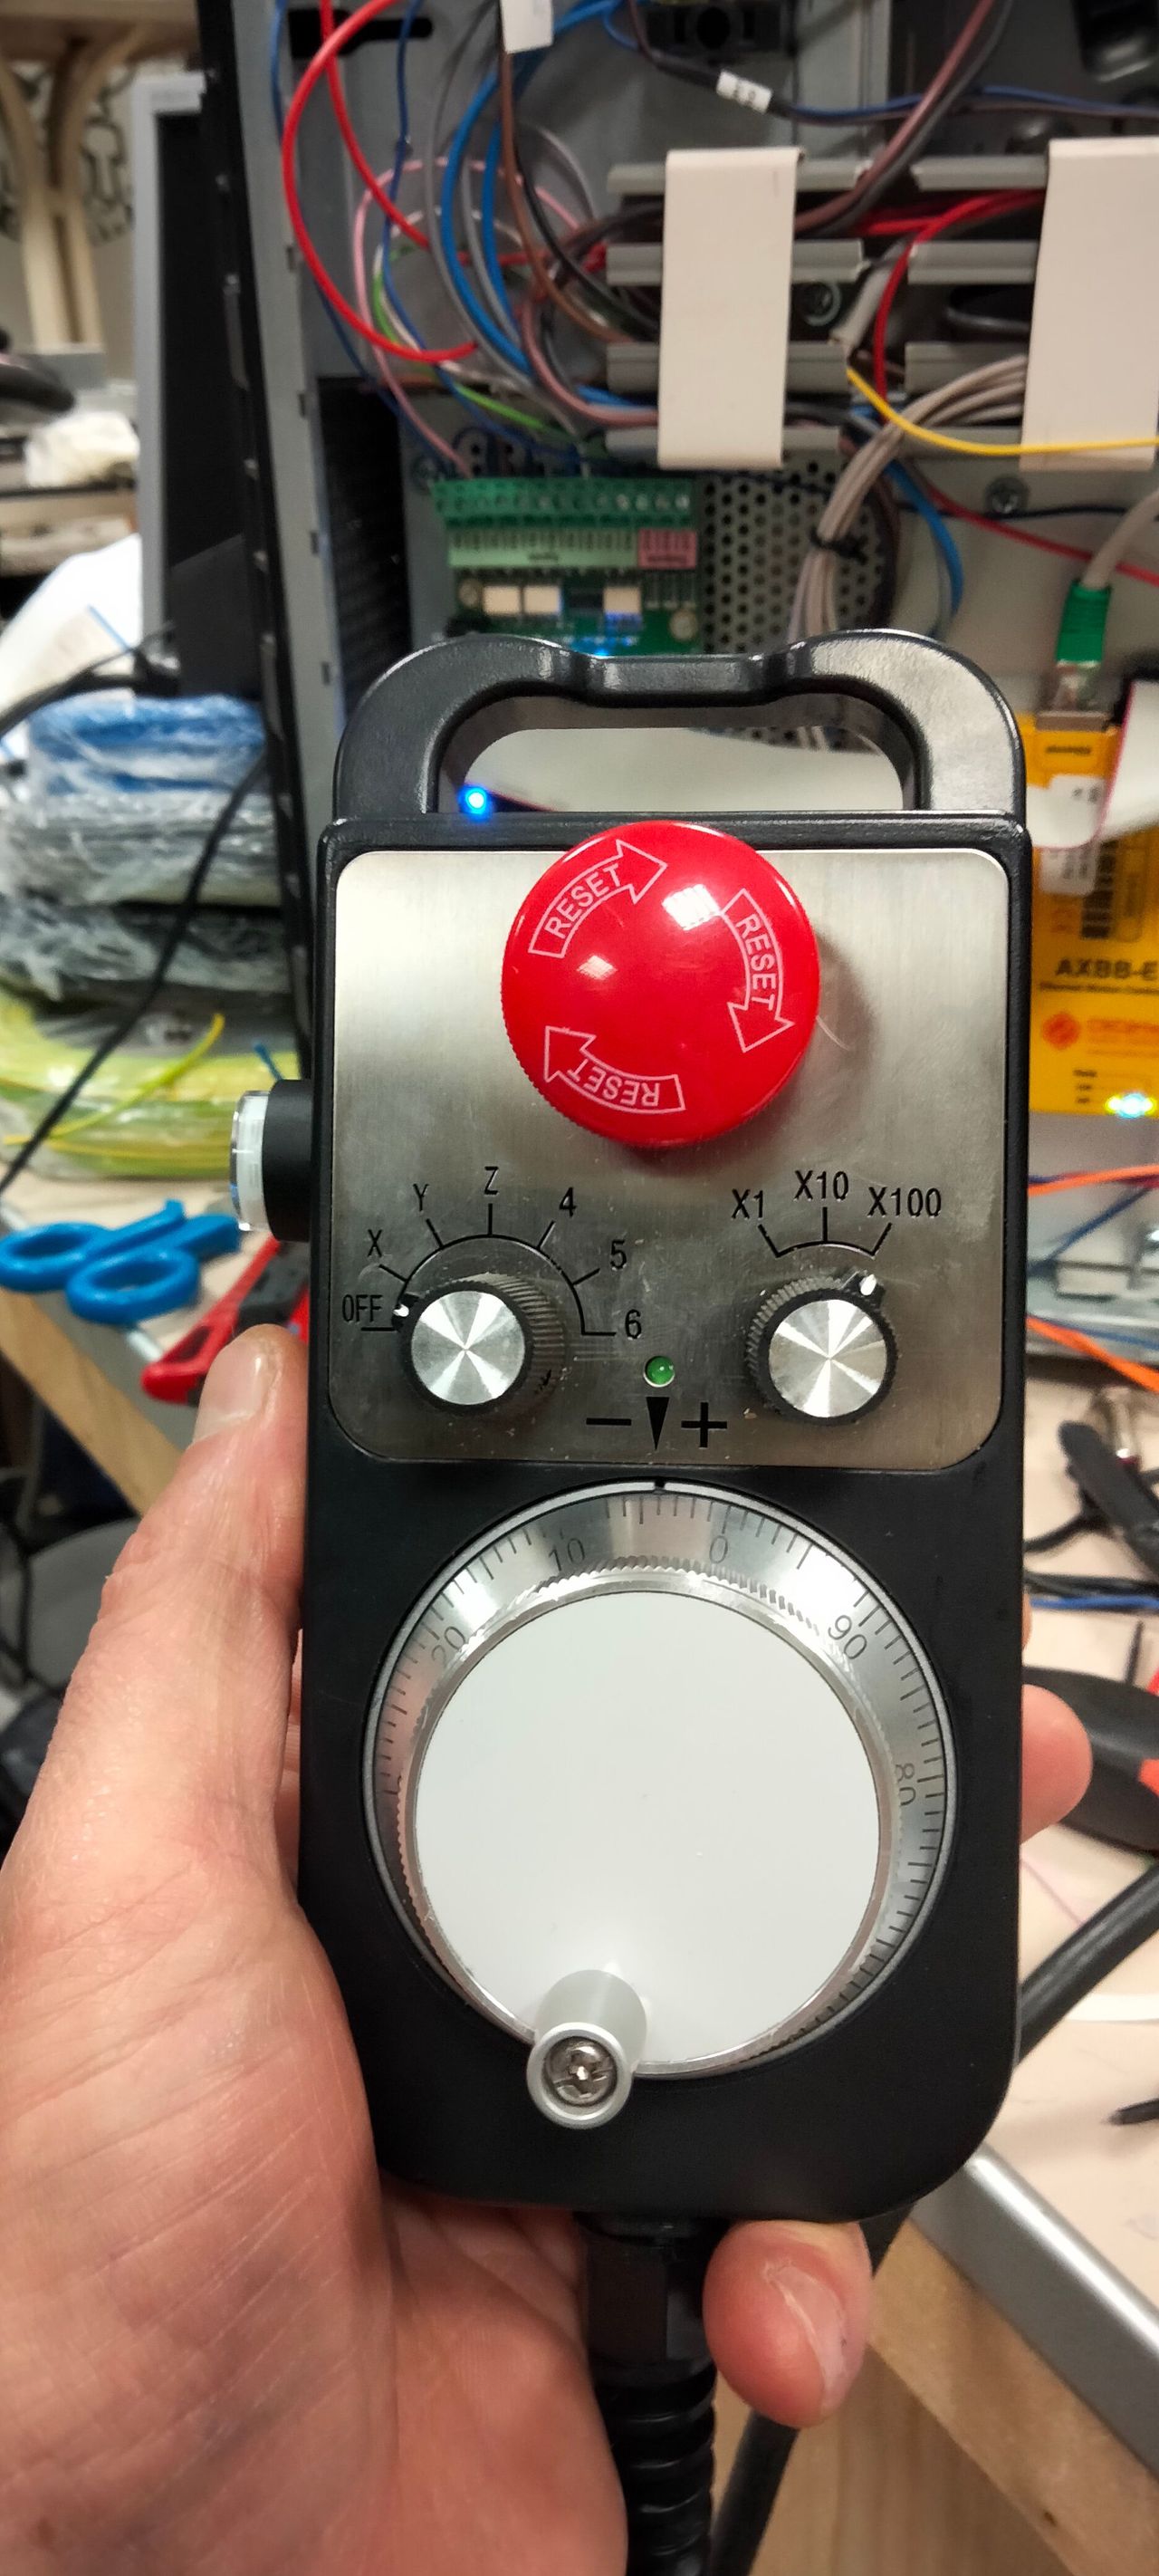
In last months we worked on the setup of motors and limit switches (bench tests).
Since I want the machine to be as precise as possible, and to have a user friendly control panel like the industrial ones I'm used to, I had to set-up some things.
First of all, the homing switches are two for every axis.
A proximity to slow the machine when the axis is near the mechanical switch, and then the mechanical one.
This is needed because I need to approach the mecanical one slowly since it have only 0.7mm travel.
It's a Metrol one with micron precision.
That needed some programming on the UCCNC homing procedure macro.
Programming that I'm not able to do, and I have to wait for a friend for.
After that, I focused to the MPG pendant controls, and that required also a couple of macros.
But now all seems working properly, with adjustable homing speeds and also the pendant is working as intended, with increments of 0.001mm in the lower setting.
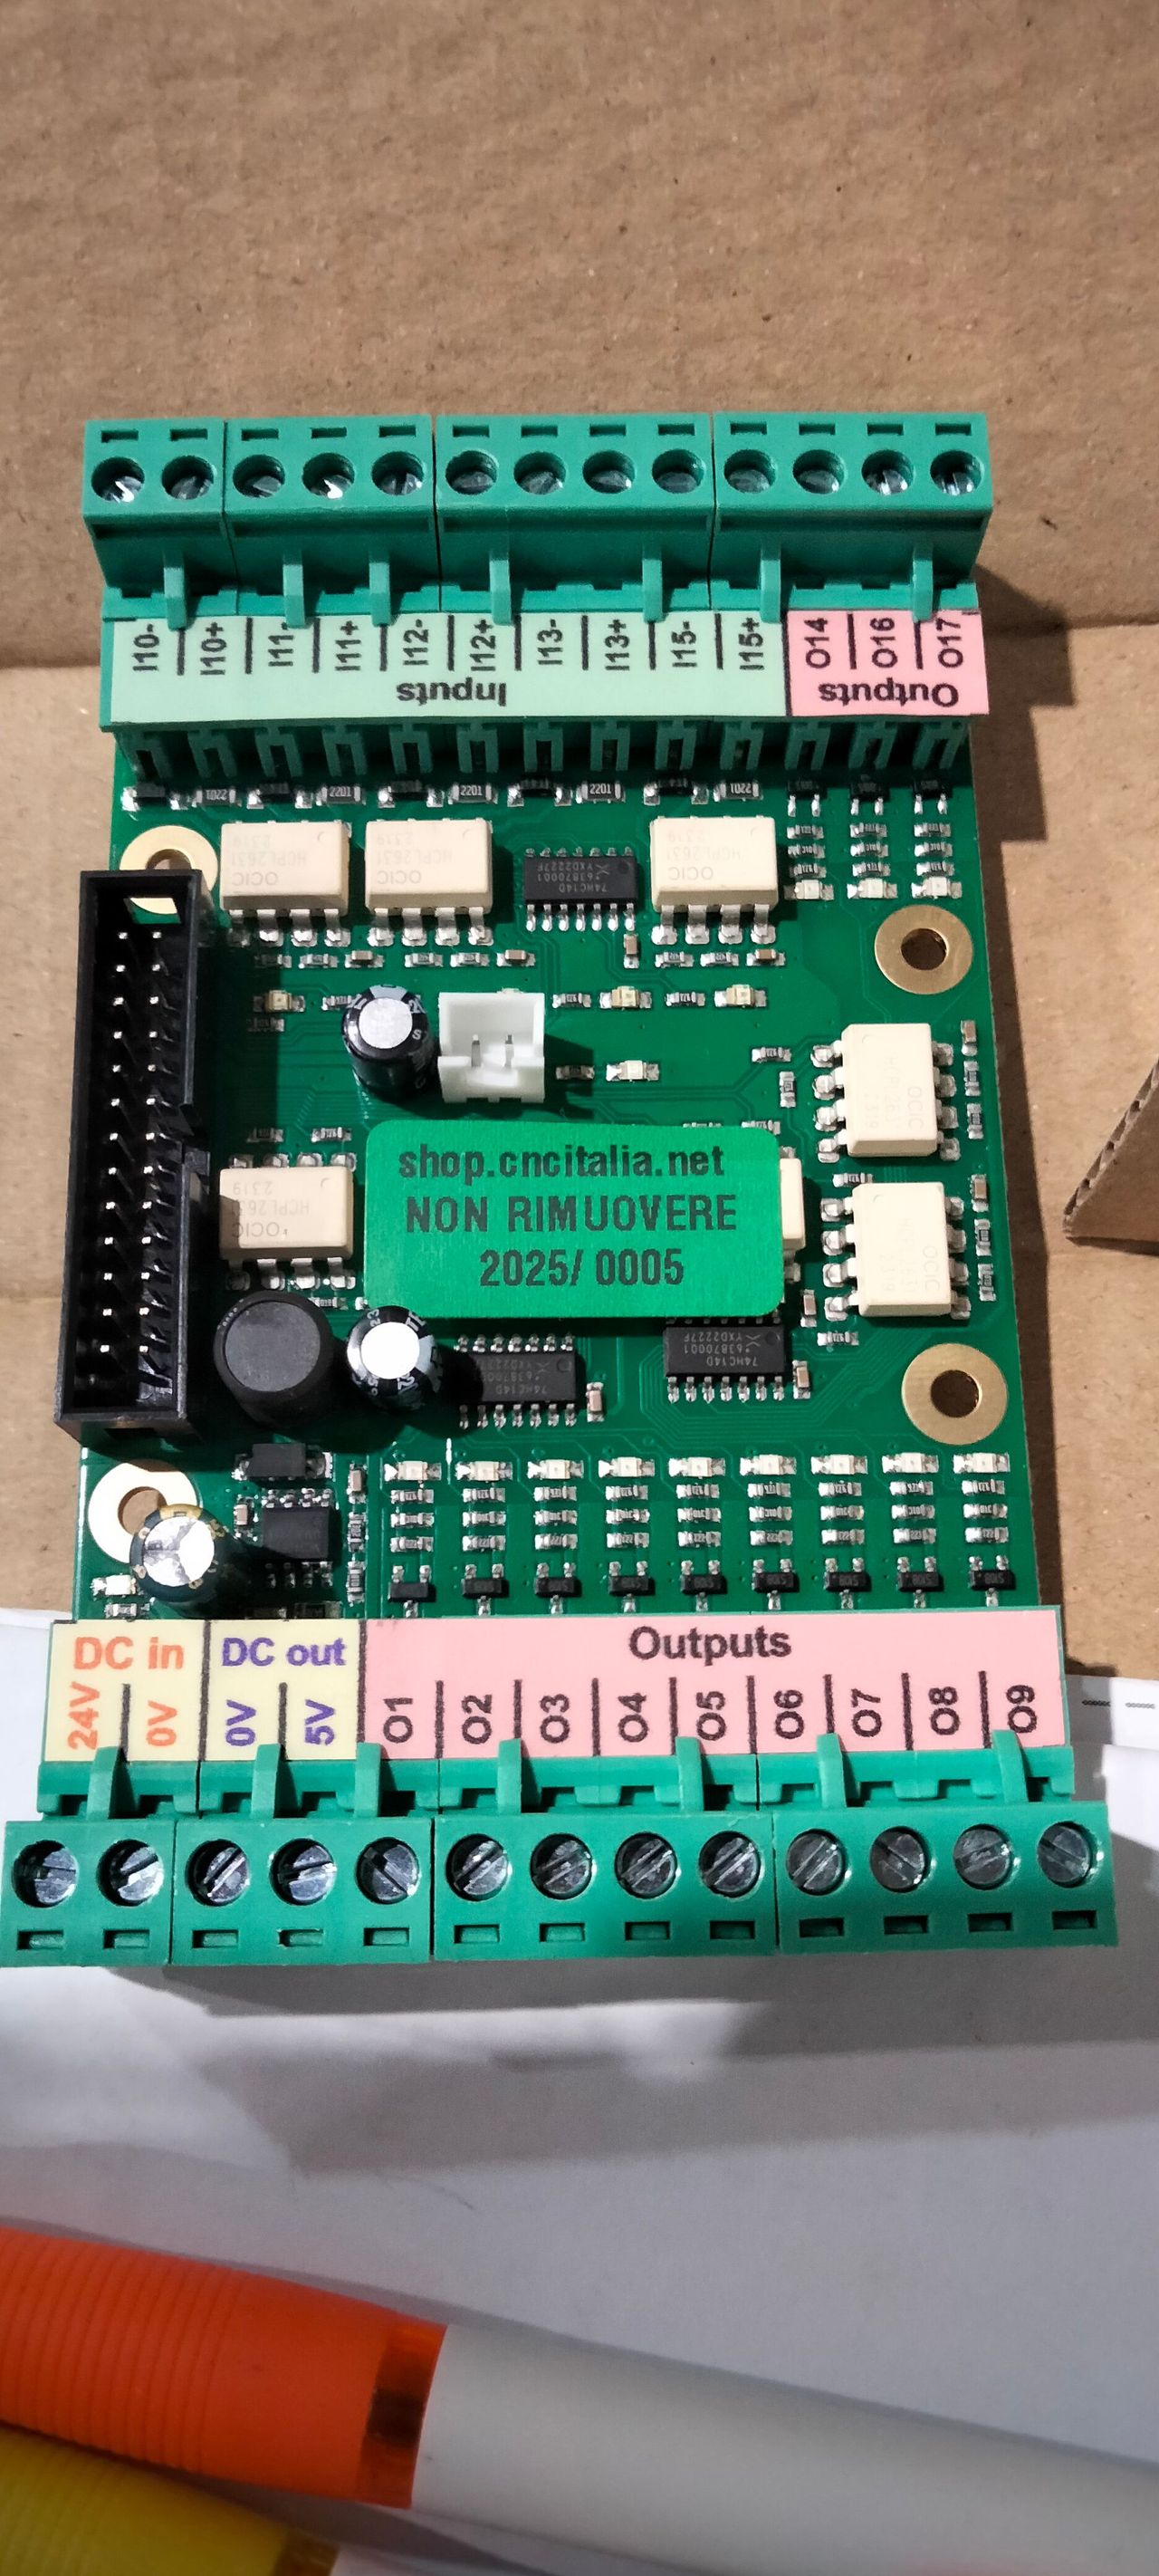
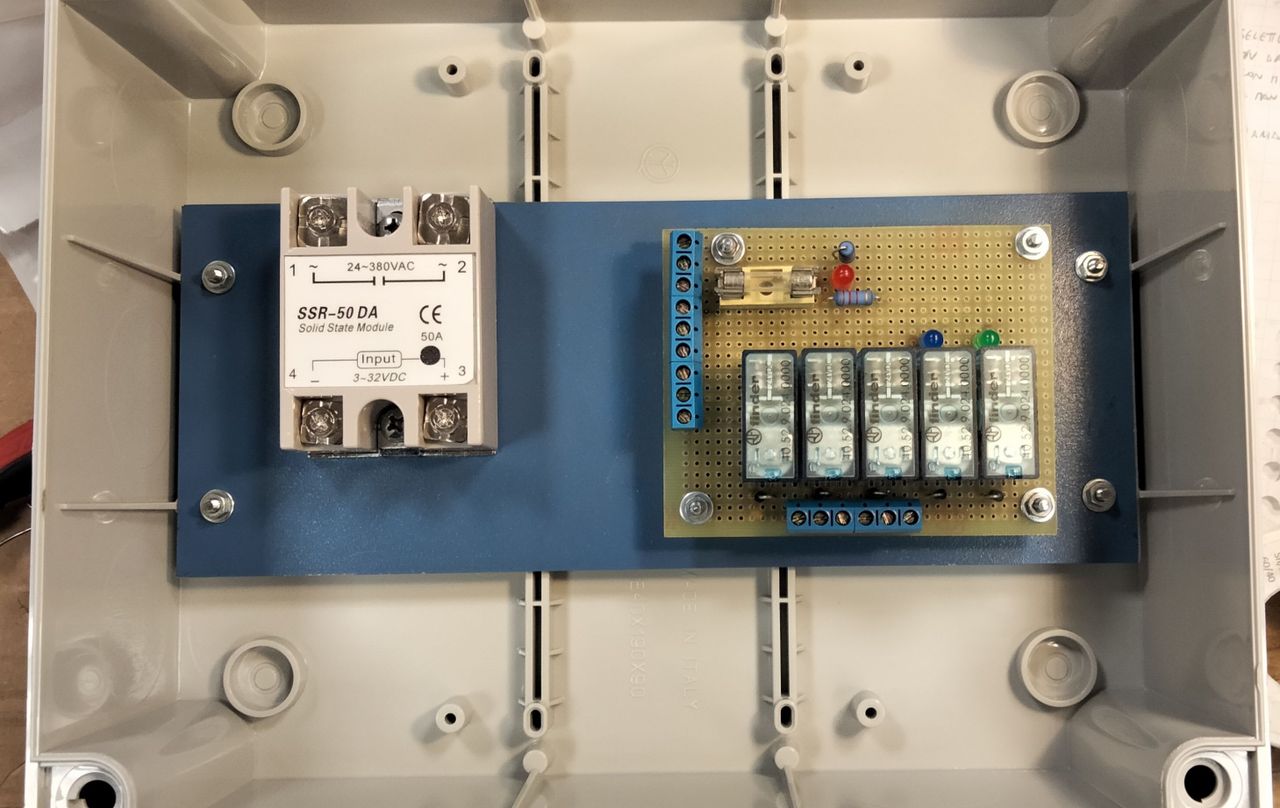
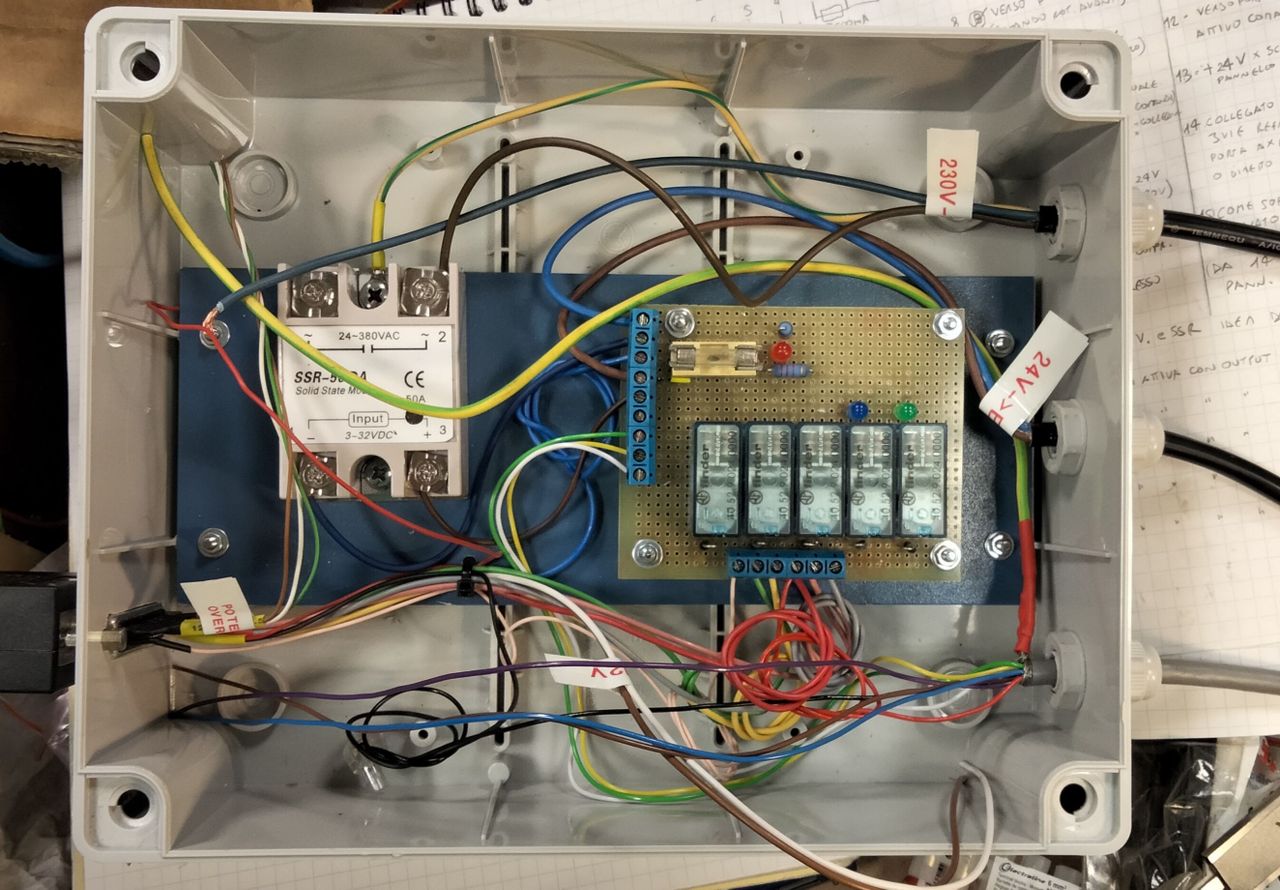
Now I just made a relay board to allow me to control the spindle both from g-code and manually, to allow me to tap manually.
In next days I have to install all the switches on the control panel and to carry it to powder coat before of the final electrical installation.
13
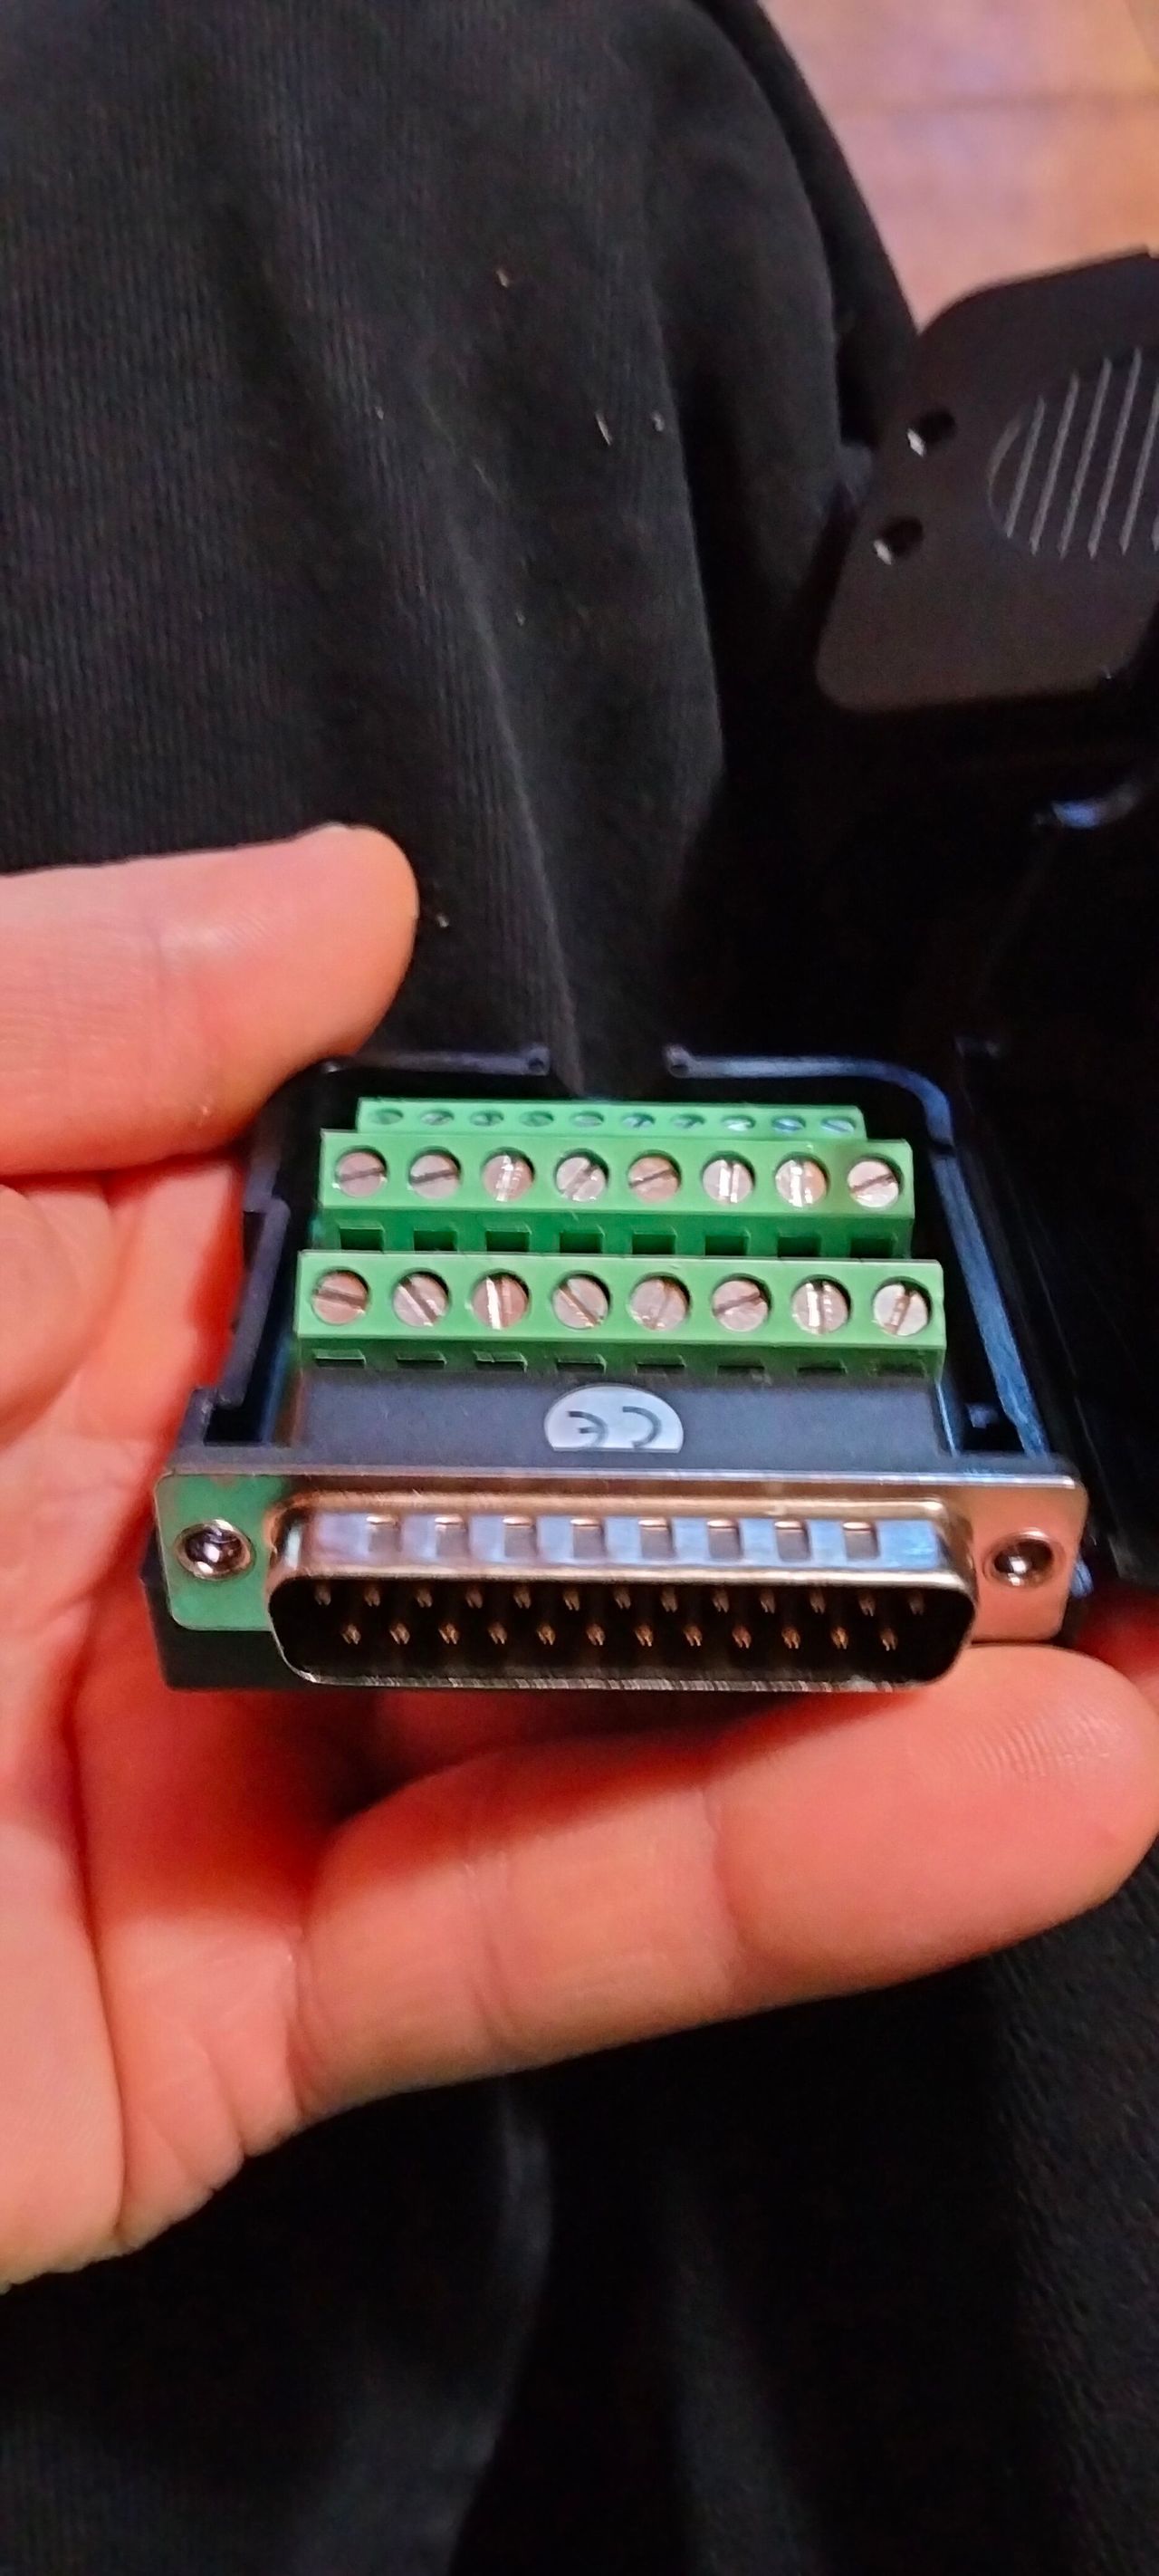
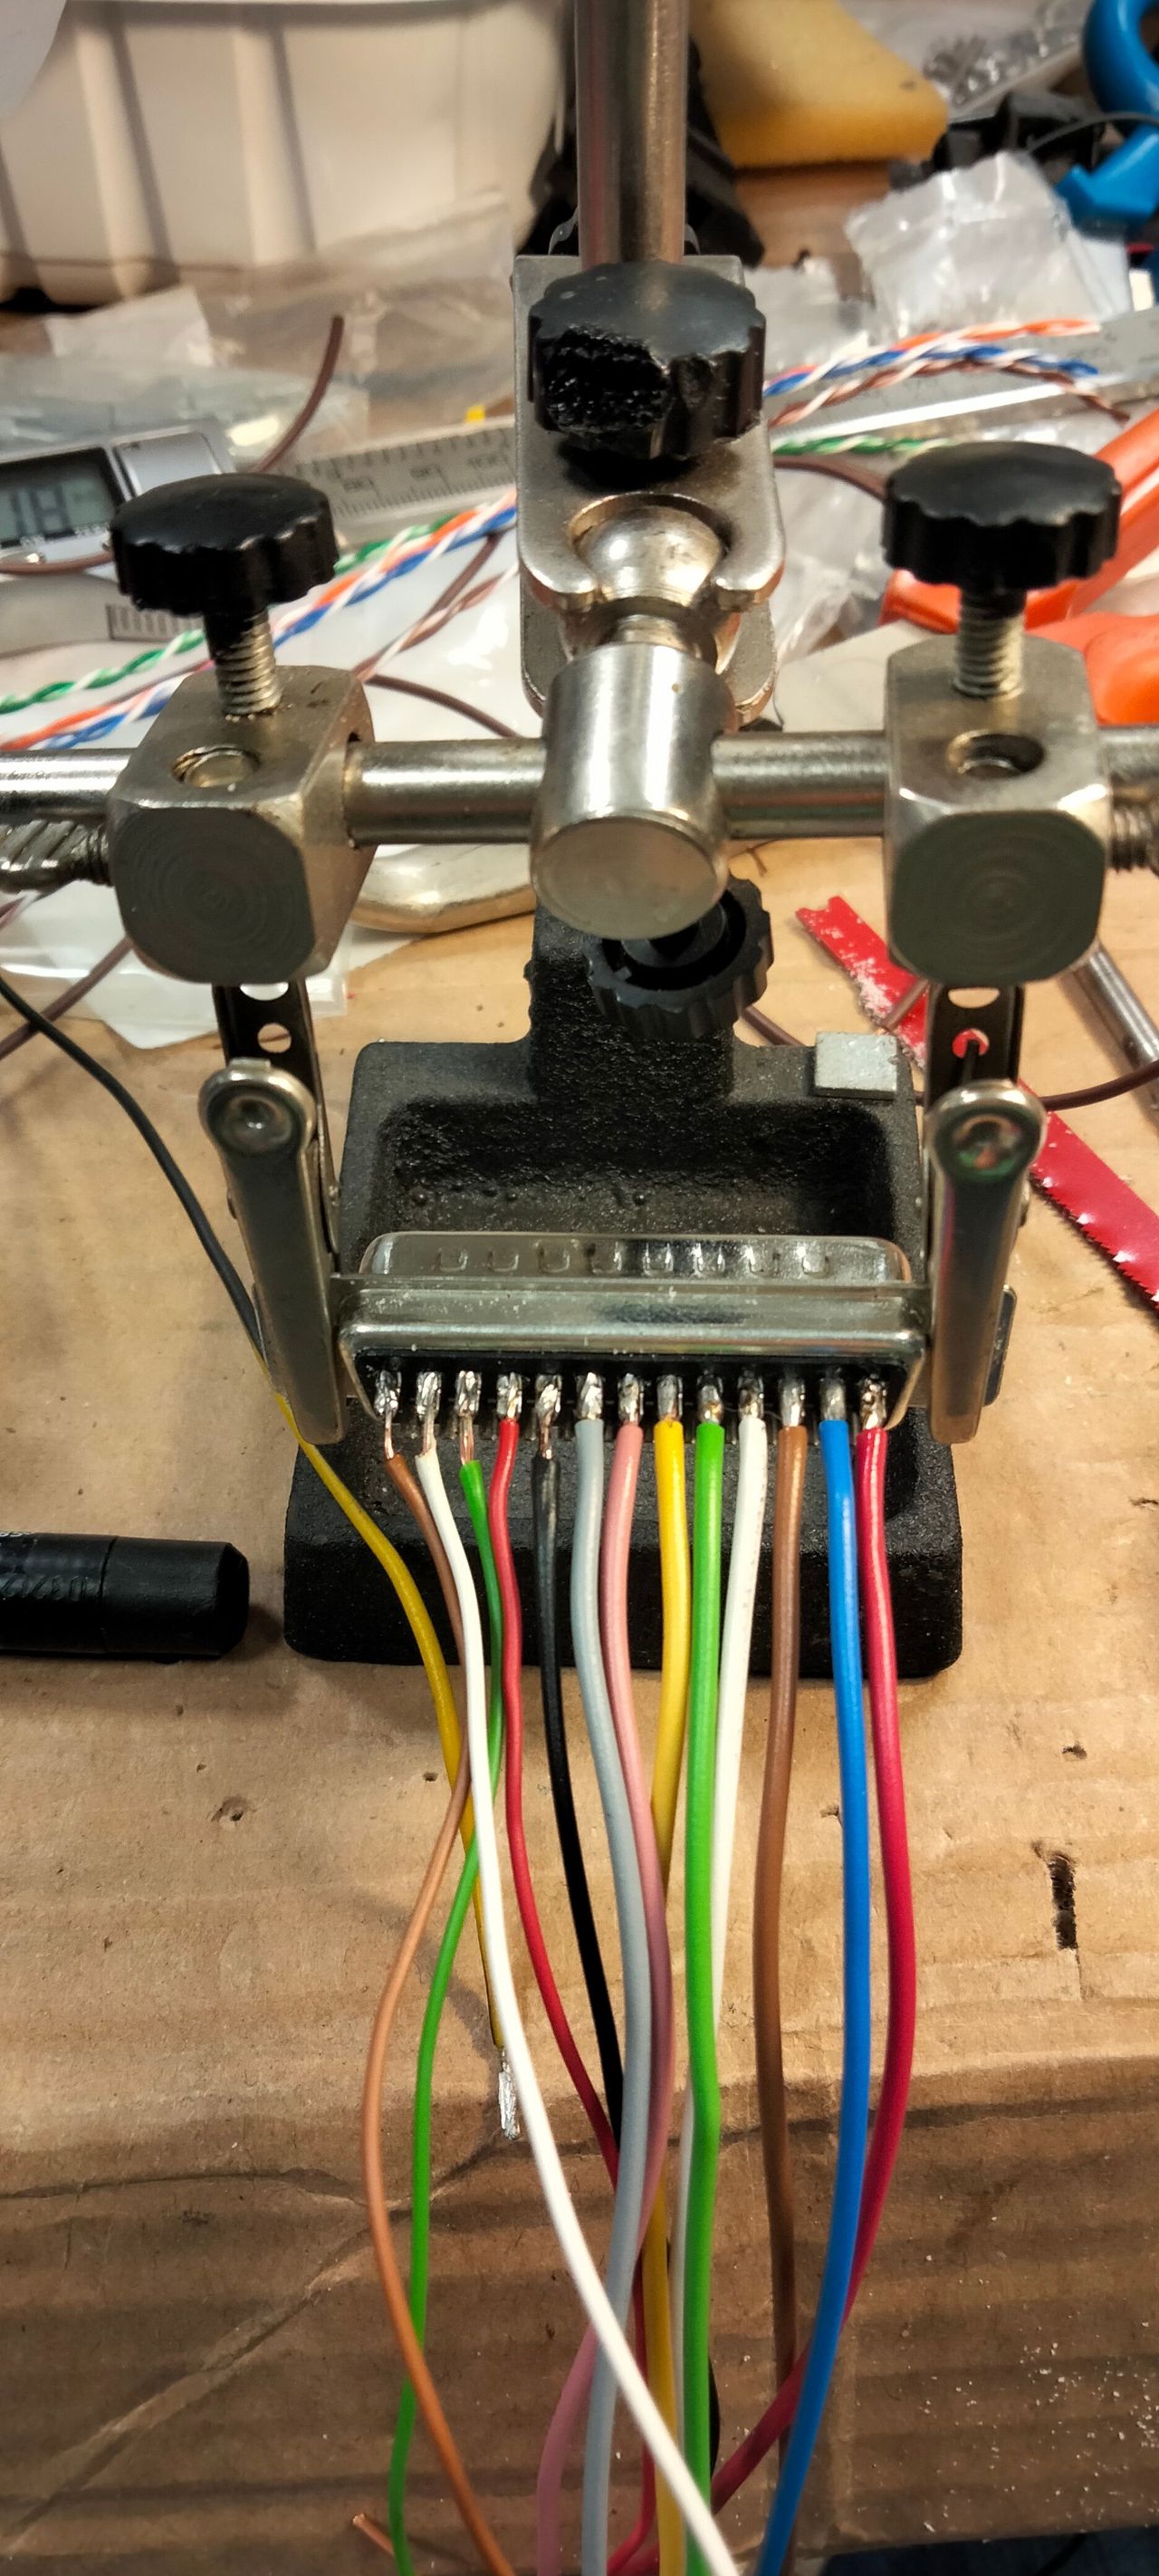
Some progress on the relay box today.
Published 1yPublished about 1 year ago
Added a DB25 connector to the box for the signals, and some cables to the VFD, coolant pump and MQL solenoid valve.
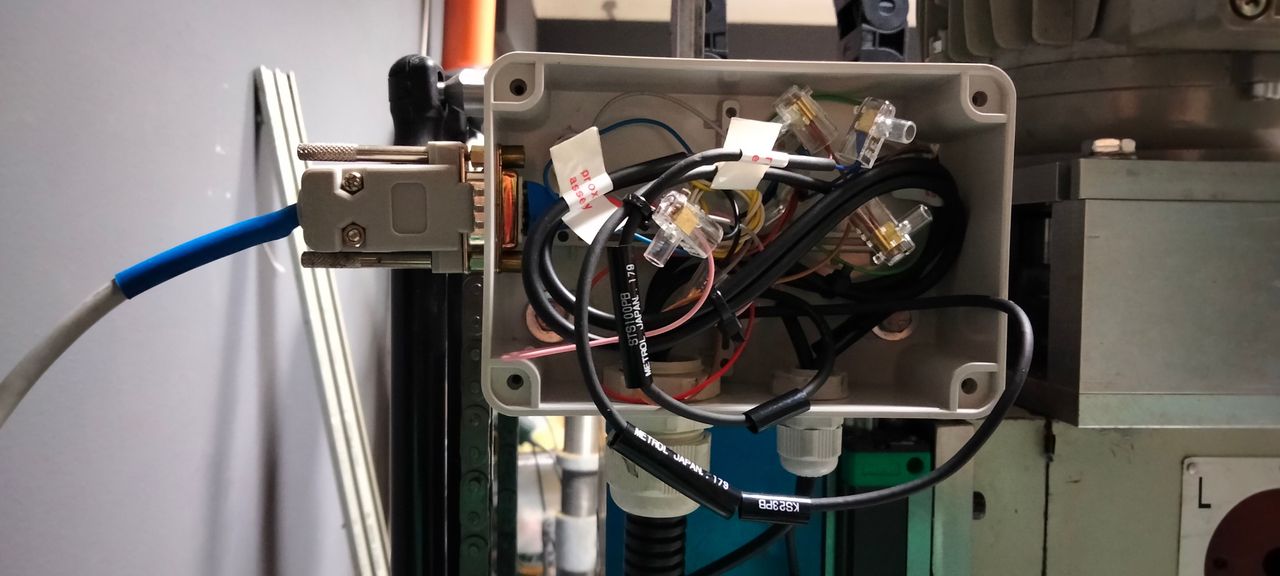
The small box is on top of the machine column and contains the connections to the homing proximities and microswitches.
14
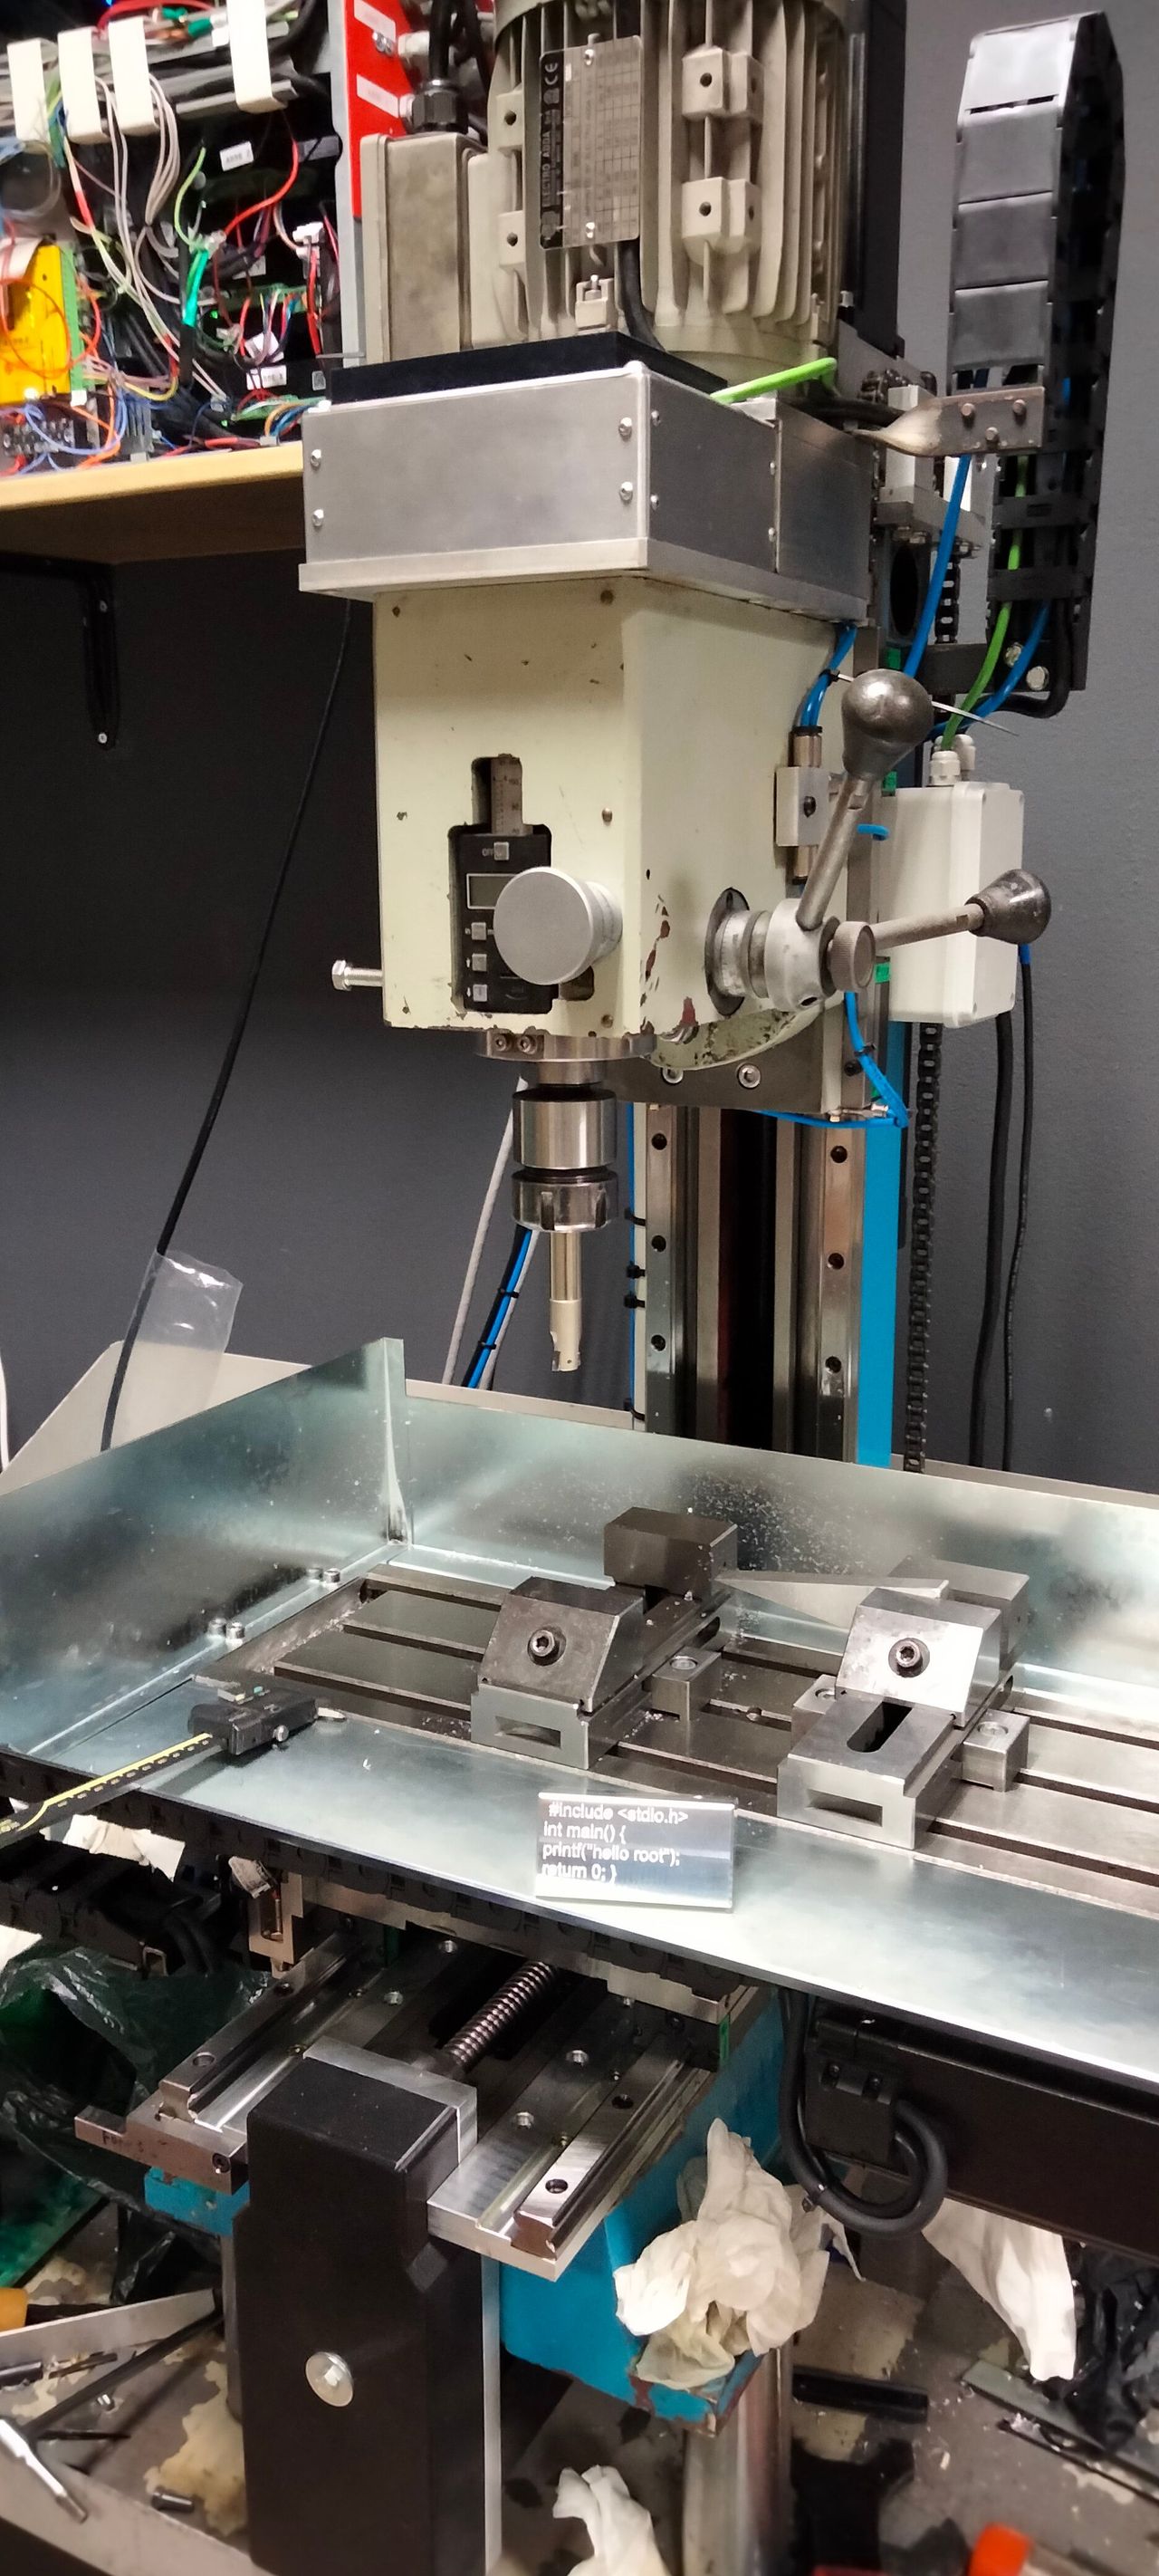
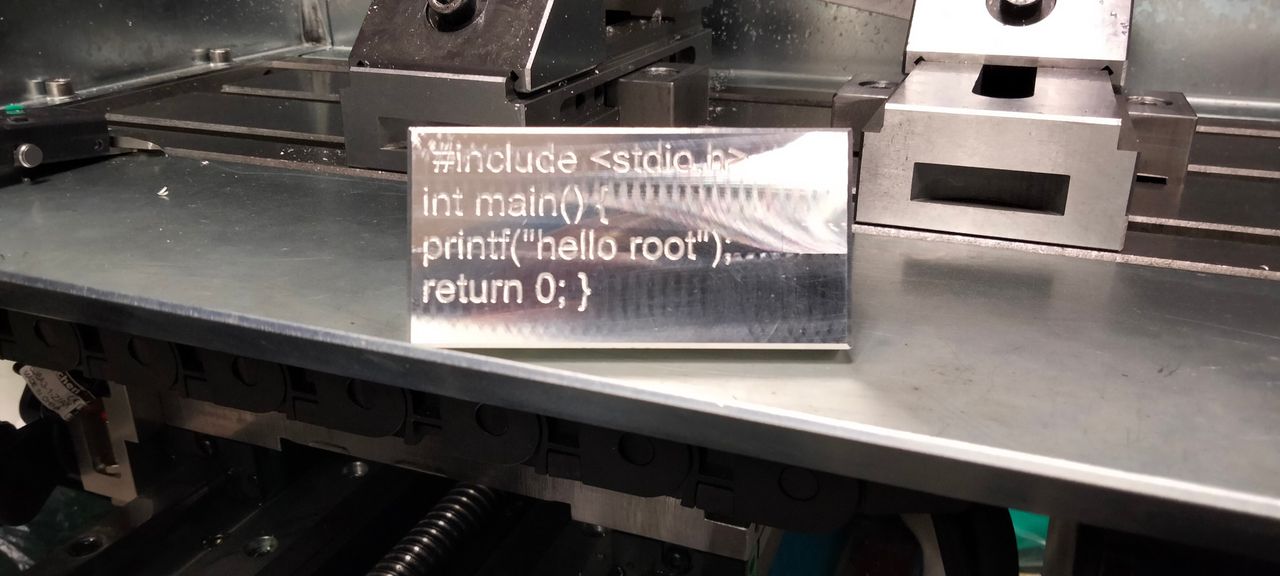
Machine tested
Published 11moPublished 12 months ago
Last weekend I finished the motors and cables installation, and tested the machine.
First test was squaring an aluminium scrap to test precision and then engraved a C++ code line to make an ornament for the bar of the hackerspace in which I'm developing the project.
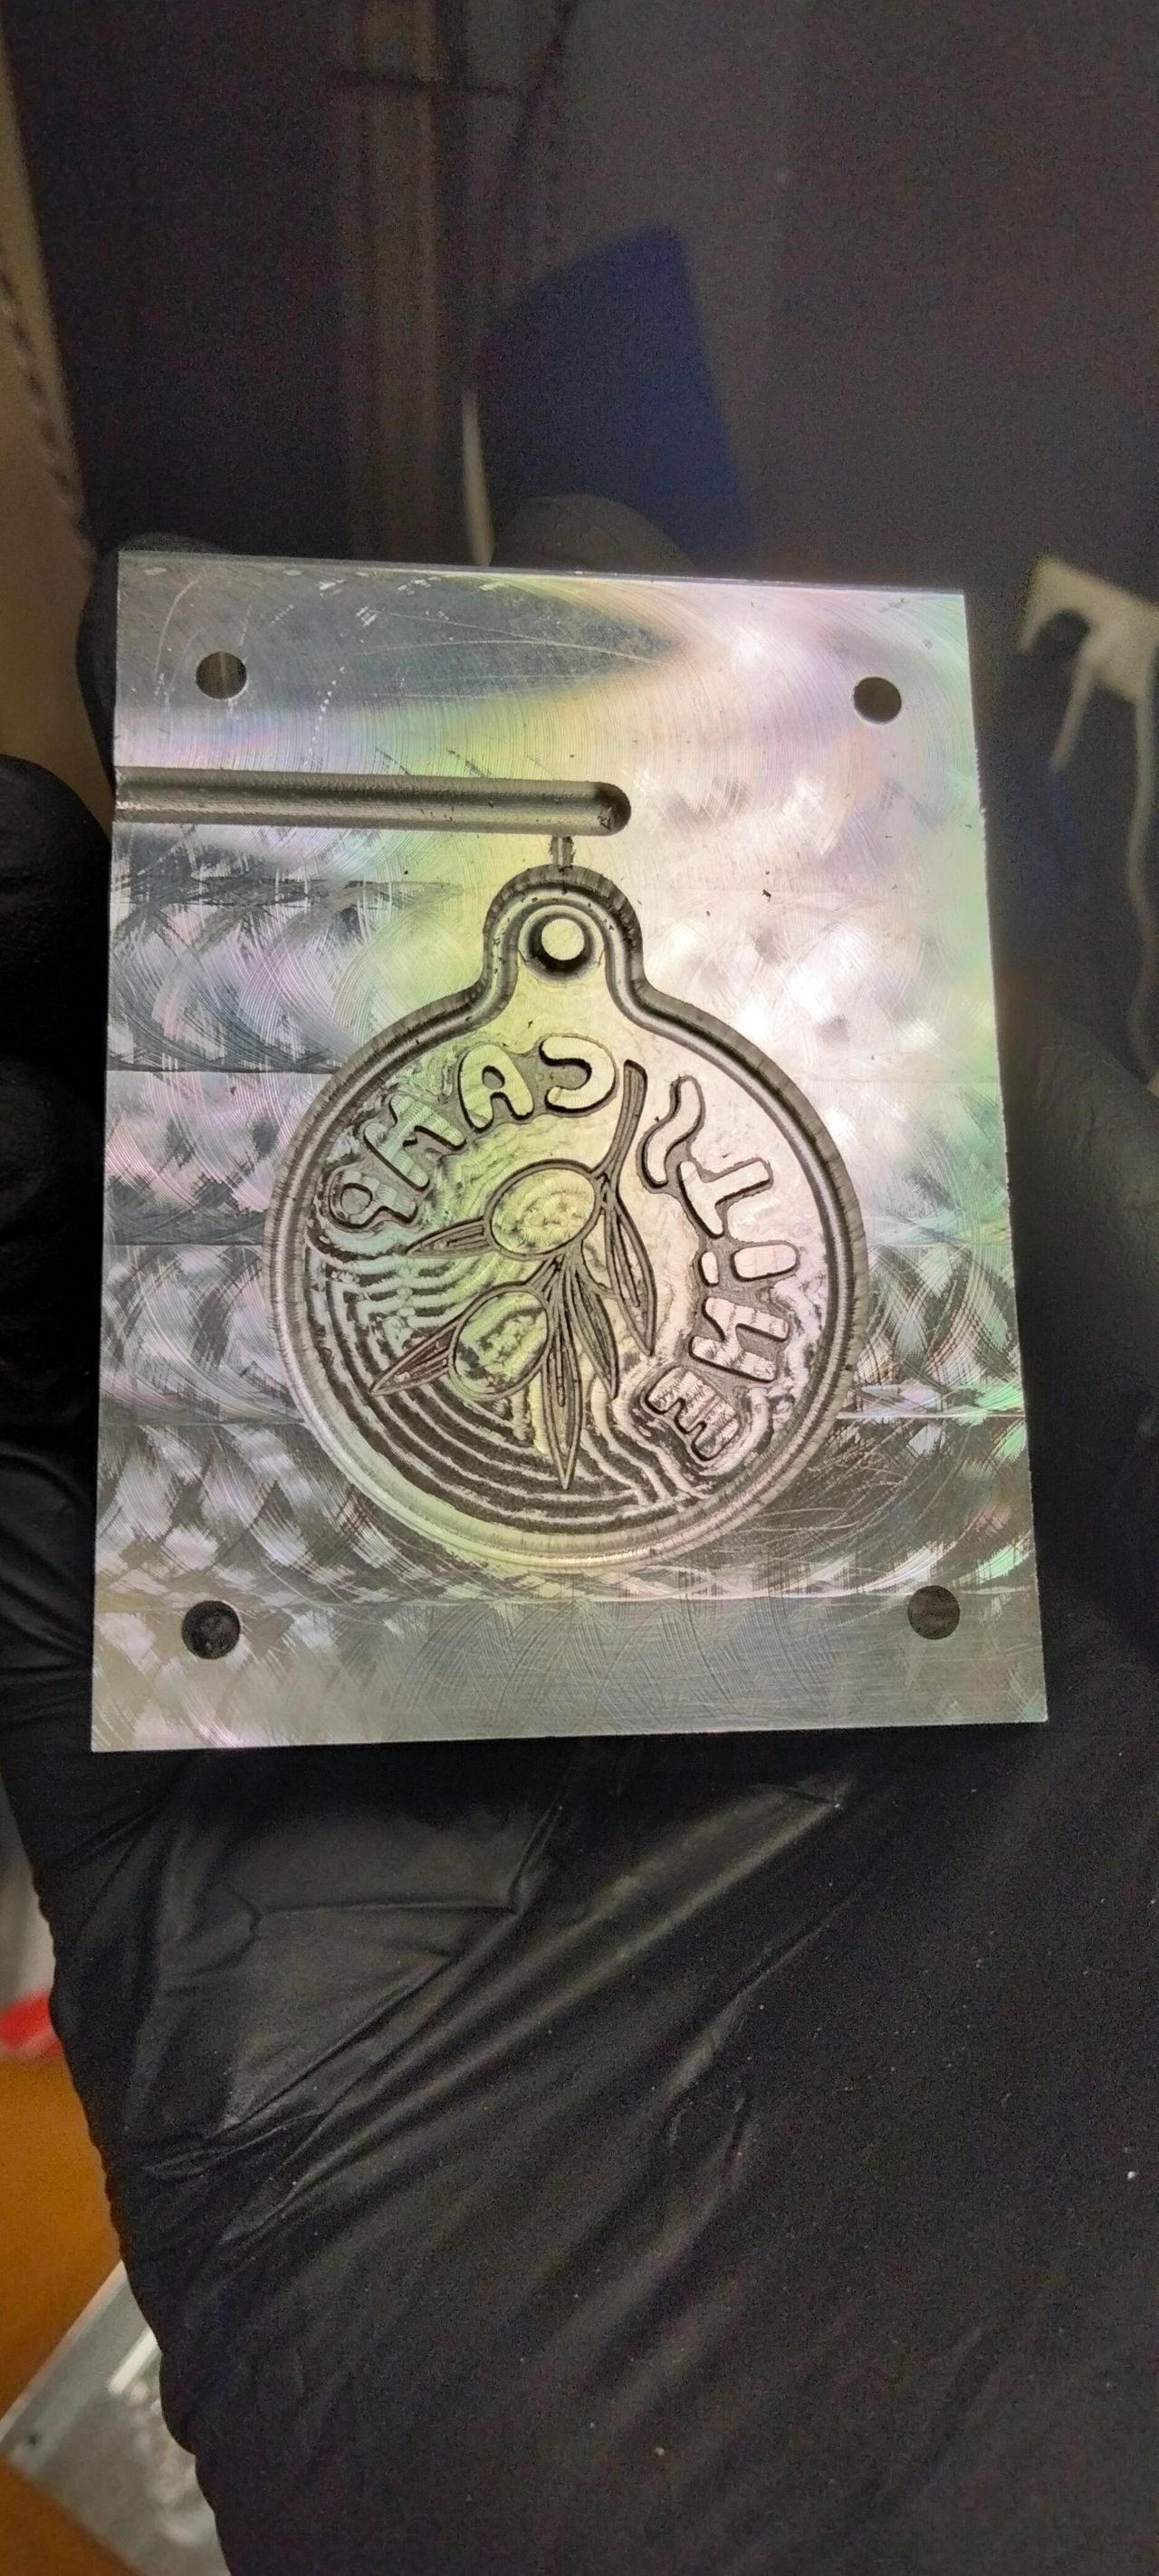
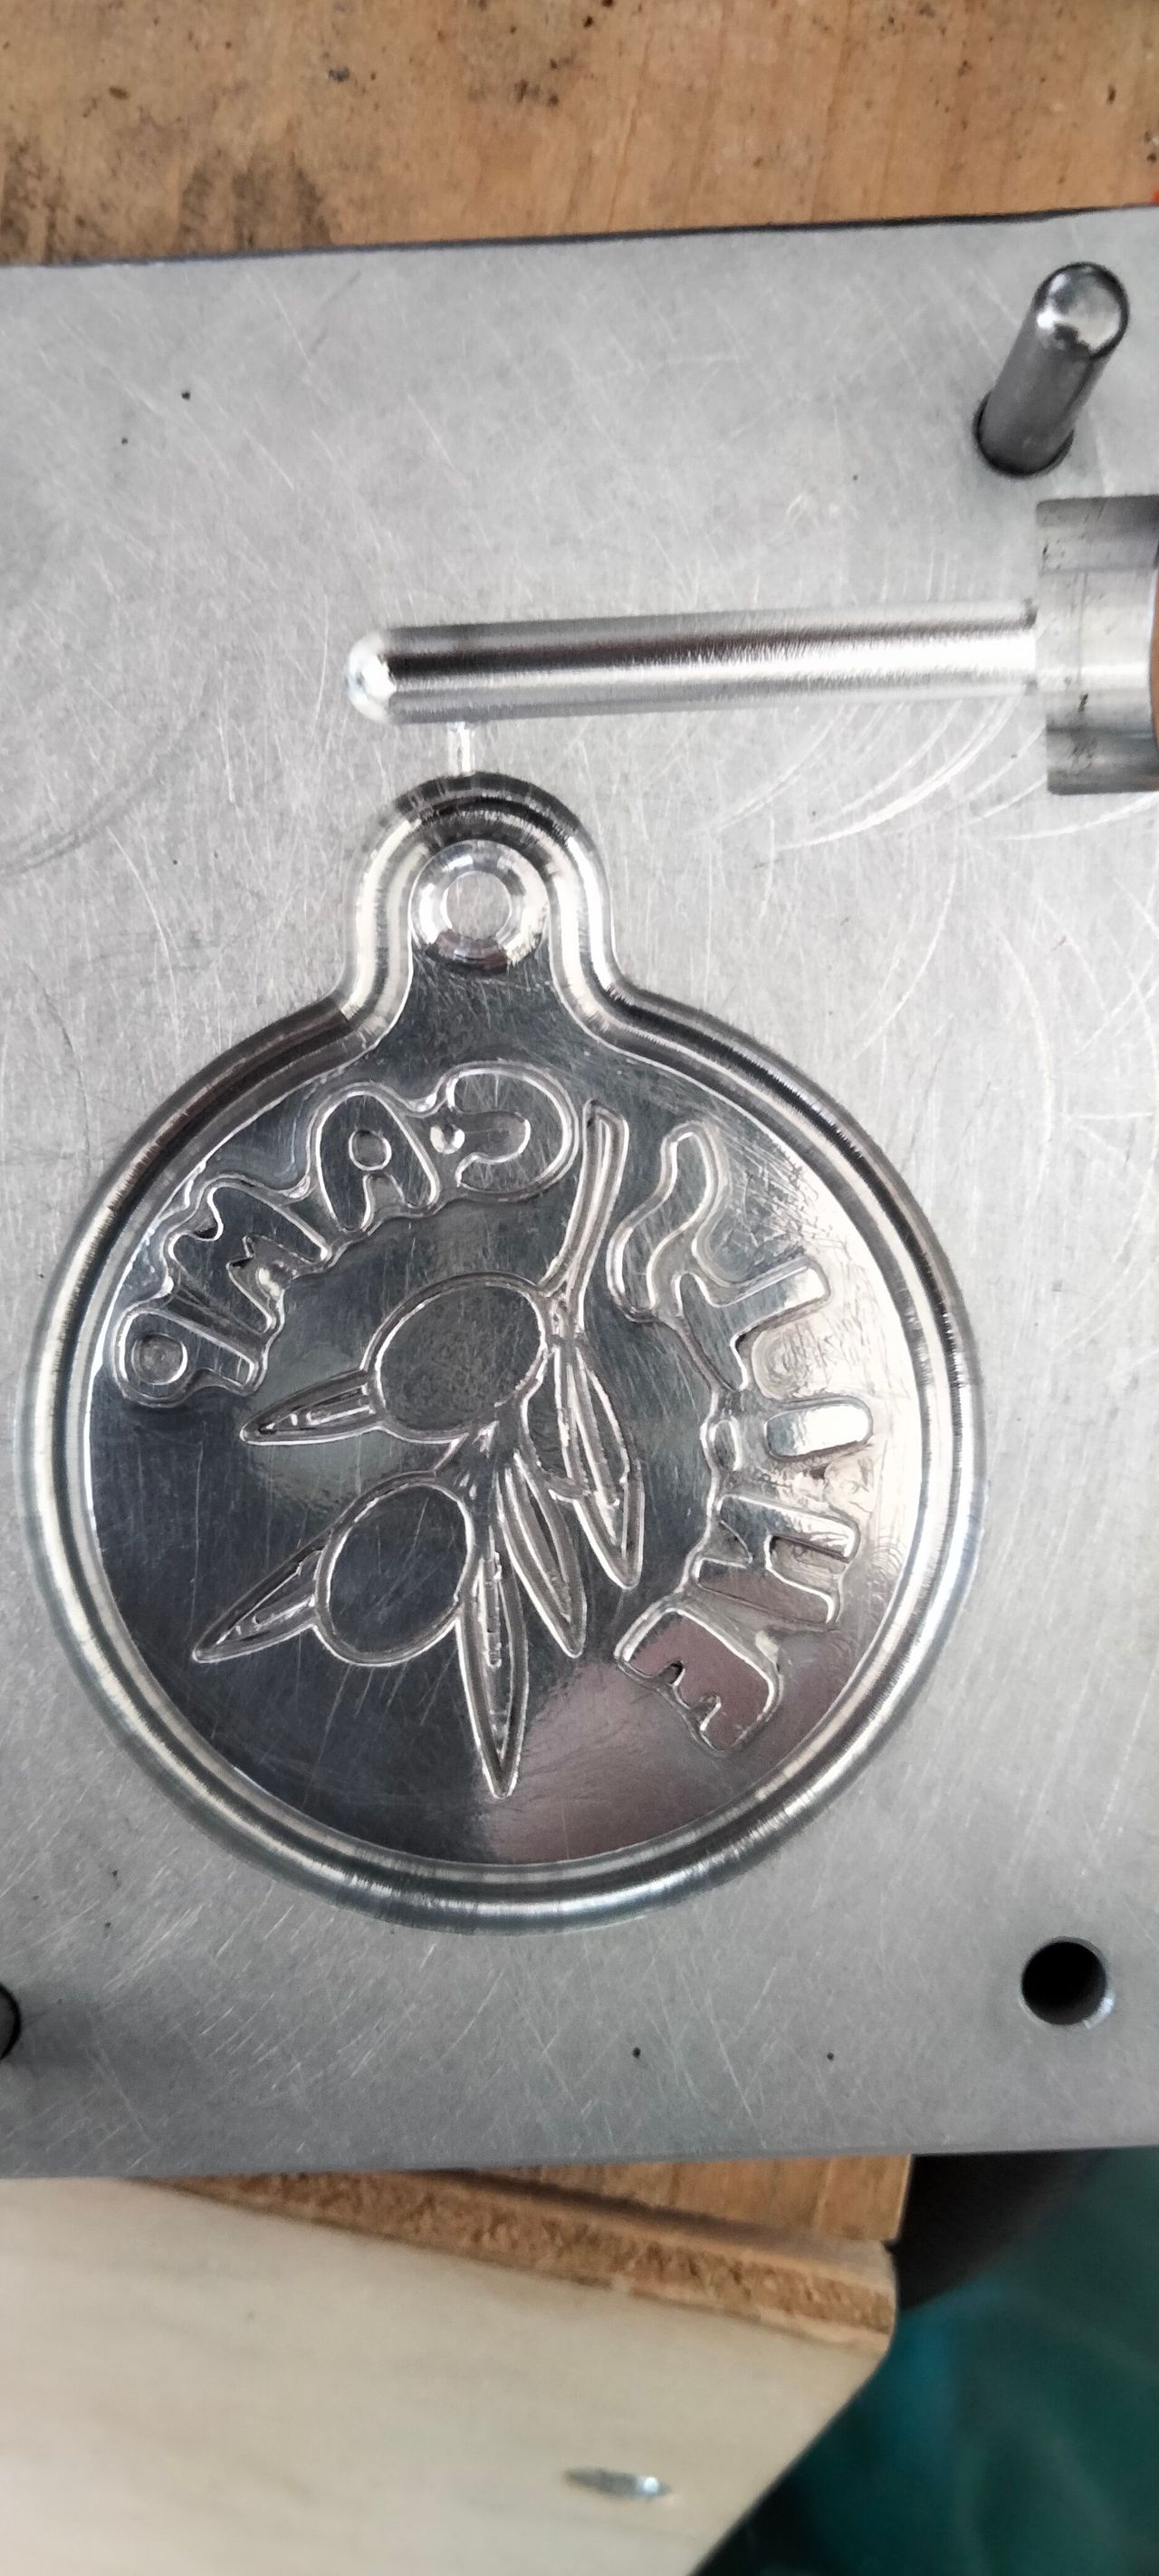
The machine is more precise than expected, and I'm very happy with that.
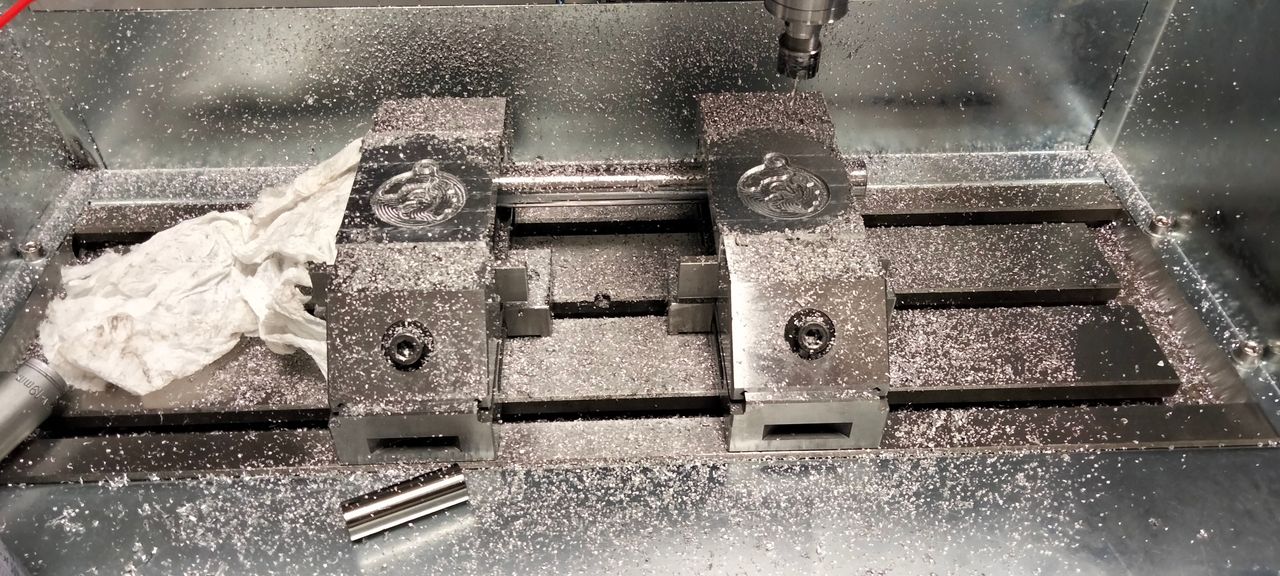
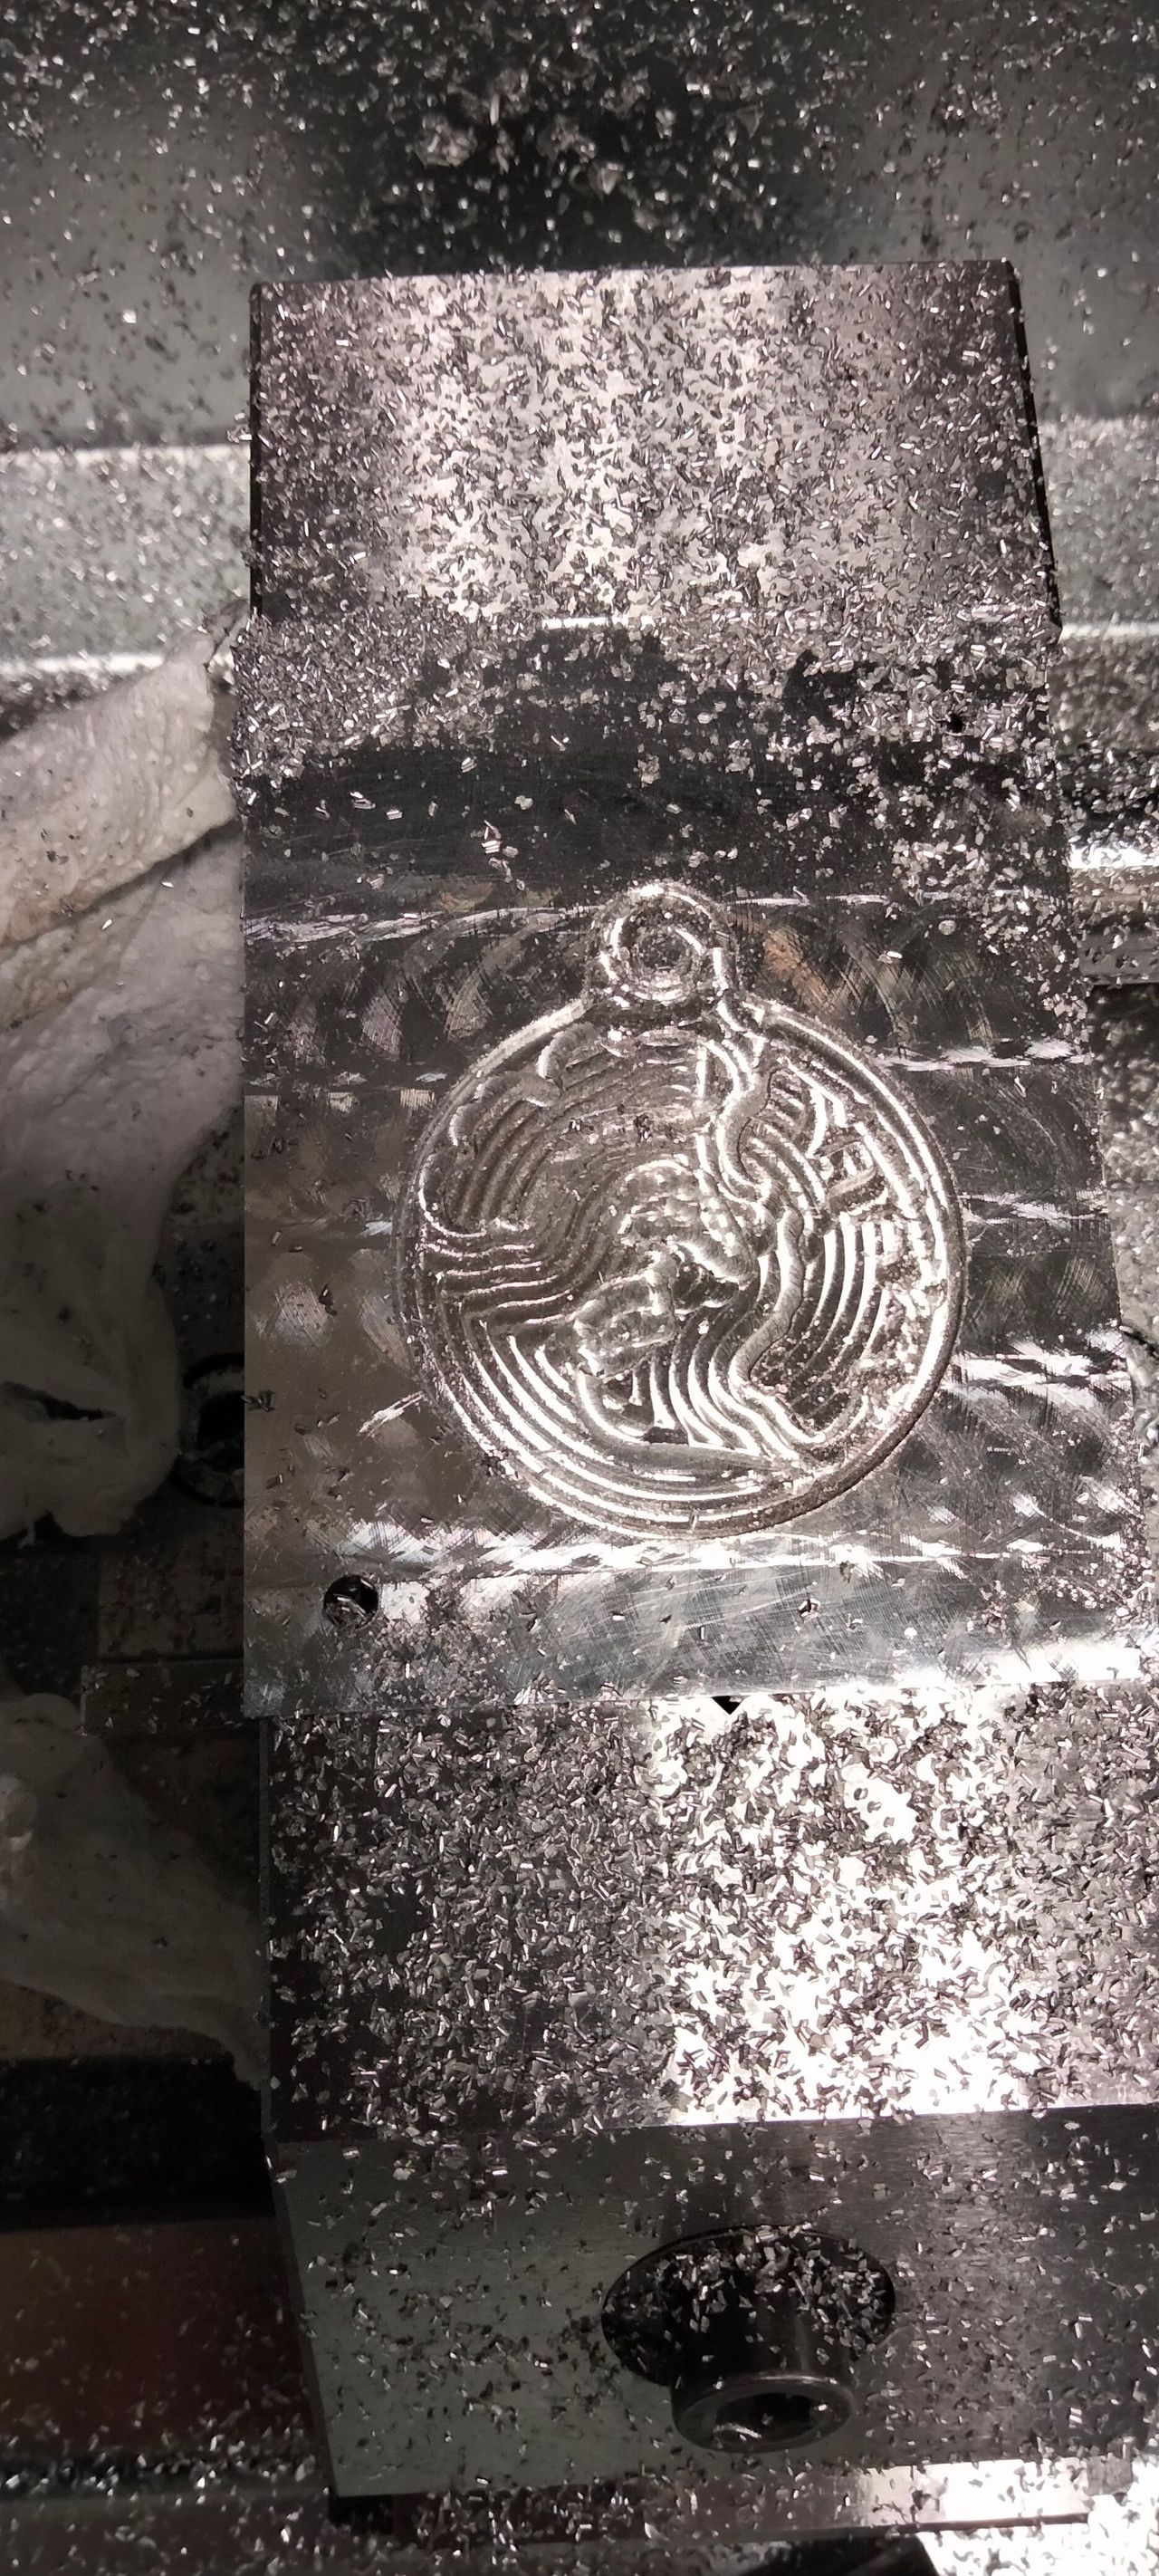
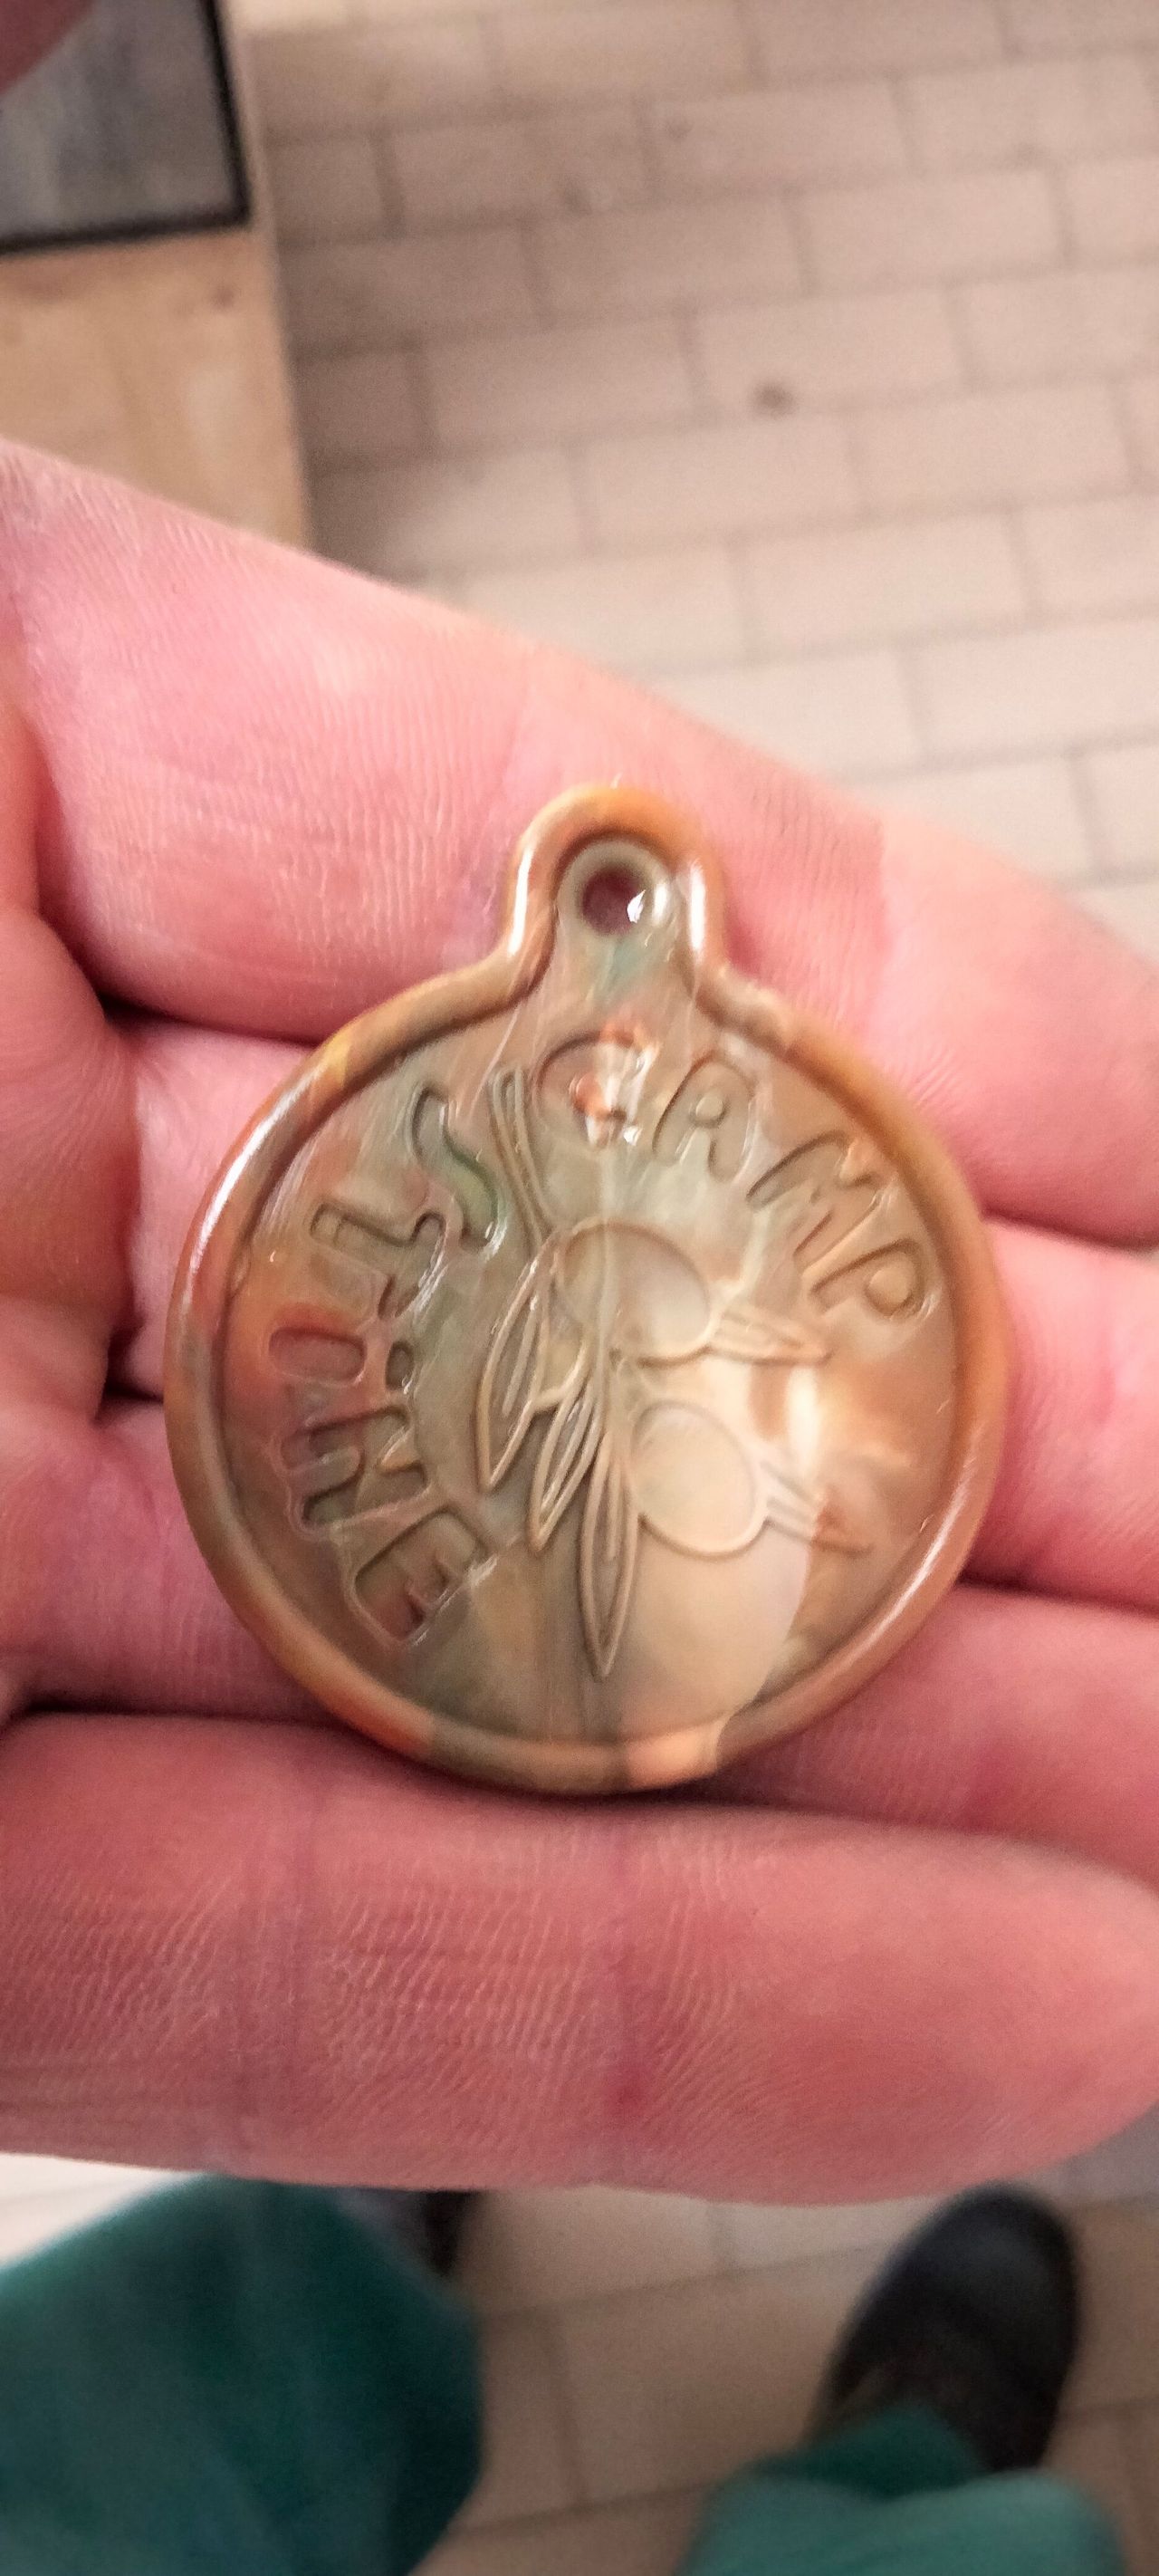
Then I made a small mold to make keychains for a friend who have a camping in Croatia.
Now I have to use the machine to make some parts for itself, mainly chip guards.


15
Started to build the table top fixture plate
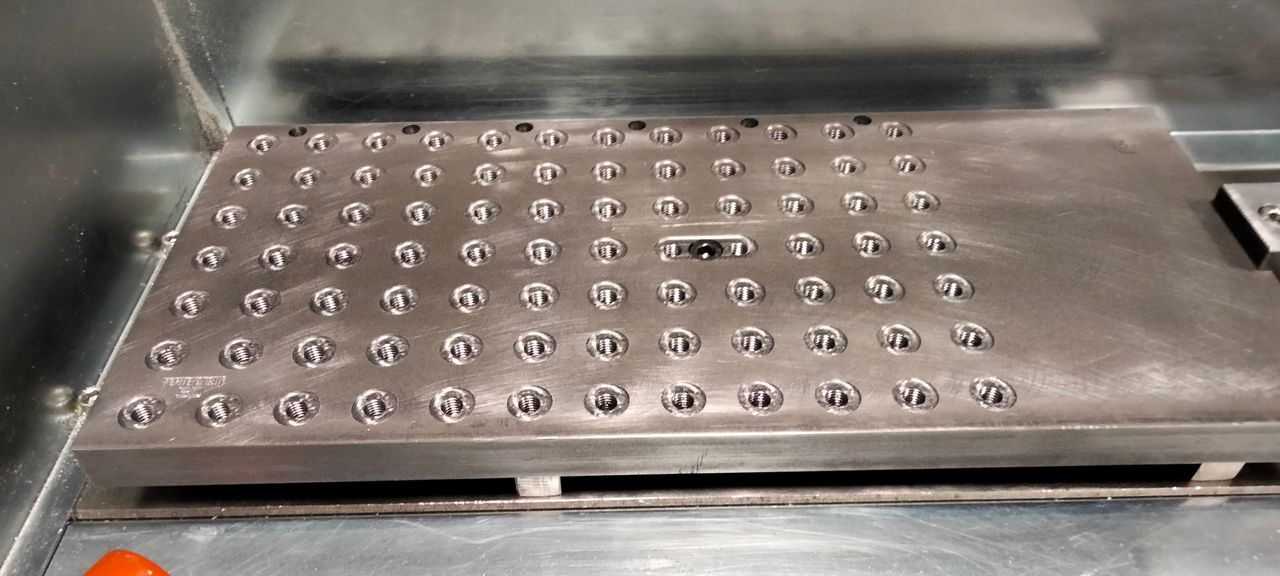
Published 8moPublished 9 months ago
Last week I started to work on the fixture plate for fixing big parts on the machine.
It is coming out well!
Made from a C45 drawn bar, 180x20x410mm
16
A couple of videos of the running machine.
Published 8mo. Edited 8moPublished 9 months ago. Last edit 9 months ago
Button mould
17
Fixture plate
Published 8mo. Edited 8moPublished 9 months ago. Last edit 9 months ago

18
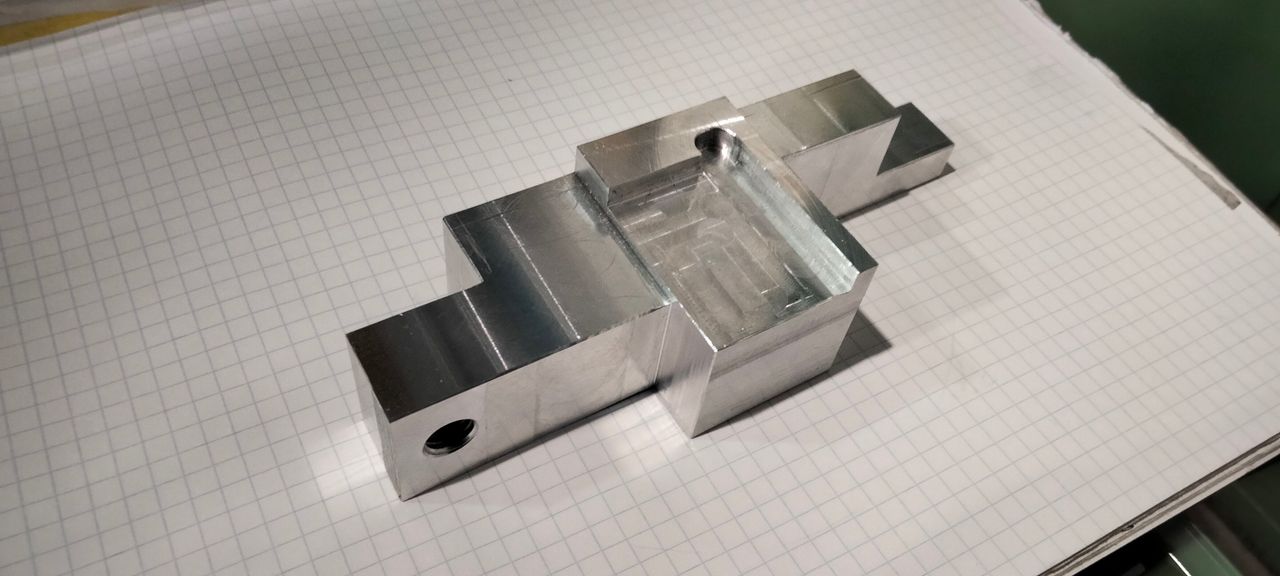
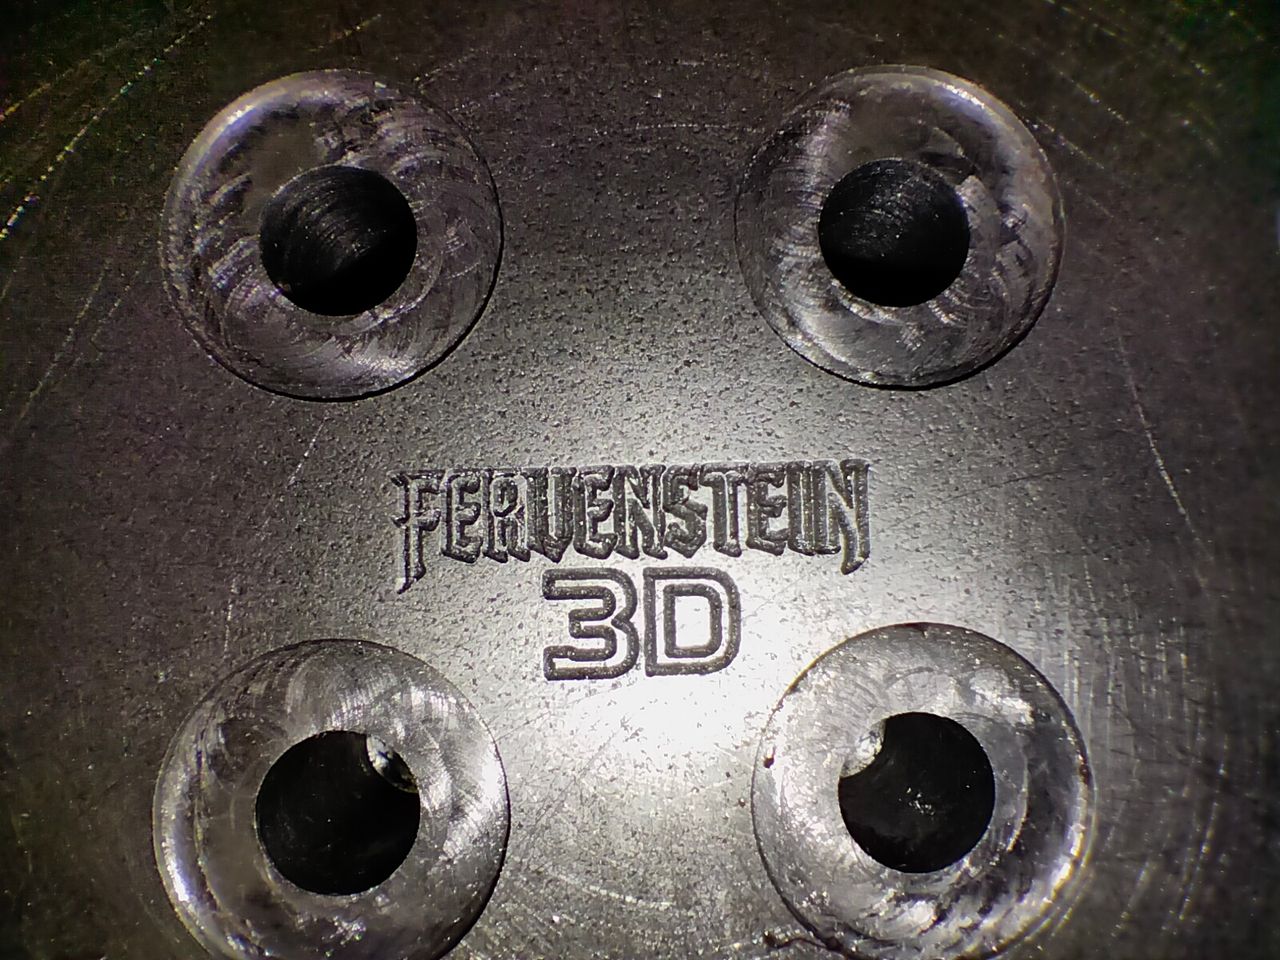
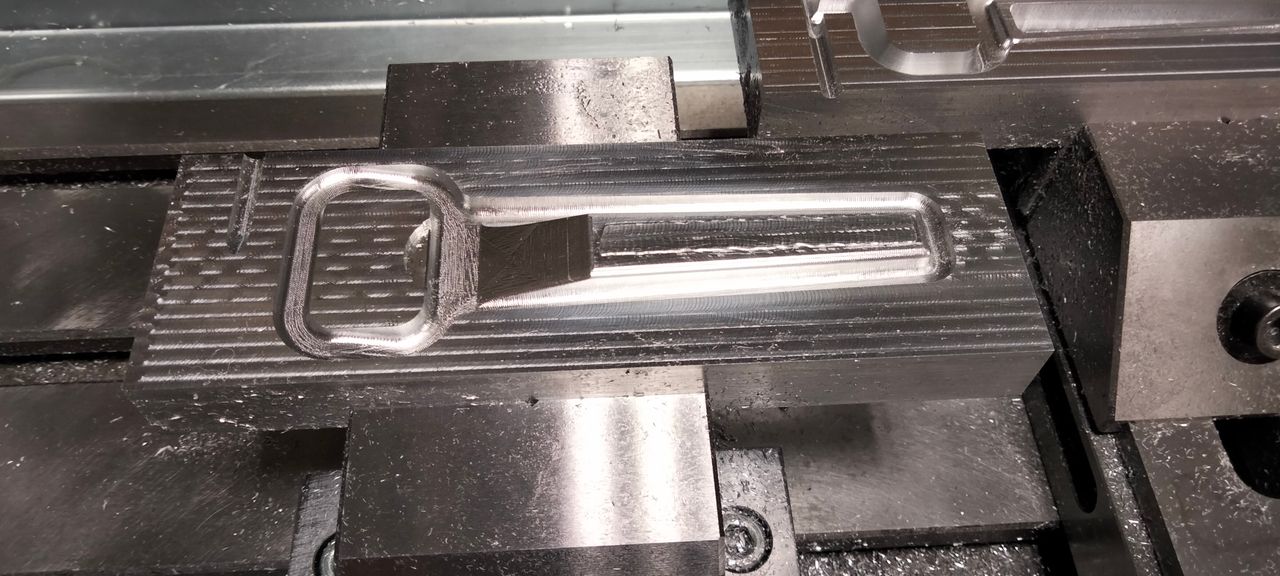
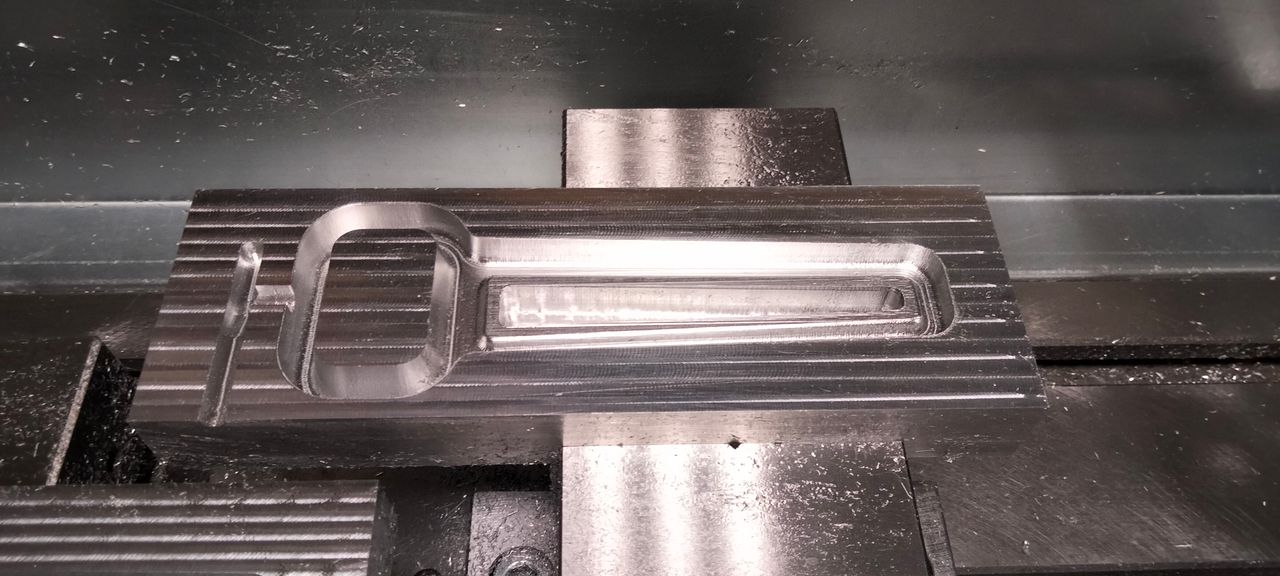
Another mould...
Published 6mo. Edited 6moPublished 6 months ago. Last edit 6 months ago
After almost 70 days of forced stop becuse of a broken vertebrae, I slowly restarted making something.
I refined a little my knowledge on CAM strategies and made this, a bottle opener mould.
It isn't finished yet, but for now the results are satisfying.
The machine seems to be precise and fast.
Video for the part one:
https://youtu.be/6nXyIVYt6zM?si=jub8crCBrok7wqbc
Part two.
https://youtu.be/jDHkNi4Kjdw?si=gTWHcCdjQBP67n7H
%20--%3e%3csvg%20version='1.1'%20id='Layer_1'%20xmlns='http://www.w3.org/2000/svg'%20xmlns:xlink='http://www.w3.org/1999/xlink'%20x='0px'%20y='0px'%20viewBox='0%200%2064%2063'%20style='enable-background:new%200%200%2064%2063;'%20xml:space='preserve'%3e%3cstyle%20type='text/css'%3e%20.st0{fill:%2320B7EB;}%20.st1{fill:%23E9475A;}%20.st2{fill:%23FECE4E;}%20%3c/style%3e%3cdesc%3eCreated%20with%20Sketch.%3c/desc%3e%3cg%20id='Page-1'%3e%3cg%20id='OA-Logo-Black-Background'%3e%3cpath%20id='Shape'%20class='st0'%20d='M14.1,30.1c-1.5-0.8-8.6-3.8-14.1-7.8c1.8-3.4,3.1-5.6,5-9.1c2.7,1.1,1.9,0.5,4.6,1.7%20c0.8,0.4,10.1,4.5,13.8,6.2c2.4,1.1,4.7,2.2,7,3.3L43,30.5l8.1,3.9c4,2,7.2,3.5,11.3,5.5c0.5,0.3-3.7,9.4-3.7,9.4%20c-1.7-0.6-3.9-1.8-5.5-2.5c-4.7-2.1-9-3.9-13.7-6c-4-1.8-6.7-2.9-10.8-4.5C25,34.9,17.1,31.6,14.1,30.1z'/%3e%3cpath%20id='Shape_1_'%20class='st1'%20d='M12.1,54.9c-0.8,0.6-1.6,1.2-2.5,1.6c-0.4-0.5-0.9-1-1.3-1.5c-0.3-1.2-2.3-4.9-2.7-6.2%20c-0.1-0.4-0.7-2.2-0.8-2.6c0,0,5-3.4,8.2-5.9c3.2-2.6,6.2-5,9.3-7.5c1.4-1.1,3.9-2.5,5.3-3.5c2.5-1.7,13-9.1,15.6-10.5%20c5.4-3.3,11.1-6.3,16.8-9c1.7,3.5,1.8,3,3.8,6.9c0,0-17.8,13.5-22.7,17.1c-3.8,2.8-7.5,5.7-11.3,8.5c-1.7,1.3-3.5,2.4-5.2,3.7'/%3e%3cpath%20id='Shape_2_'%20class='st2'%20d='M20.8,2.9l-0.2-0.8C25,0,31.2-0.3,31.4,0.2c0.4,1.1,0.9,2.2,1.2,3.4c1.4,4.4,2.7,8.7,4,13.1%20c0.4,1.4,2.8,10,2.9,10.5c0.5,2.8,1.2,5.6,1.6,8.4c0.8,4.7,1.4,8.6,2.3,13.3c0.6,3.1,1.3,6.3,2.3,11.3c0,0-5.8,1.4-7.5,1.8%20c-0.8,0.2-1.5,0.4-2.4,0.6c-0.3-1.1-0.2-1.2-0.5-2.1c-0.9-3.7-1.8-7.3-2.6-11c-1.5-6.4-3-12.9-4.4-19.3%20c-1.2-5.4-2.6-10.7-4.4-15.9c-1-3.1-1.8-6.3-2.7-9.5C21.1,3.8,21,3.8,20.8,2.9z'/%3e%3c/g%3e%3c/g%3e%3c/svg%3e)