
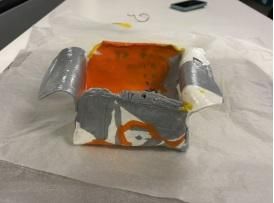
Make a Box from 3D Printing Scraps
Did you know you can take your failed prints and print scraps and melt them down to make things? In this “how to” you will be making a bowl from a melted sheet of PLA. This process is hot and includes high temperature in order to melt and mold the plastic effectively. In this, we will use a Cricket EasyPress and a Chandler Tool Heat gun.meltingcompression
More Information

%20--%3e%3csvg%20version='1.1'%20id='Layer_1'%20xmlns='http://www.w3.org/2000/svg'%20xmlns:xlink='http://www.w3.org/1999/xlink'%20x='0px'%20y='0px'%20viewBox='0%200%2064%2063'%20style='enable-background:new%200%200%2064%2063;'%20xml:space='preserve'%3e%3cstyle%20type='text/css'%3e%20.st0{fill:%23231F20;}%20%3c/style%3e%3cdesc%3eCreated%20with%20Sketch.%3c/desc%3e%3cg%20id='Page-1'%3e%3cg%20id='OA-Logo-Black-Background'%3e%3cpath%20id='Shape'%20class='st0'%20d='M14.1,30.1c-1.5-0.8-8.6-3.8-14.1-7.8c1.8-3.4,3.1-5.6,5-9.1c2.7,1.1,1.9,0.5,4.6,1.7%20c0.8,0.4,10.1,4.5,13.8,6.2c2.4,1.1,4.7,2.2,7,3.3L43,30.5l8.1,3.9c4,2,7.2,3.5,11.3,5.5c0.5,0.3-3.7,9.4-3.7,9.4%20c-1.7-0.6-3.9-1.8-5.5-2.5c-4.7-2.1-9-3.9-13.7-6c-4-1.8-6.7-2.9-10.8-4.5C25,34.9,17.1,31.6,14.1,30.1z'/%3e%3cpath%20id='Shape_1_'%20class='st0'%20d='M12.1,54.9c-0.8,0.6-1.6,1.2-2.5,1.6c-0.4-0.5-0.9-1-1.3-1.5c-0.3-1.2-2.3-4.9-2.7-6.2%20c-0.1-0.4-0.7-2.2-0.8-2.6c0,0,5-3.4,8.2-5.9c3.2-2.6,6.2-5,9.3-7.5c1.4-1.1,3.9-2.5,5.3-3.5c2.5-1.7,13-9.1,15.6-10.5%20c5.4-3.3,11.1-6.3,16.8-9c1.7,3.5,1.8,3,3.8,6.9c0,0-17.8,13.5-22.7,17.1c-3.8,2.8-7.5,5.7-11.3,8.5c-1.7,1.3-3.5,2.4-5.2,3.7'/%3e%3cpath%20id='Shape_2_'%20class='st0'%20d='M20.8,2.9l-0.2-0.8C25,0,31.2-0.3,31.4,0.2c0.4,1.1,0.9,2.2,1.2,3.4c1.4,4.4,2.7,8.7,4,13.1%20c0.4,1.4,2.8,10,2.9,10.5c0.5,2.8,1.2,5.6,1.6,8.4c0.8,4.7,1.4,8.6,2.3,13.3c0.6,3.1,1.3,6.3,2.3,11.3c0,0-5.8,1.4-7.5,1.8%20c-0.8,0.2-1.5,0.4-2.4,0.6c-0.3-1.1-0.2-1.2-0.5-2.1c-0.9-3.7-1.8-7.3-2.6-11c-1.5-6.4-3-12.9-4.4-19.3%20c-1.2-5.4-2.6-10.7-4.4-15.9c-1-3.1-1.8-6.3-2.7-9.5C21.1,3.8,21,3.8,20.8,2.9z'/%3e%3c/g%3e%3c/g%3e%3c/svg%3e)


1
Gathering Supplies and Safety Gear
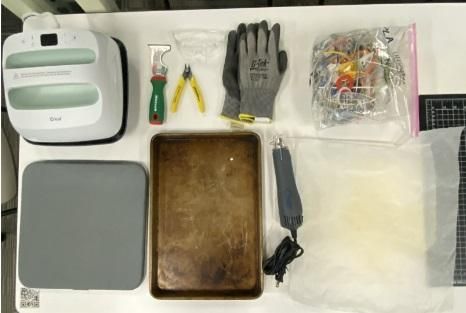
You will need:
- Heat resistant glove/Oven mitts
- Clippers/Wire Cutters
- Safety Goggles
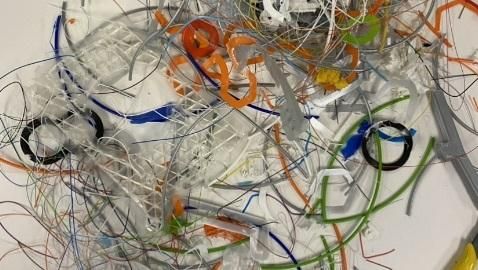
- PLA Scraps
- Cricket EasyPress (or similar that goes up to 400°F)
- Chandler Tool Heat gun (or a heat gun that can go over 400°F)
- a cookie sheet
- parchment paper
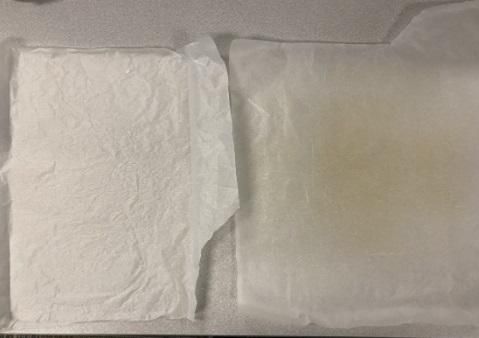
Although parchment paper is generally good with high heat, it still scorches. The scorching looks darker and yellow. When the paper gets scorched, you can replace it with a new one.
2
Breaking Down The Scraps
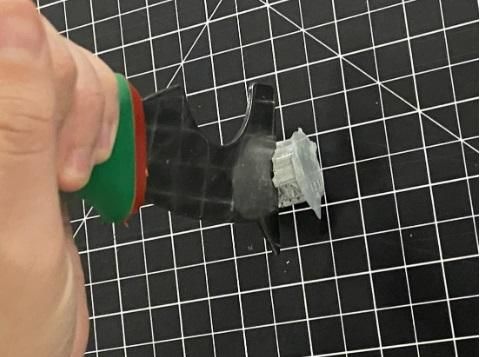
Some scraps may be too large for the easy press to melt. If this is the case, grab the clippers and a pair of safety goggles. Use clippers to break down the plastic.
If the clippers cannot break down the plastic, I suggest using a spatula with a sharp edge and a mallet.
3
Melting the Basic Shape
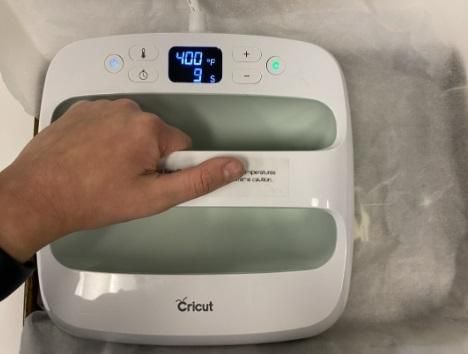
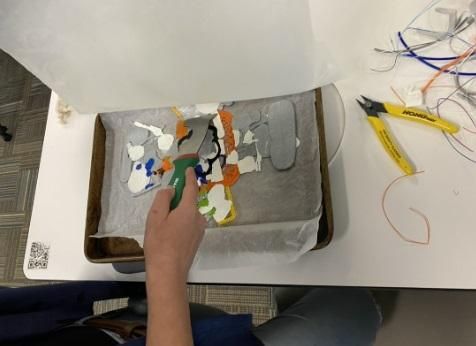
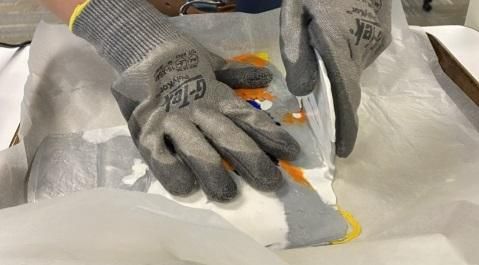
Turn on the EasyPress and set the temperature to 400°F and the time to 30 seconds. As it heats up, get your 3D printing scraps out.
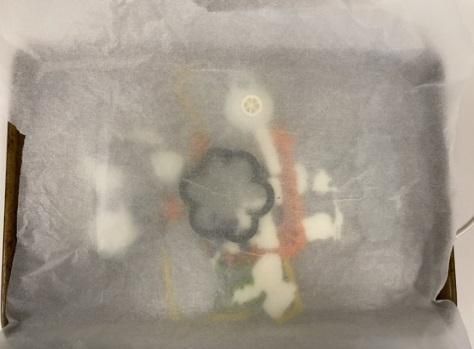
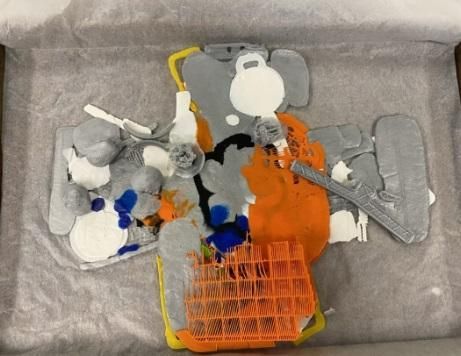
Grab the cookie sheet and lay a sheet of parchment paper on it. Take larger scraps (this is a good time to use failed prints) and lay them in an arrangement of a plus sign. The plus sign will allow us to bend the walls up easier than making a square.
Lay another layer of parchment paper on top of the scraps. When the EasyPress is done heating up, hold the EasyPress down on the second layer of parchment paper and (for the Crickets) press the Cricket Button to start the timer. For non-cricket users, hold the press down for 30 seconds to a minute. For larger objects, such as failed prints, you need to press the button for the timer twice.
You can melt the PLA down till you reach your desired thickness of the sheet.
4
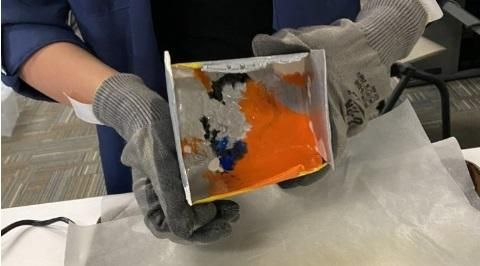
Melting and Cutting the Sheet
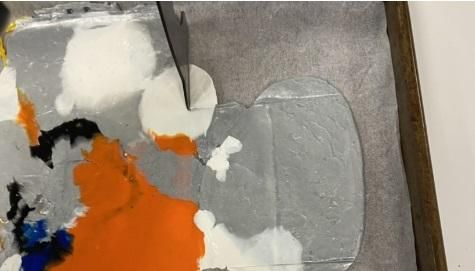
After you melt the big scraps, you can use medium sized and smaller scraps to fill in the gaps. You can also add more to the shape if the larger pieces fail to fill in the ideal area. For the smaller pieces, less time is required but you can keep melting the plastic and adding more scraps to the desired area until it's filled in.
If you want the edges of the box to be straight, you can use a spatula while the PLA is still hot and press into the sheet where you want the edge to be.
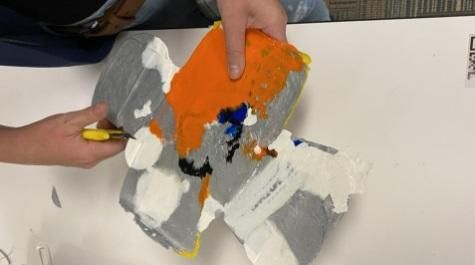
When done, you can put the Cricket EasyPress away and let the plastic cool to the point of stiffness.
When it's done cooling and safe to touch you can wear goggles and use the clippers to snap off the plastic at the line created by the spatula. When you cut it, the plastic may snap off and go flying.
5
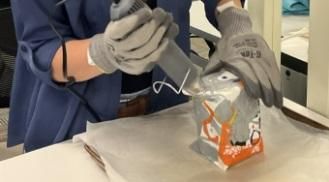
Molding the Sheet
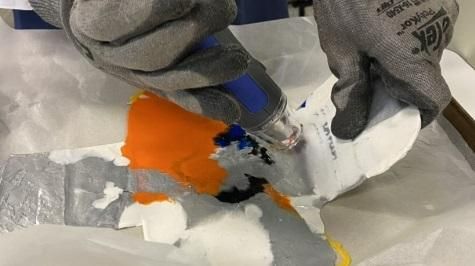
Wear heat resistant gloves or oven mitts.
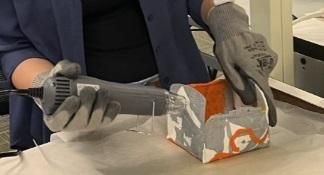
In this step, we will use a Chandler Tool Heat Gun but any heat gun that can reach or goes over 400°F will work.
In the area where you want to bend the plastic so that it's upright and forms something like a 90° angle, move the heat gun in a line. Do this motion back and forth until the plastic can bend. Bend the plastic so that it's upright, hold that position till it cools and does not move back.
Repeat this for the rest of the sides.
6
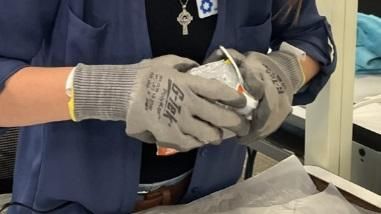
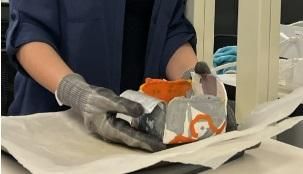
Melting the Corners
For the corners, use the heat gun along the corners of the walls. When they are easily malleable, press the two ends of the wall together and hold till it cools and becomes stiff.
Repeat for the other corners.
7
Make Handles
This is like step 5, except that you bend the top parts of the side walls down.
Use the heat gun on the area where you want the part to bend. Hold until the handle is stiff. Repeat on the other side.
And your box is complete!
%20--%3e%3csvg%20version='1.1'%20id='Layer_1'%20xmlns='http://www.w3.org/2000/svg'%20xmlns:xlink='http://www.w3.org/1999/xlink'%20x='0px'%20y='0px'%20viewBox='0%200%2064%2063'%20style='enable-background:new%200%200%2064%2063;'%20xml:space='preserve'%3e%3cstyle%20type='text/css'%3e%20.st0{fill:%2320B7EB;}%20.st1{fill:%23E9475A;}%20.st2{fill:%23FECE4E;}%20%3c/style%3e%3cdesc%3eCreated%20with%20Sketch.%3c/desc%3e%3cg%20id='Page-1'%3e%3cg%20id='OA-Logo-Black-Background'%3e%3cpath%20id='Shape'%20class='st0'%20d='M14.1,30.1c-1.5-0.8-8.6-3.8-14.1-7.8c1.8-3.4,3.1-5.6,5-9.1c2.7,1.1,1.9,0.5,4.6,1.7%20c0.8,0.4,10.1,4.5,13.8,6.2c2.4,1.1,4.7,2.2,7,3.3L43,30.5l8.1,3.9c4,2,7.2,3.5,11.3,5.5c0.5,0.3-3.7,9.4-3.7,9.4%20c-1.7-0.6-3.9-1.8-5.5-2.5c-4.7-2.1-9-3.9-13.7-6c-4-1.8-6.7-2.9-10.8-4.5C25,34.9,17.1,31.6,14.1,30.1z'/%3e%3cpath%20id='Shape_1_'%20class='st1'%20d='M12.1,54.9c-0.8,0.6-1.6,1.2-2.5,1.6c-0.4-0.5-0.9-1-1.3-1.5c-0.3-1.2-2.3-4.9-2.7-6.2%20c-0.1-0.4-0.7-2.2-0.8-2.6c0,0,5-3.4,8.2-5.9c3.2-2.6,6.2-5,9.3-7.5c1.4-1.1,3.9-2.5,5.3-3.5c2.5-1.7,13-9.1,15.6-10.5%20c5.4-3.3,11.1-6.3,16.8-9c1.7,3.5,1.8,3,3.8,6.9c0,0-17.8,13.5-22.7,17.1c-3.8,2.8-7.5,5.7-11.3,8.5c-1.7,1.3-3.5,2.4-5.2,3.7'/%3e%3cpath%20id='Shape_2_'%20class='st2'%20d='M20.8,2.9l-0.2-0.8C25,0,31.2-0.3,31.4,0.2c0.4,1.1,0.9,2.2,1.2,3.4c1.4,4.4,2.7,8.7,4,13.1%20c0.4,1.4,2.8,10,2.9,10.5c0.5,2.8,1.2,5.6,1.6,8.4c0.8,4.7,1.4,8.6,2.3,13.3c0.6,3.1,1.3,6.3,2.3,11.3c0,0-5.8,1.4-7.5,1.8%20c-0.8,0.2-1.5,0.4-2.4,0.6c-0.3-1.1-0.2-1.2-0.5-2.1c-0.9-3.7-1.8-7.3-2.6-11c-1.5-6.4-3-12.9-4.4-19.3%20c-1.2-5.4-2.6-10.7-4.4-15.9c-1-3.1-1.8-6.3-2.7-9.5C21.1,3.8,21,3.8,20.8,2.9z'/%3e%3c/g%3e%3c/g%3e%3c/svg%3e)