
Gamify plastic sorting
Published 1y. Edited 1yPublished almost 2 years ago. Last edit about 1 year ago
What if sorting plastic was so fun, it could be used to introduce new people to your Precious Plastic project?
What if it was so fun, your community would queue around the block to help out?
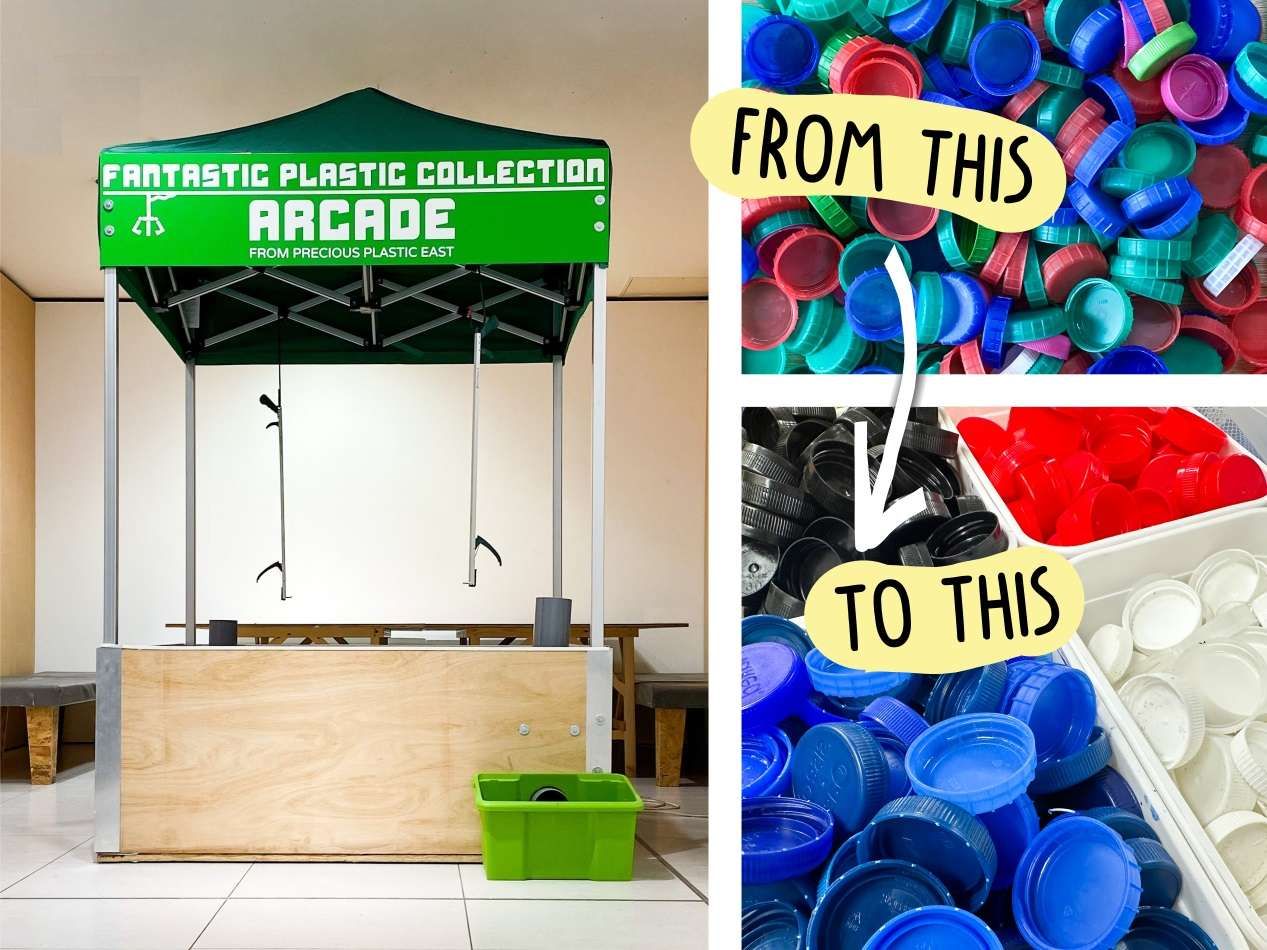
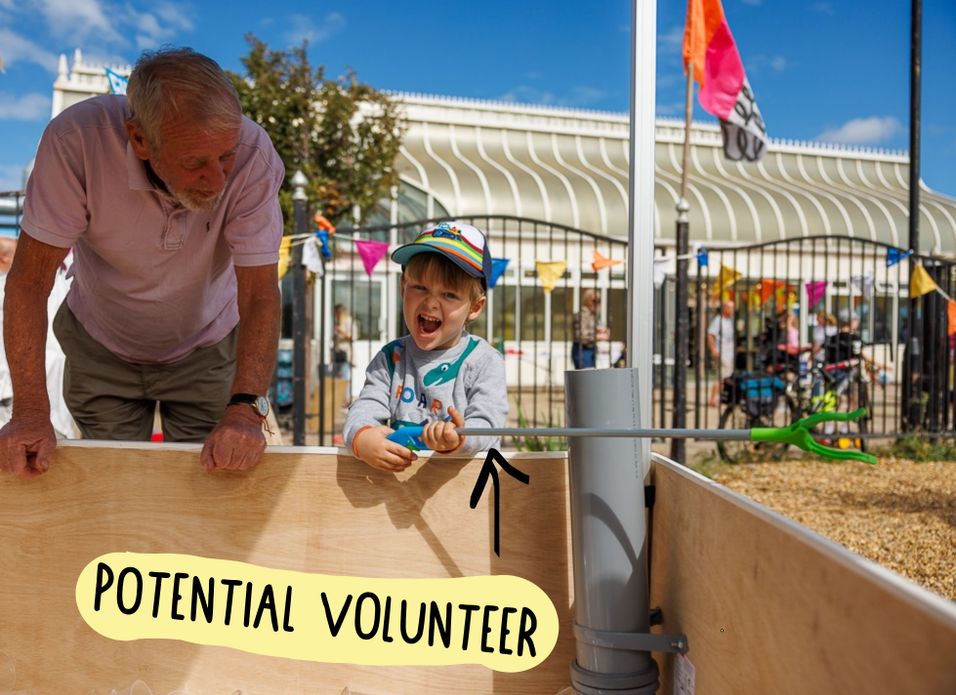
In 2022 we designed our first Litter Arcade machine to use at events to introduce new people to our Precious Plastic project. In fact we built three very different Litter Arcade machines, and this 'machine' was by far the most popular with all ages from children through to adults.
Now in 2024 we're excited to share a 'How-to' for building V2.0 which has been adapted to incorporate sorting plastic by colour into the game. This will allow you to transform a sack of mixed lids into organised bags of lids sorted by colour, while providing a fun activity that promotes your workshop. This Litter Arcade 'machine' also celebrates and improves litter picking skills, recruits volunteers, and provides the perfect opportunity to talk to people about the plastic problem. Every workshop should have one!Machines
other machinesorting
%20--%3e%3csvg%20version='1.1'%20id='Calque_1'%20xmlns='http://www.w3.org/2000/svg'%20xmlns:xlink='http://www.w3.org/1999/xlink'%20x='0px'%20y='0px'%20viewBox='0%200%2027.2%2027.8'%20style='enable-background:new%200%200%2027.2%2027.8;'%20xml:space='preserve'%3e%3ctitle%3eicon%20redirect%20new%3c/title%3e%3cg%3e%3cpath%20d='M27.2,26.5c-0.1-5-0.3-10-0.4-15c0-0.7-0.6-1.2-1.2-1.2s-1.2,0.6-1.2,1.2c0.1,4.6,0.3,9.1,0.4,13.7%20c-3.9-0.2-7.7-0.6-11.6-0.4c-3.3,0.2-6.7,0.5-10,0.4C2.8,19.5,2.7,13.7,2.5,8c2.9-0.1,5.8-0.8,8.6-0.7c1.6,0.1,1.6-2.4,0-2.5%20C7.8,4.6,4.5,5.7,1.2,5.5c-0.6,0-1,0.3-1.1,0.7C0,6.3,0,6.4,0,6.6c0,0,0,0.1,0,0.1c0,0,0,0,0,0.1c0.2,6.6,0.4,13.2,0.5,19.7%20c0,0.6,0.4,1.3,1.2,1.4c3.8,0.1,7.5-0.2,11.3-0.4c4.4-0.3,8.6,0.2,12.9,0.4c0.6,0,1-0.3,1.1-0.7C27.1,26.9,27.2,26.7,27.2,26.5z'/%3e%3cpath%20d='M12,12.6c-0.2,0.7,0.2,1.4,0.9,1.5c0.7,0.2,1.4-0.2,1.5-0.9v0c0.6-2.2,1.4-4.5,3.1-6c1.3-1.2,3-1.9,4.7-2.7%20c-0.4,1.3-0.8,2.6-1.4,3.8c-0.6,1.5,1.8,2.1,2.4,0.7c0.8-1.9,1.5-3.9,2-5.9c0-0.1,0-0.2,0-0.3c0.3-0.6,0.1-1.5-0.7-1.8%20C22.3,0.4,20,0,17.7,0c-0.7,0-1.2,0.6-1.2,1.2s0.6,1.2,1.2,1.2c0.9,0,1.7,0.1,2.6,0.2c-1.7,0.8-3.4,1.7-4.8,3%20C13.6,7.6,12.7,10.1,12,12.6z'/%3e%3c/g%3e%3c/svg%3e)
More Information

%20--%3e%3csvg%20version='1.1'%20id='Layer_1'%20xmlns='http://www.w3.org/2000/svg'%20xmlns:xlink='http://www.w3.org/1999/xlink'%20x='0px'%20y='0px'%20viewBox='0%200%2064%2063'%20style='enable-background:new%200%200%2064%2063;'%20xml:space='preserve'%3e%3cstyle%20type='text/css'%3e%20.st0{fill:%23231F20;}%20%3c/style%3e%3cdesc%3eCreated%20with%20Sketch.%3c/desc%3e%3cg%20id='Page-1'%3e%3cg%20id='OA-Logo-Black-Background'%3e%3cpath%20id='Shape'%20class='st0'%20d='M14.1,30.1c-1.5-0.8-8.6-3.8-14.1-7.8c1.8-3.4,3.1-5.6,5-9.1c2.7,1.1,1.9,0.5,4.6,1.7%20c0.8,0.4,10.1,4.5,13.8,6.2c2.4,1.1,4.7,2.2,7,3.3L43,30.5l8.1,3.9c4,2,7.2,3.5,11.3,5.5c0.5,0.3-3.7,9.4-3.7,9.4%20c-1.7-0.6-3.9-1.8-5.5-2.5c-4.7-2.1-9-3.9-13.7-6c-4-1.8-6.7-2.9-10.8-4.5C25,34.9,17.1,31.6,14.1,30.1z'/%3e%3cpath%20id='Shape_1_'%20class='st0'%20d='M12.1,54.9c-0.8,0.6-1.6,1.2-2.5,1.6c-0.4-0.5-0.9-1-1.3-1.5c-0.3-1.2-2.3-4.9-2.7-6.2%20c-0.1-0.4-0.7-2.2-0.8-2.6c0,0,5-3.4,8.2-5.9c3.2-2.6,6.2-5,9.3-7.5c1.4-1.1,3.9-2.5,5.3-3.5c2.5-1.7,13-9.1,15.6-10.5%20c5.4-3.3,11.1-6.3,16.8-9c1.7,3.5,1.8,3,3.8,6.9c0,0-17.8,13.5-22.7,17.1c-3.8,2.8-7.5,5.7-11.3,8.5c-1.7,1.3-3.5,2.4-5.2,3.7'/%3e%3cpath%20id='Shape_2_'%20class='st0'%20d='M20.8,2.9l-0.2-0.8C25,0,31.2-0.3,31.4,0.2c0.4,1.1,0.9,2.2,1.2,3.4c1.4,4.4,2.7,8.7,4,13.1%20c0.4,1.4,2.8,10,2.9,10.5c0.5,2.8,1.2,5.6,1.6,8.4c0.8,4.7,1.4,8.6,2.3,13.3c0.6,3.1,1.3,6.3,2.3,11.3c0,0-5.8,1.4-7.5,1.8%20c-0.8,0.2-1.5,0.4-2.4,0.6c-0.3-1.1-0.2-1.2-0.5-2.1c-0.9-3.7-1.8-7.3-2.6-11c-1.5-6.4-3-12.9-4.4-19.3%20c-1.2-5.4-2.6-10.7-4.4-15.9c-1-3.1-1.8-6.3-2.7-9.5C21.1,3.8,21,3.8,20.8,2.9z'/%3e%3c/g%3e%3c/g%3e%3c/svg%3e)


1
Watch the video
Before you throw yourself into building your own Litter Arcade 'machine' to gamify plastic sorting, this video will give you a flavour of the process. The detail of the build is below, and so use the video and the 'How-to' description below together to master this build.
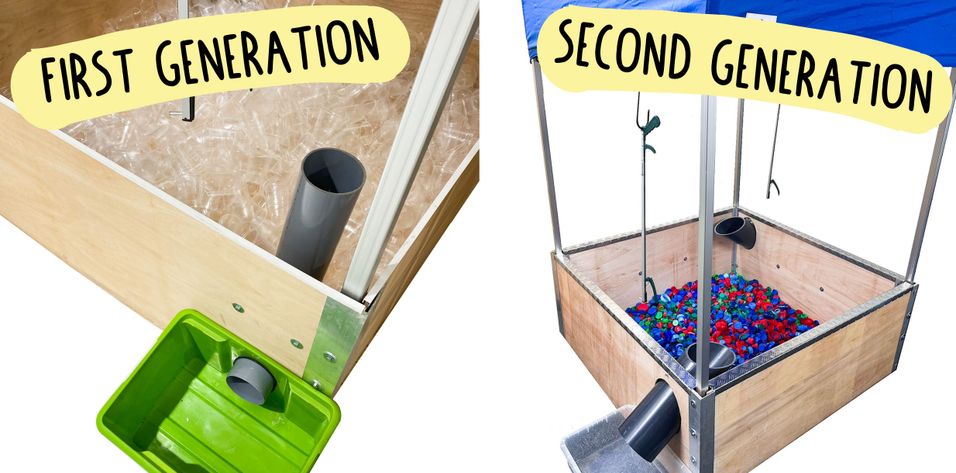
This is the second generation of our Litter Arcade 'machine' and we are sure there are many improvements we could make for generation three. We'd love to hear your suggestions. If you build your own we'd love to hear how it goes and how your community respond to it. We're also sure there are many other ways to gamify plastic sorting. We're really curious to hear your ideas and suggestions.
2
What you're building
Here's what you're building, and why it looks the way it does.
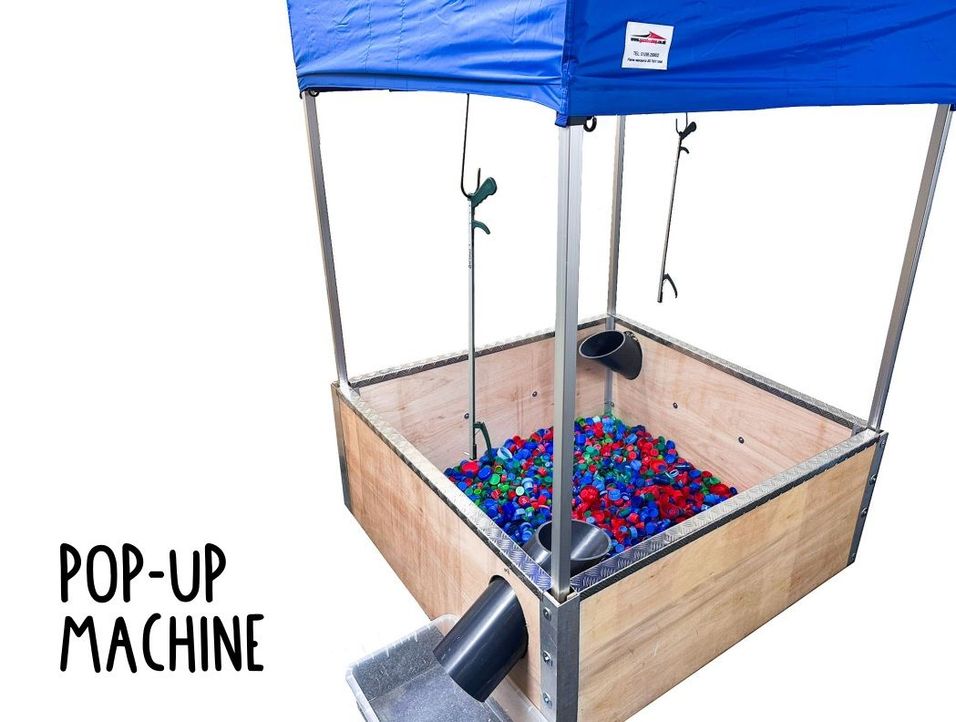
We set ourselves the design specifications of creating a Litter Arcade 'machine' inspired by the grabber machines in our home town of Great Yarmouth. The design needed to work at events, festivals and community gatherings as a pop-up. So it needs to be constructed and dismantled quickly. We don't have a van, and so we also needed it to fit into the luggage space in an average car. We have an estate car that we use to take stuff to events, though this 'machine' is rarely the only thing we're transporting to the event.
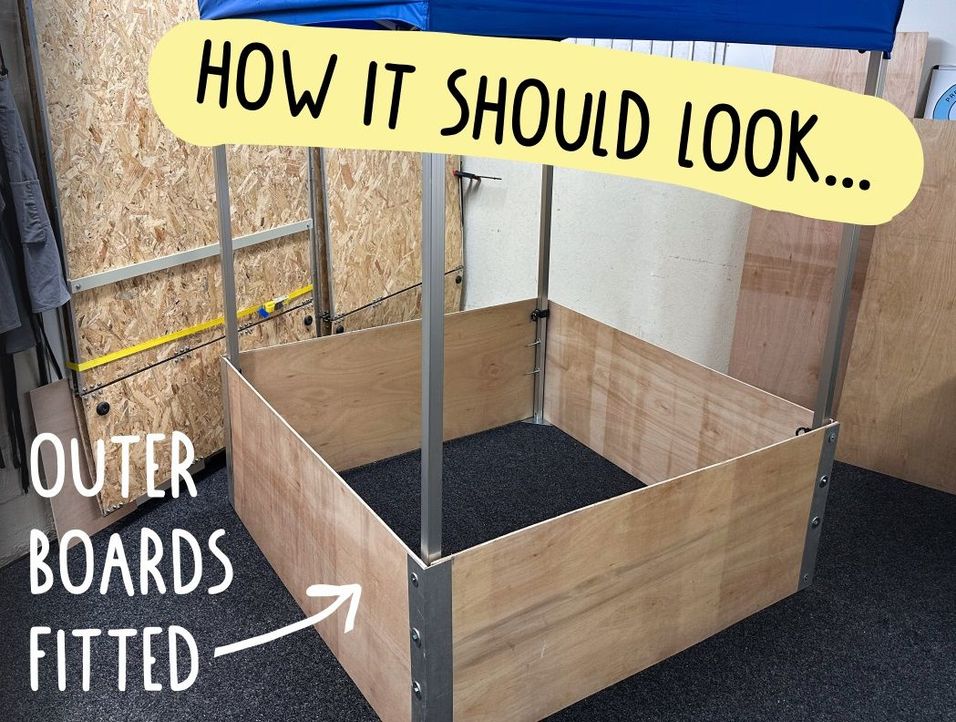
Among the options we don't go into within the 'How-to' are, the number of collection tubes, which dictate the number of participants. What is depicted here is a classic head-to-head set up with two tubes. We plan to add two more tubes to this before the summer so that we can engage four participants at a time. Outer panel decoration adds some pizzazz. Add this to the boards before adding corner pieces.
3
The stuff you will need
Parts:
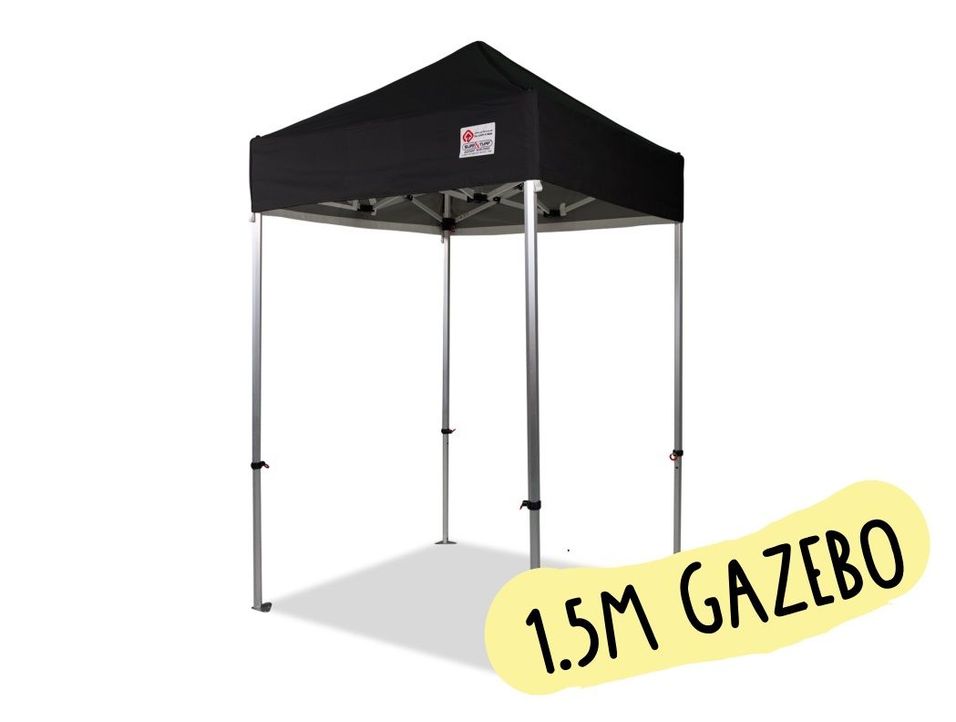
1 x 1500mm x 1500mm gazebo
8 x 1830mm x 610mm x 12mm marine plywood boards
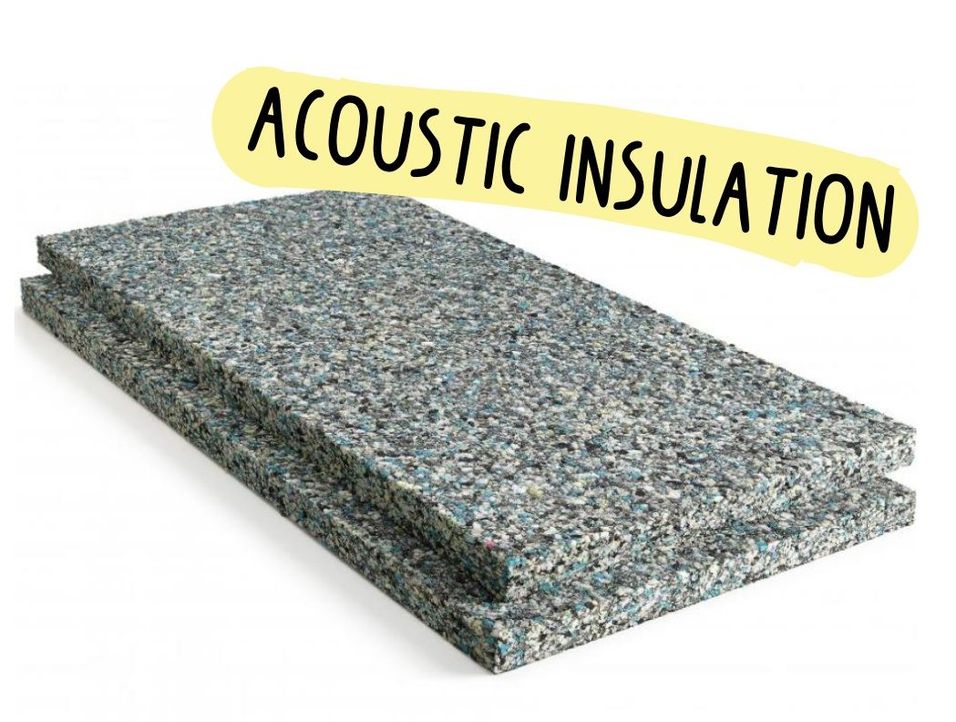
4 x 1500mm x 600mm sheets of acoustic insulation
1 x 2000mm x 2000mm tarpaulin with eyelets
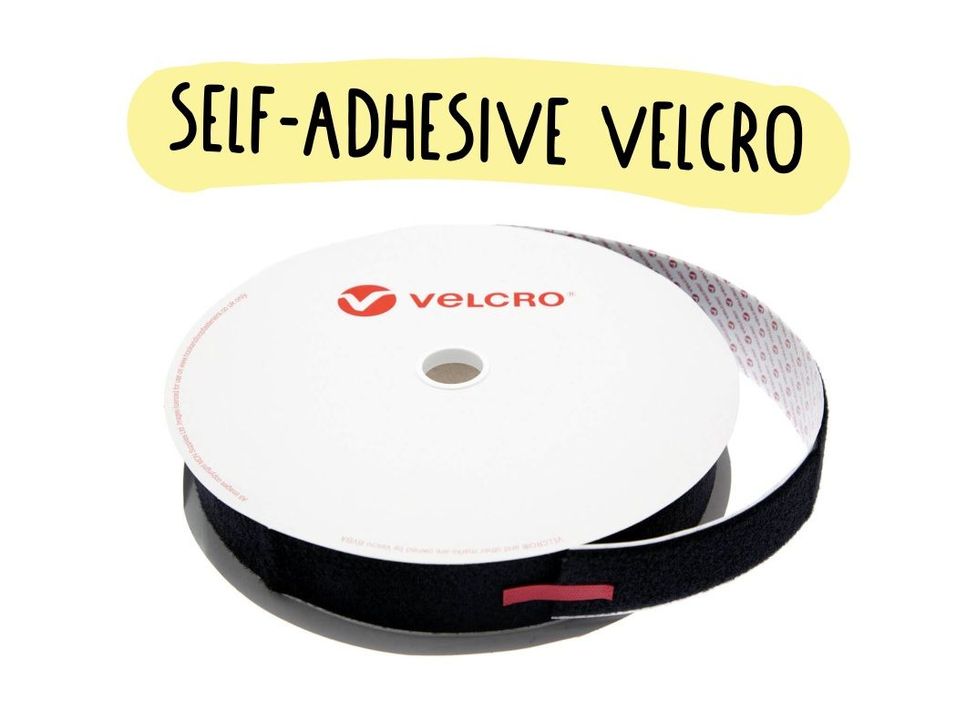
50mm width self-adhesive Velcro with heavy duty adhesive
4 x self-adhesive hooks
2000mm of pipe in the diameter you desire (we chose 500mm)
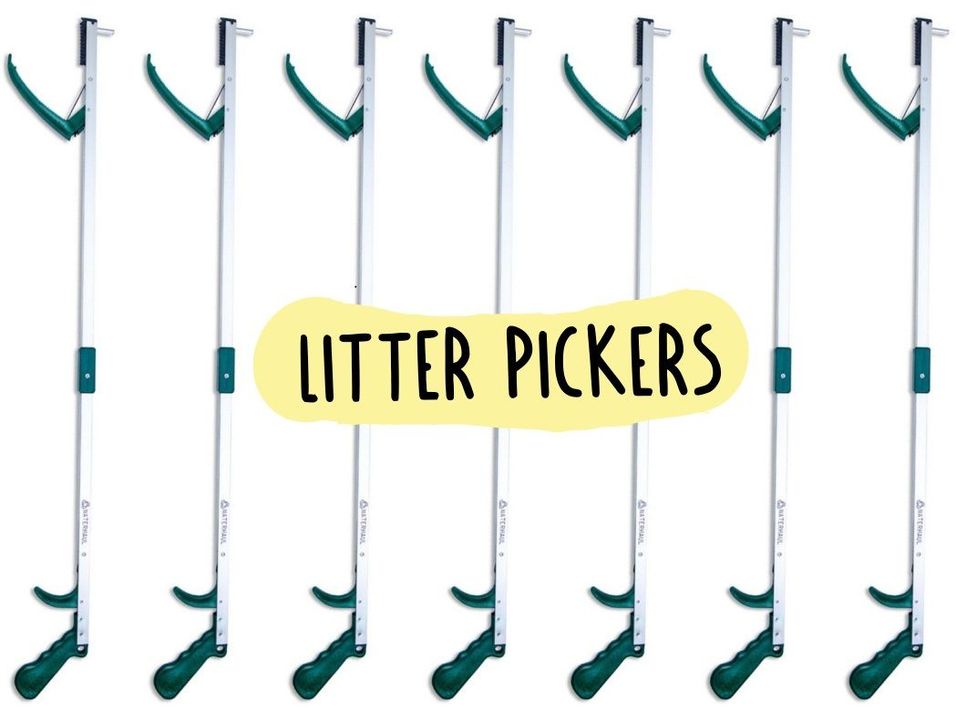
4 x Litter pickers
4 x large hooks (compatible with displaying the litter pickers)
Bags of waste plastic that need sorting by colour
Nuts & bolts etc:
8 x 5mm x 30mm bolts with allen key cap head
Nylon lock threaded nuts: 8 x 5mm, 8 x 6mm, 8 x 8mm
8 x 6mm x 50mm bolts
8 x 8mm x 80mm bolts
16 x washers with an 5mm hole
Penny washers 16 with an 8mm and 16 with a 6mm hole

-1938cc96ed2.png?width=956&resize=contain)

4
The tools you will need
The great news about this build is that it doesn't require any specialist tools. In fact you could use hand tools throughout if you have a range of hand saws and a hand operated drill.
Tools:
A pen or pencil to mark wood ahead of cutting
A set of allen keys
A tape measure
A set of spanners/wrenches
A saw, manual or powered, for cutting plywood board
A saw, manual or powered, for cutting aluminium
A drill with 6mm and 8mm drill bits for wood and aluminium
A file for shaping aluminium
A jigsaw, manual or powered, for cutting plywood board
1 x small paint roller and tray
-1938d180313.png?width=956&resize=contain)
5
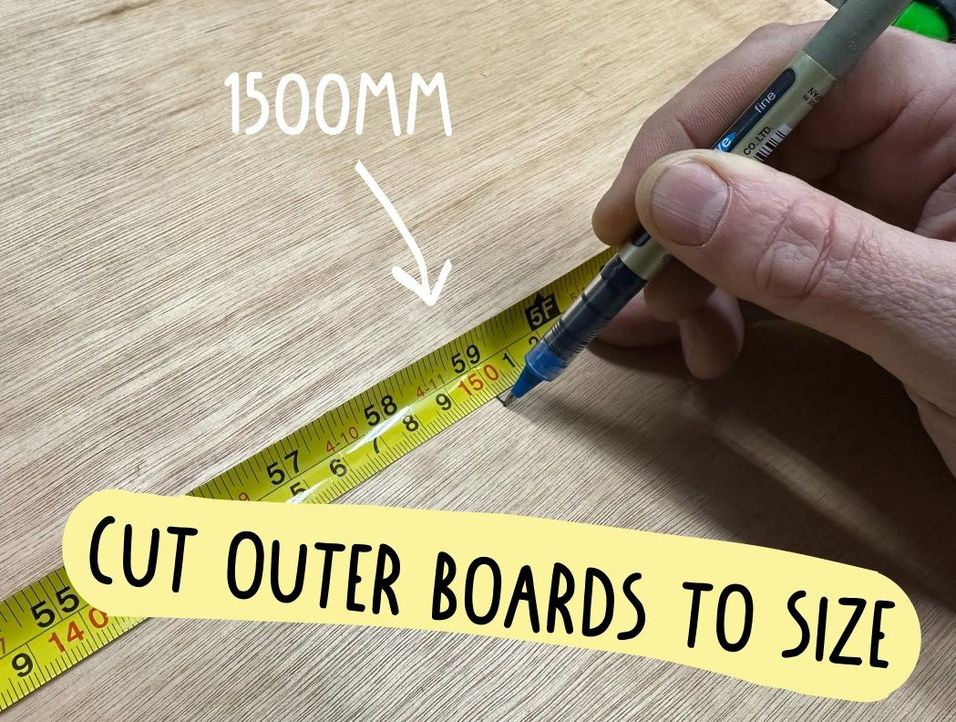
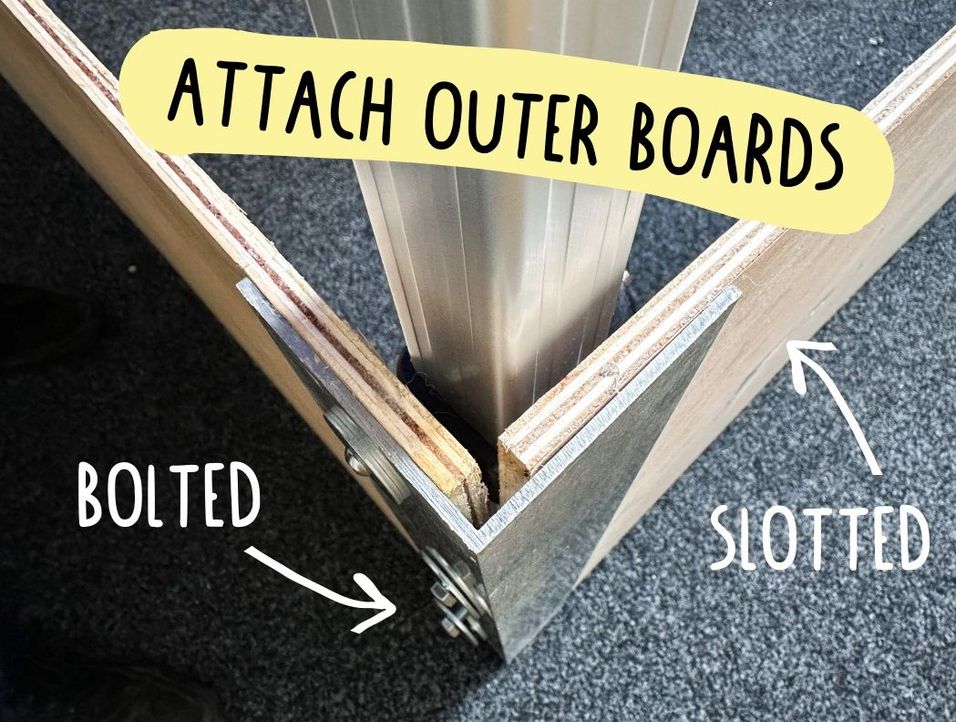
Cut side boards and secure corner pieces
Measure and cut four of your 1830mm x 610mm plywood boards to a length of 1500mm. If you're planning to add decoration to the outer face of the outer boards, this is the time to do it before attaching corner pieces.
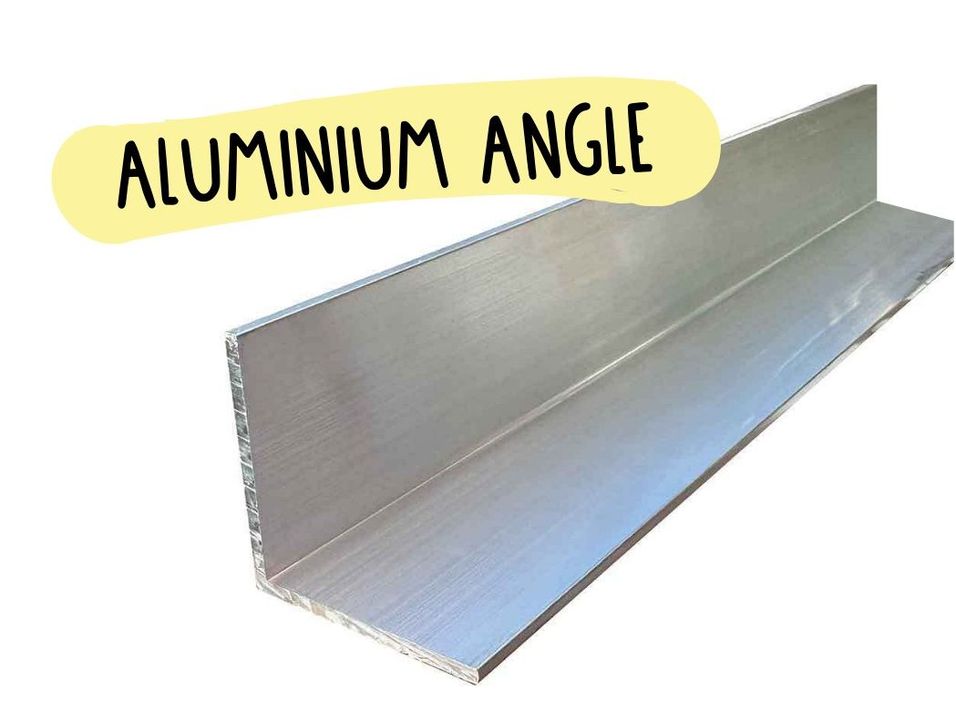
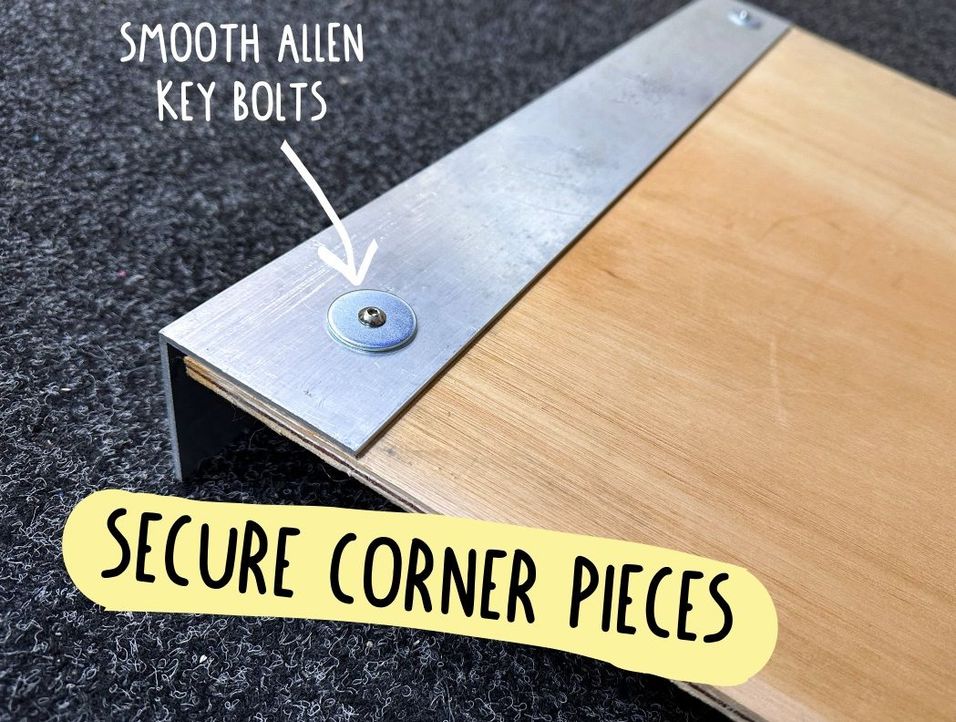
Cut the 50mm x 50mm corner angles to 610mm lengths. On one side of the angle drill a 6mm hole 50mm from each end. You will now have four pieces of corner angle cut to 610mm, each with two holes. Clamp one angle to the end of each board. Use the holes you've already drilled in the corner angle as a guide to drill through the plywood and use 5mm x 30mm bolts, washers and 5mm nuts to secure the corner angle to the end of the plywood.
Your outer boards will now be cut to their final length and each board will have a corner angle piece at one end, secured with 5mm bolts. The outer boards in this form will be how the outer boards will be stored and transported when going to events. there is no need to dismantle them further than this when dismantling the Litter Arcade.
6
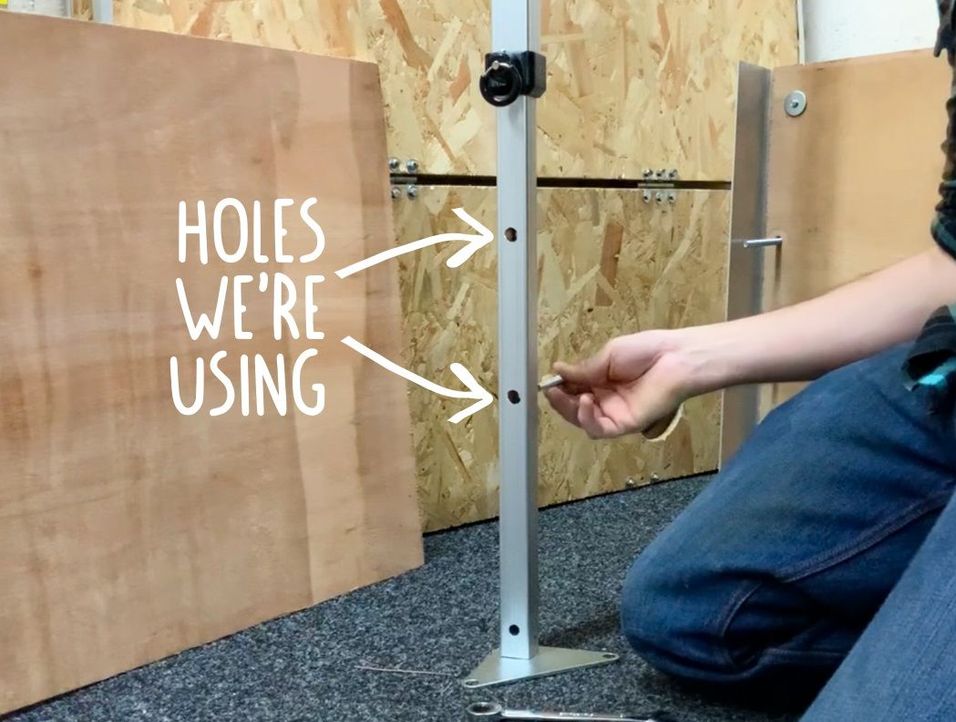
Erect the gazebo and drill holes for sides
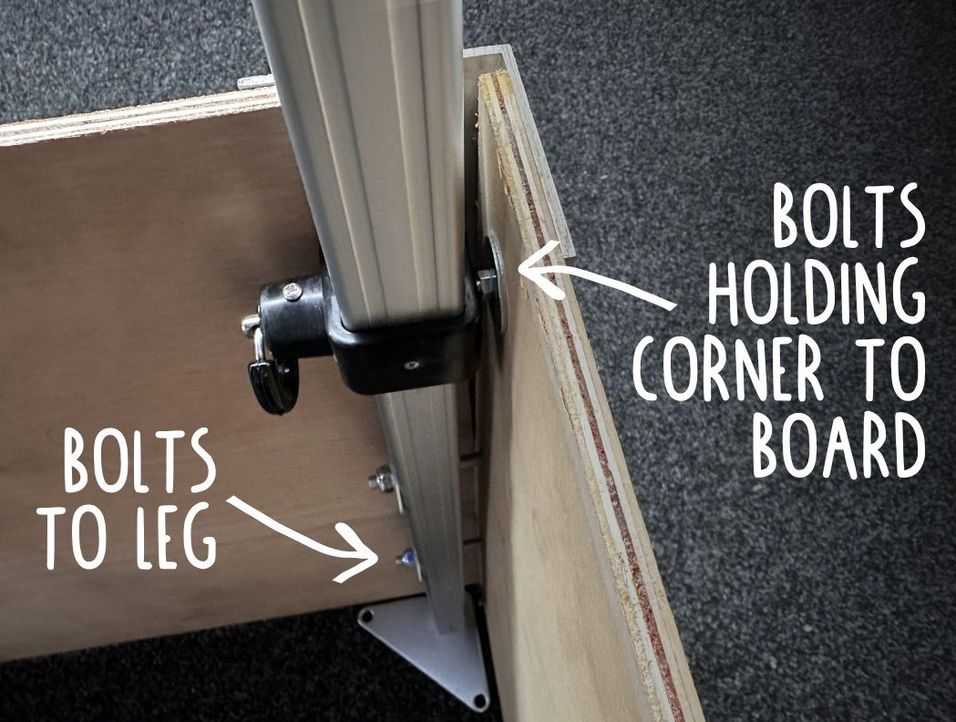
Now it's time to erect your gazebo fully. When erecting the gazebo, secure the legs on the highest hole leaving three holes visible on the lower leg.
Our approach to securing the outer boards is to use two of the existing holes on the legs of the gazebo, to maintain the integrity of the structure. Each leg has four holes. The top hole will be securing your gazebo's height. The bottom hole is almost at ground level and is at the same level as where the gazebo foot is secured to the leg. So we're going to use the middle two holes to secure the outer side boards. The existing holes are 10mm in diameter and we're going to use two 8mm bolts with penny washers to secure the corners of each side to a leg.
The first step is to drill out the middle holes on each leg so that they are extended to go completely through the leg. Start with a 3mm drill bit as a pilot hole and then a 6mm drill bit before finishing up with a 10mm drill bit.
7
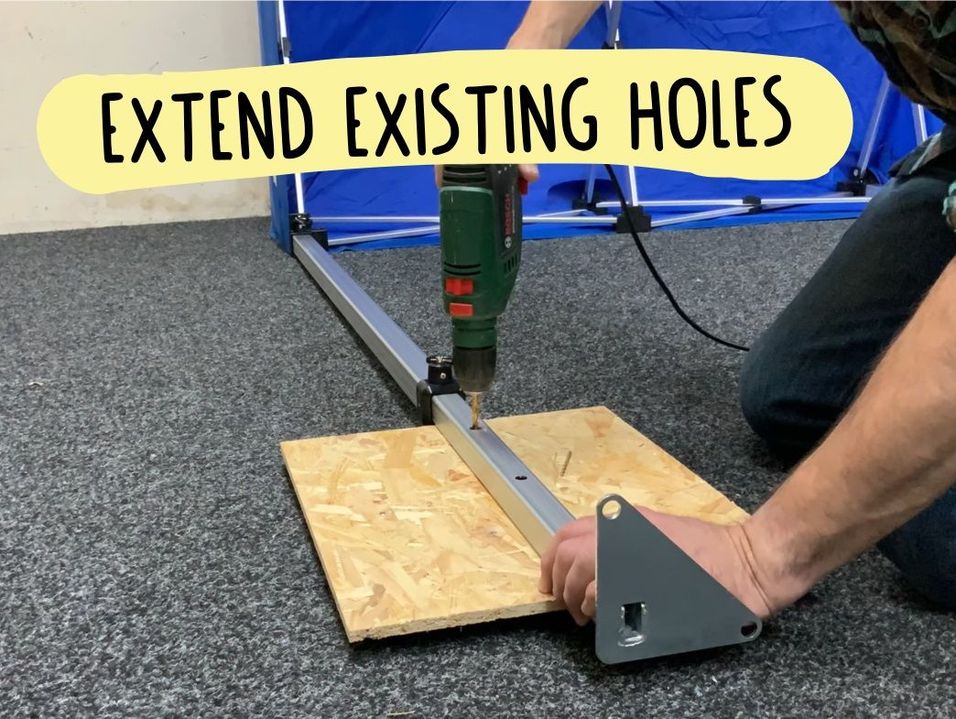
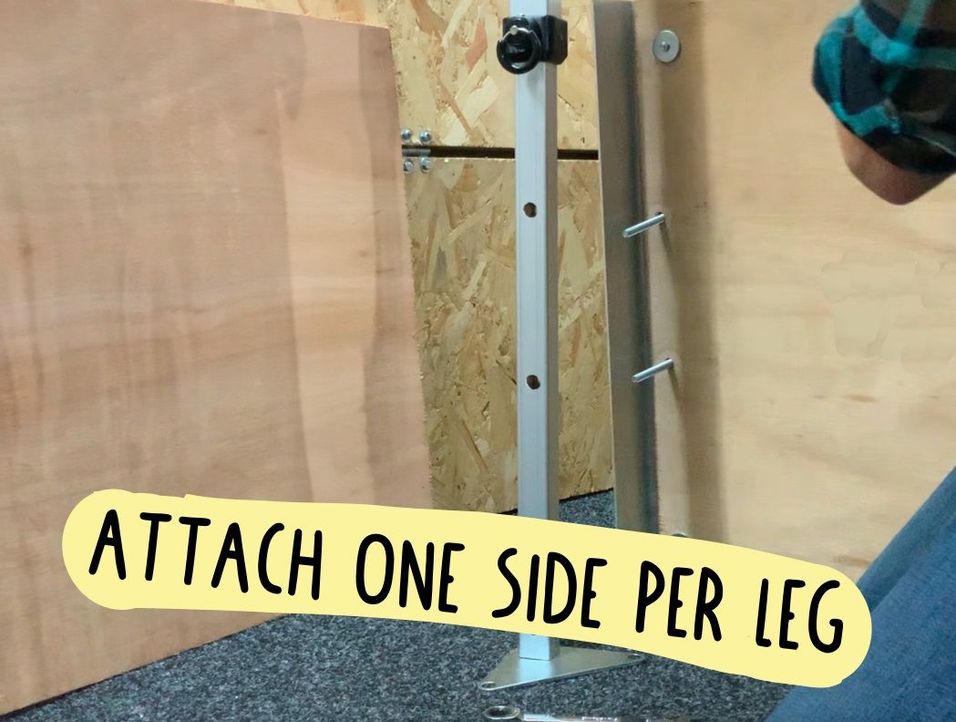
Drill securing holes in sides and attach to gazebo
Now that the holes in all four Gazebo legs are ready for attaching your side, it is time to mark your sides where you want the hole for the securing bolts.
To mark where these holes need to be you need to use two sides to mimic the set-up when the Litter Arcade 'machine' is fully built. The clever thing about how the sides are designed is that every side only attaches to one leg. So one end of the side is secured by two bolts and the other end slots behind the corner angle of the adjacent side. So to mark each side, first line up the side you're marking in position and then slot its adjacent side between the gazebo leg and the corner angle. This ensures the position where the side is bolted allows space for the adjacent side to be slotted in.
Once marked use three drill bits to end up with a 10mm hole. We started with a 3mm drill bit for a pilot hole, then a 6mm drill bit, finishing off with the 10mm drill bit. Bolt each side on using an 8mm bolt, two penny washers and a nut.
8
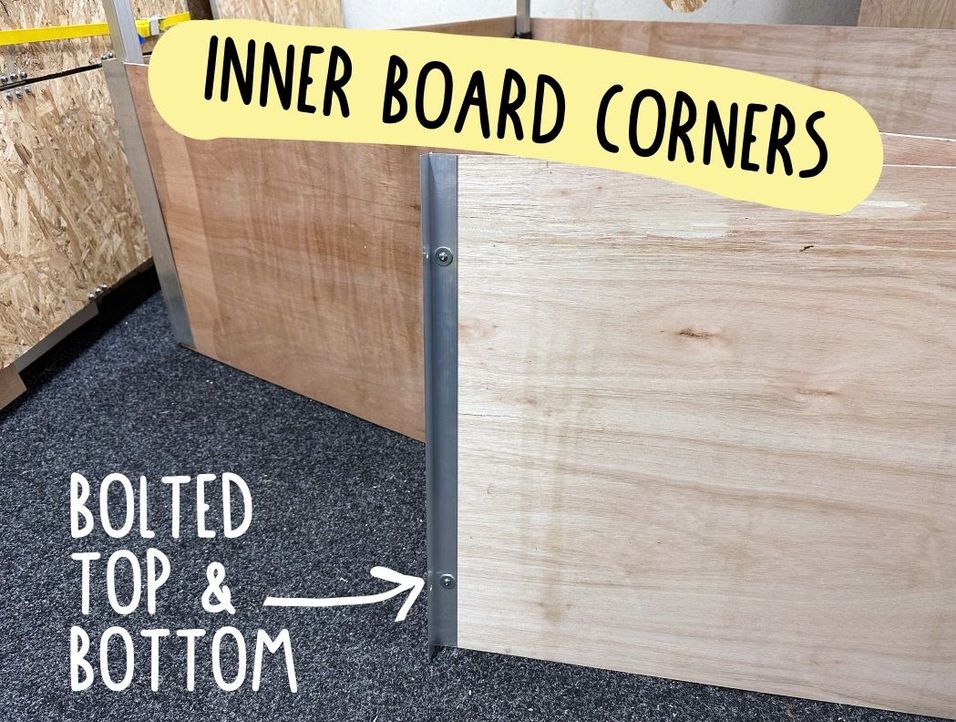
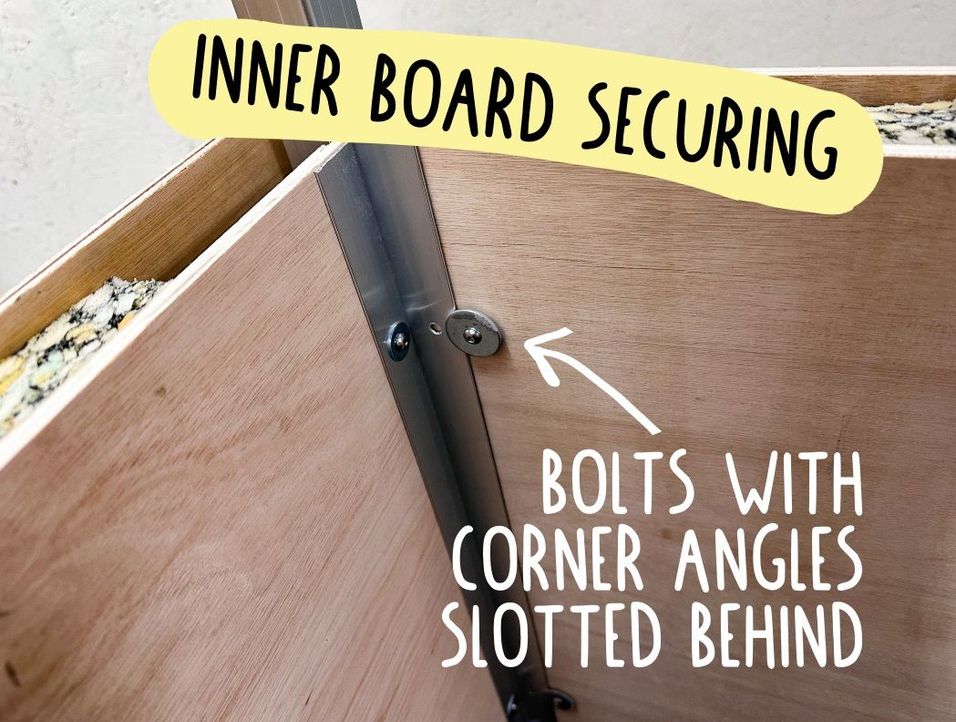
Cut inner boards and install corner pieces
The walls of your Litter Arcade 'Machine' are made out of three layers: an outer and an inner layer of board and sandwiched in between them a layer of acoustic insulation. This three layer design makes it possible to have an acoustic insulation layer without having bolt heads on the outer layer where participants might catch themselves on them causing a risk of injury.
Once your gazebo is erected and the outer boards are attached, it's time to cut and install your inner boards. Measure your remaining 1830mm x 610mm x 12mm marine plywood boards to a length of 1450mm and cut. Next cut your smaller aluminium angle into lengths of ideally 610mm, though if the amount you have won't cut down to four x 610mm lengths, then shorter will work fine.
Clamp one corner angle to the end of each inner board and drill a hole 50mm from each end of the corner angle, through the aluminium and the plywood board. Now attach the angles to the plywood boards using 5mm x 30mm bolts, washers and 5mm nuts.

9
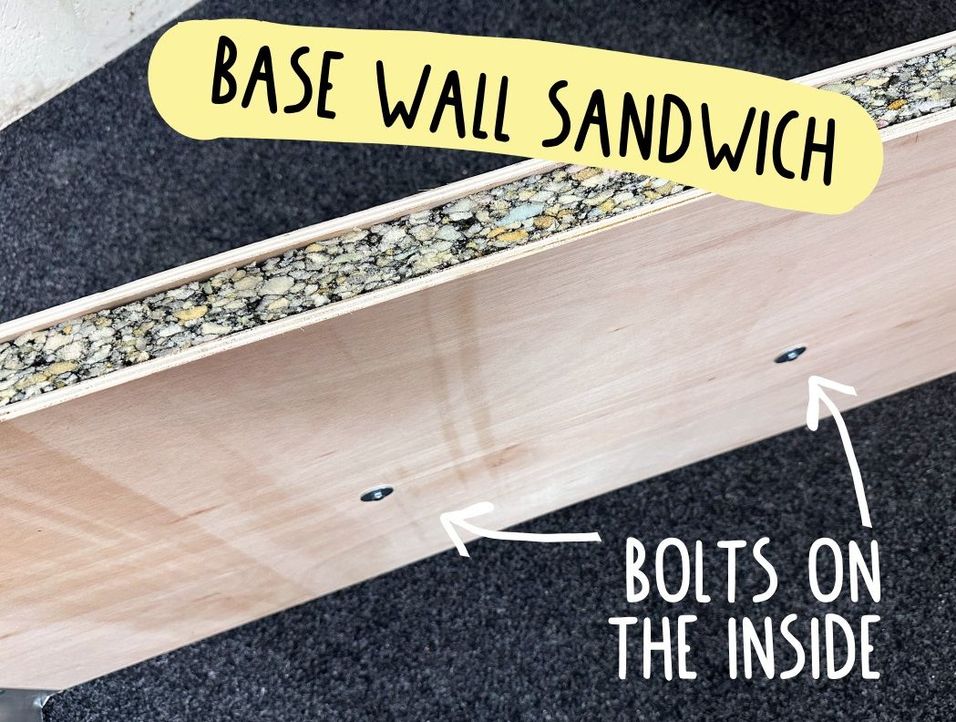
Attach acoustic insulation
This 'machine' has a base made of walls that are three layers thick. These thicker sides make it stronger and deadens the sound of litter pickers, participants and audience members knocking against the sides. This acoustic insulation is manufactured using recycled foam and is easily attached using an adhesive and two anchor bolts with penny washers for security when transporting the 'machine'.
You are going to stick the acoustic insulation to the inner walls, so that the insulation is sandwiched between the inner and outer walls. To stick the acoustic insulation to the walls we're using a roller and Mapei Ultrabond Eco Rubber Adhesive. Use the roller to apply the adhesive to the entire area of the wall that will contact the acoustic foam. Lay the foam in place and apply pressure until adhesive is dry.
Now drill two 6mm holes equally spaced, half way up the walls. Insert a 6mm bolt with a penny washer into the both holes and secure with a nyloc nut and penny washer against the foam.
10
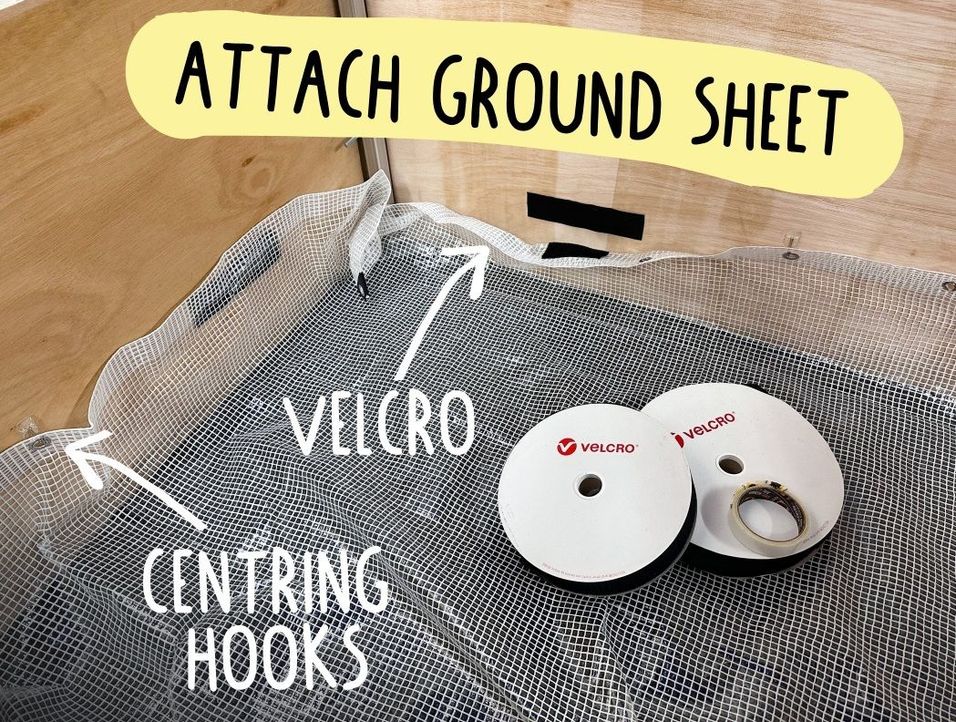
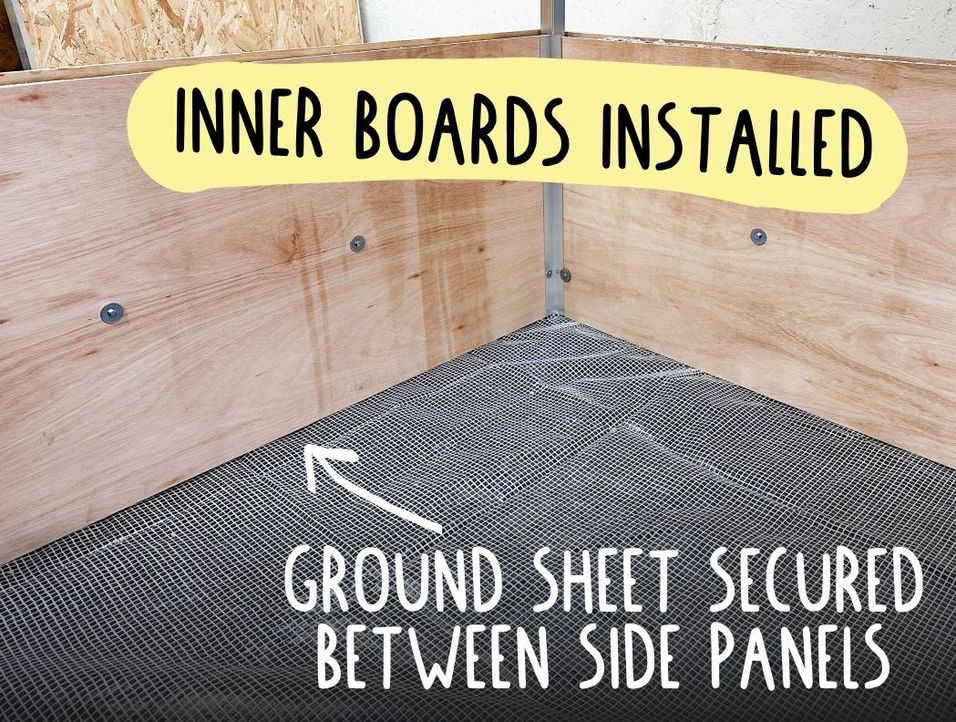
Install ground sheet
The ground sheet doesn't provide any structural strength, it's there to help contain the plastic you're sorting and make it easier to tidy up at the end. This Litter Arcade 'machine' is designed to work as a pop-up tool. So it should be possible to turn up at an event, build the Litter Arcade 'machine', deliver the event and then pack down, leaving no trace.
The fixings for the ground sheet are attached to the inside of the outer boards. The first step is to attach four self adhesive hooks to the middle of each board 200mm from the bottom of the board. These hooks are going to attach to the eyelets of your tarpaulin and will centre your groundsheet.
The second fixing we suggest you use is heavy duty velcro, either velcro with a self-adhesive backing or add your own strong double sided tape to the back of regular velcro. With the ground sheet in place on the centring hooks, cut lengths of velcro and attach to tarpaulin and side walls to secure groundsheet in place.
11
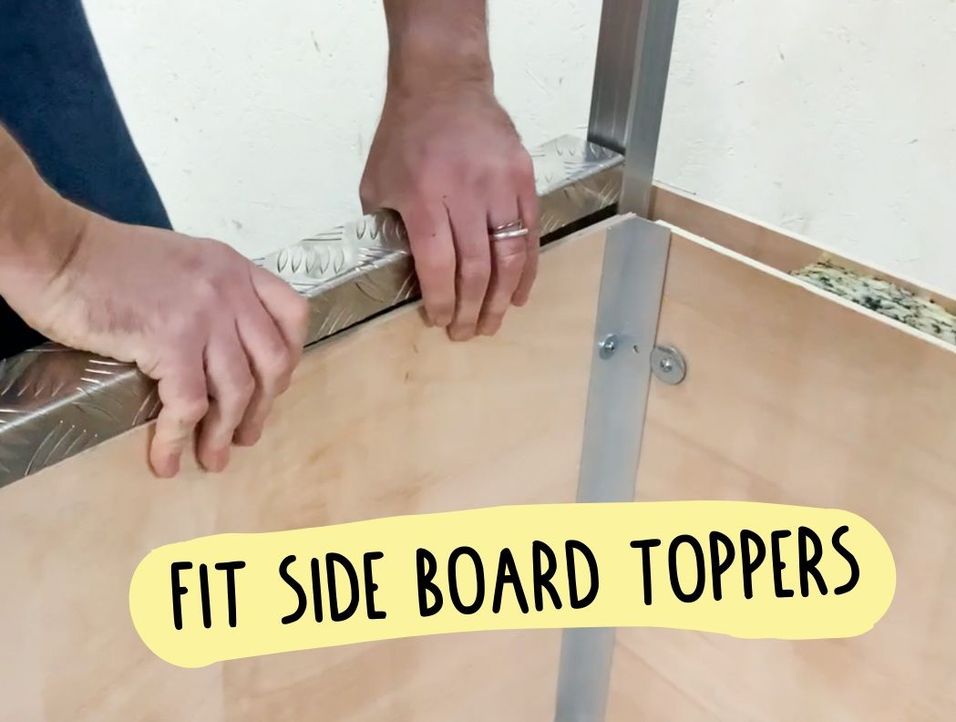
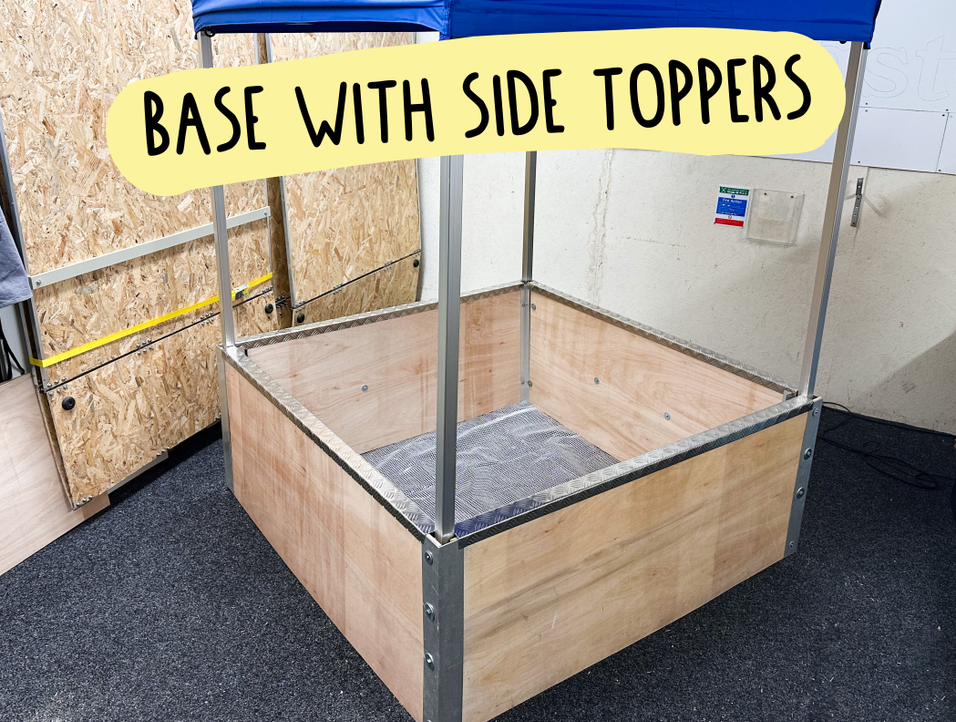
Install side toppers and litter pickers
Your side toppers need cutting to the right length before installing. So install inner boards and measure the distance between the gazebo legs on each side, the toppers need cutting to this length. The toppers have a 500mm width and so they'll fit when the acoustic insulation is compressed slightly. Start at one end and compress the insulation, guiding the topper on as you go. You may want drill a small hole at each end of your topper to add a small self tapping screw into the plywood on the inside on the base to prevent it being pulled off during use.
When choosing how to attach you litter pickers, you have a range of options based on the pickers you've picked. Some litter pickers have a hole in the handle from which they will hang on a hook; some have a magnet in the litter picking end, which you can choose to hang them from with the addition of a steel plate to the gazebo frame; other litter pickers may need to be hung from the trigger or handle in some way with an adapted hook.
12
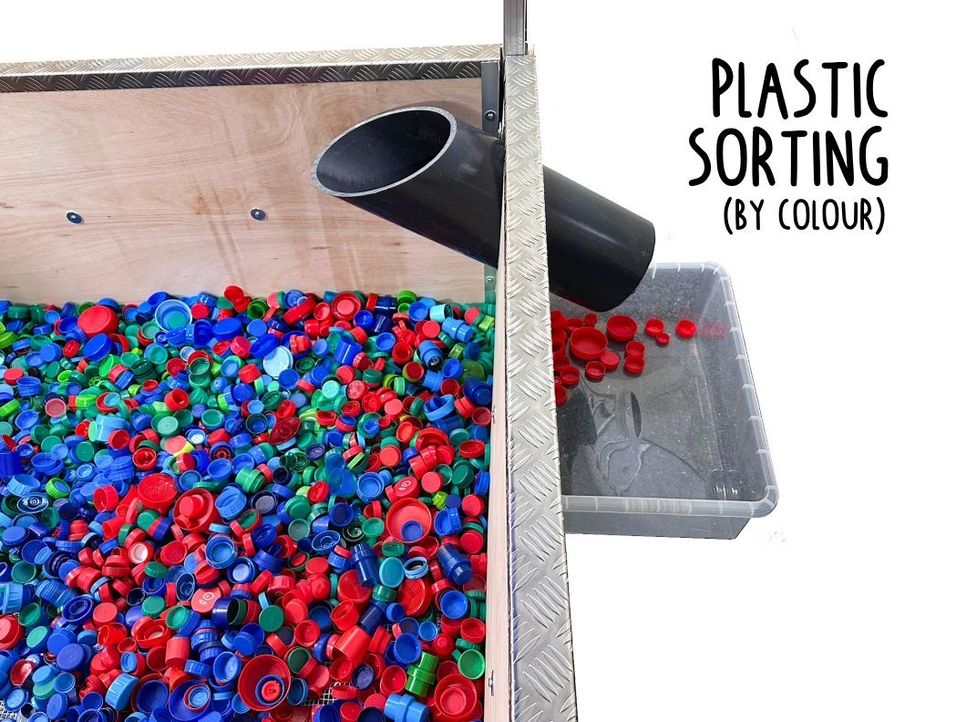
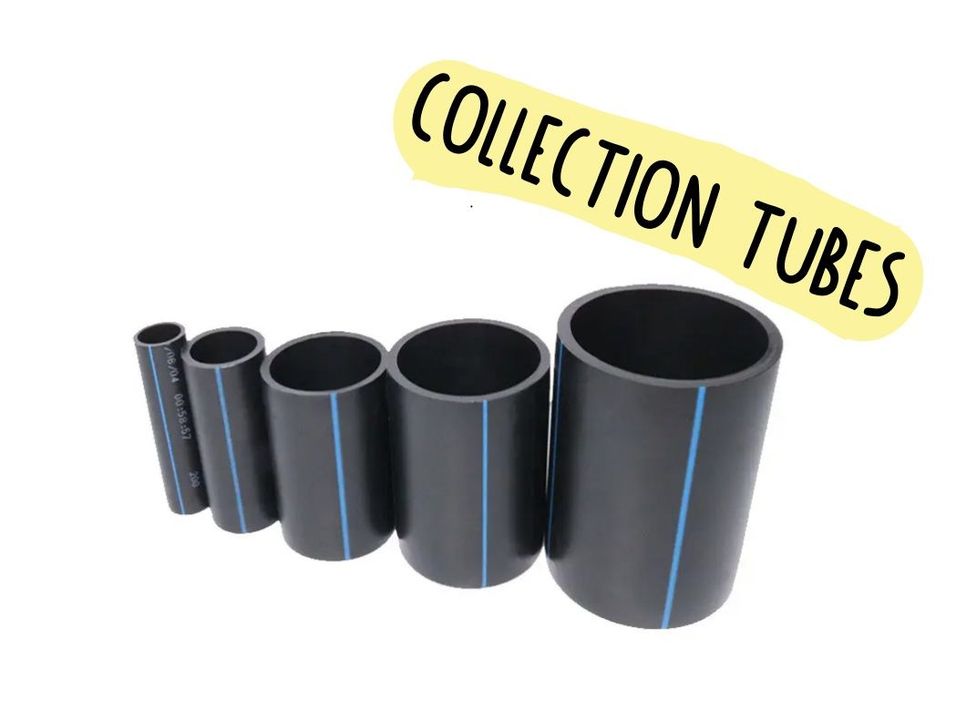
Mark and cut collection tube holes
We have chosen to use 200mm diameter collection tubes on this second generation litter arcade 'machine' making it possible to use it with waste plastics from lids through to bigger pieces of plastic like DVD cases.
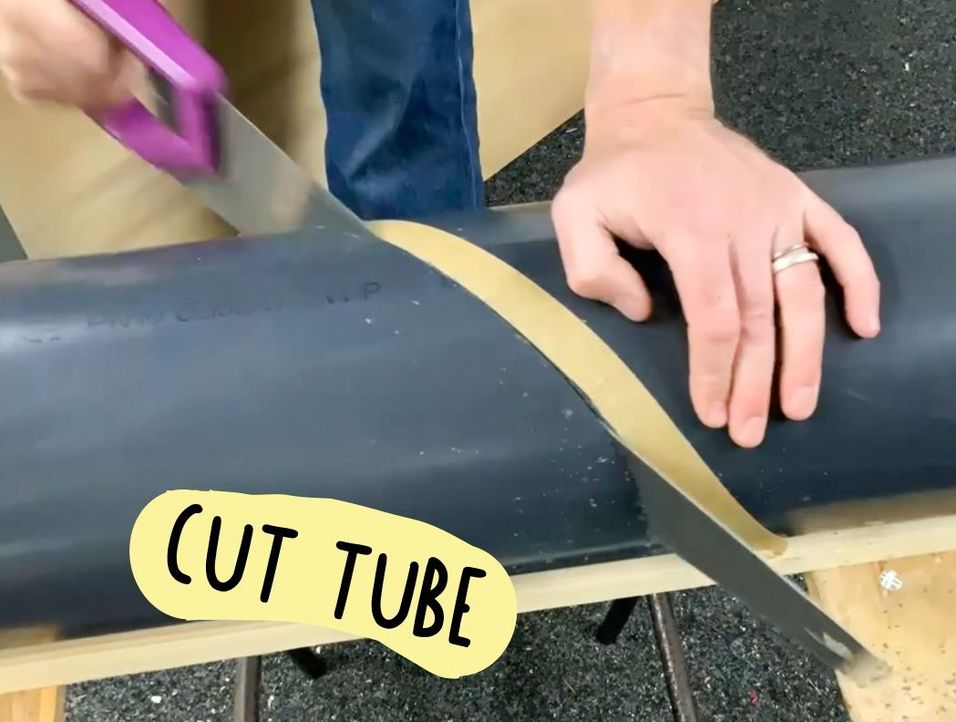
The 200mm diameter tubes came in 1000mm lengths. So we need to cut the tubes in half before mounting to the litter arcade. We are going to install the collection tubes at a 45 degree angle, and so to make the collection end horizonal, we're going to cut the tubes in half at a 45 degree angle using a hand saw designed for cutting hard plastics.
We're marking the line we're going to cut with masking tape because the tube is black and masking tape will allow us a certain amount of flexibility in adjusting the line we're going to cut along. We measured 500mm to mark the middle of the tube, then 400mm 90 degree around the tube from our initial mark, and 600mm 90 degrees in the opposite direction to guide our 45 degree line. Finish the cut edge off with a fine sandpaper.

13
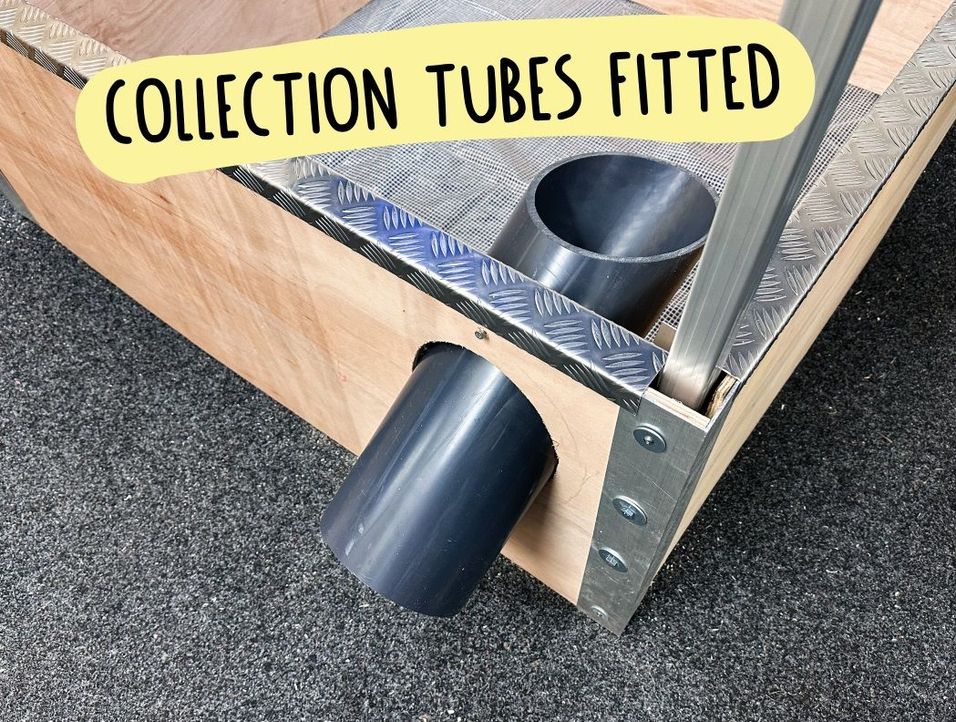
Install collection tubes
To install the collection tubes you're going to need to cut through the three side wall layers.
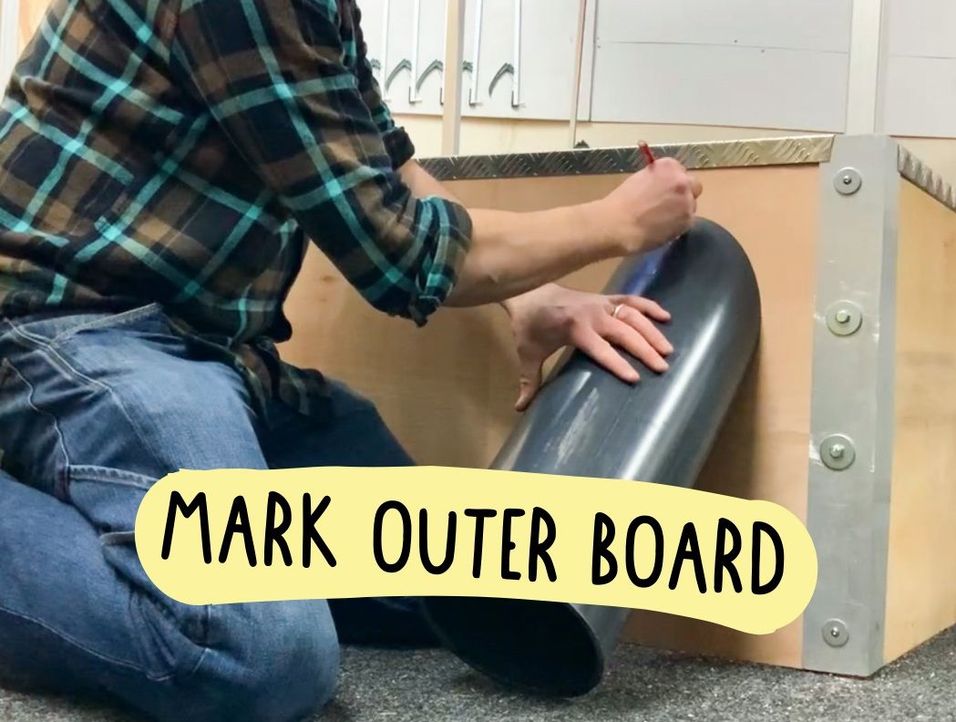
Remove the inner boards, and mark 250mm up from the bottom of the outer board where you're going to install the tube. This is to leave space for your collection tubes. Lean the cut end of the tube against the outer board and draw around it to get the shape of the hole where the tube will sit. Drill a hole on this line and use a jigsaw to create the hole in your outer board. Now reattach your inner board. You'll see acoustic insulation in whole you've cut. Remove this insulation from the visible area.
Drill a hole through the inner board at the top of the oval you've cut from the outer board as a guide. The sides are 50mm thick and so the inner hole needs to be 50mm higher to achieve the angle. Use the tube to draw the shape for the hoke 50mm above the drilled hole, and use a jigsaw to cut. once you have a hole in all three layers, the collection tube should push through into place.

14
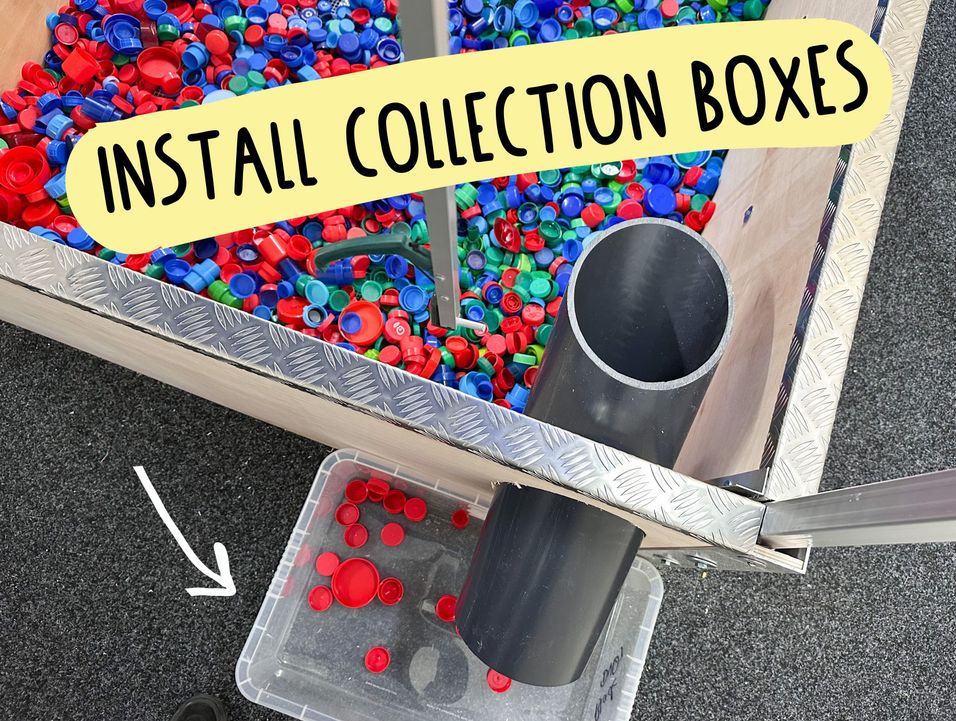
Install collection boxes
With the collection tubes emerging from the outer side board panel 250mm above the ground on each side of your Litter Arcade 'machine' there should be space for your collection boxes to sit under.
The collection boxes are part of the theatre of your plastic sorting game, and so using clear boxes, or shallow boxes without lids is a great way for spectators to follow the progress of participants taking part in the game. At the end of each game we encourage theatrically counting the scores of the different competitors as you pour the sorted lids into bags for shredding. This builds the tension while the spectators and participants await to hear who has won the game.
Creating some way to record the days highest scores is a useful way to driver additional participant, as is encourages participants to try to beat their highest scores and get to the top of the leader board.
15
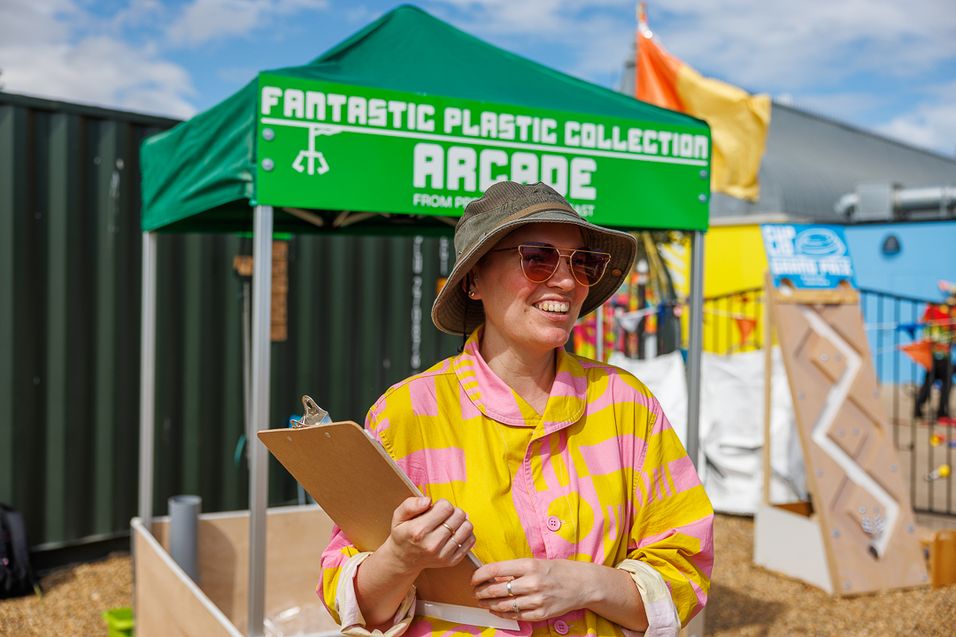
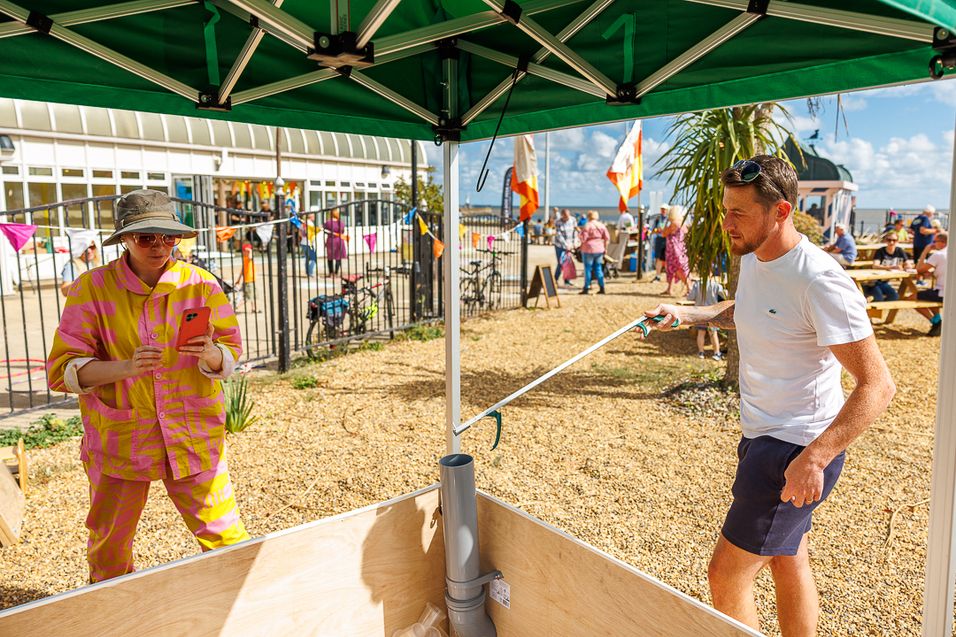
Engage your community
The rules are simple, which is why its so popular.
Competitors go head-to-head for 30 seconds to see who can pick up the most individual objects in their assigned colour with the litter picker. At the end of each game it helps to theatrically count each competitors collected objects. If the competitors are there with family or friends then it is always worth encouraging whoever their with to cheer for their favourite competitor, as this will draw new people into what you're doing.
To spark conversations about waste plastic and litter, we often ask the competitors if they have used a litter picker before. If anyone hasn't used a litter picker before we often give the competitors a 30 second practice. High scorers get their name on the leaderboard.
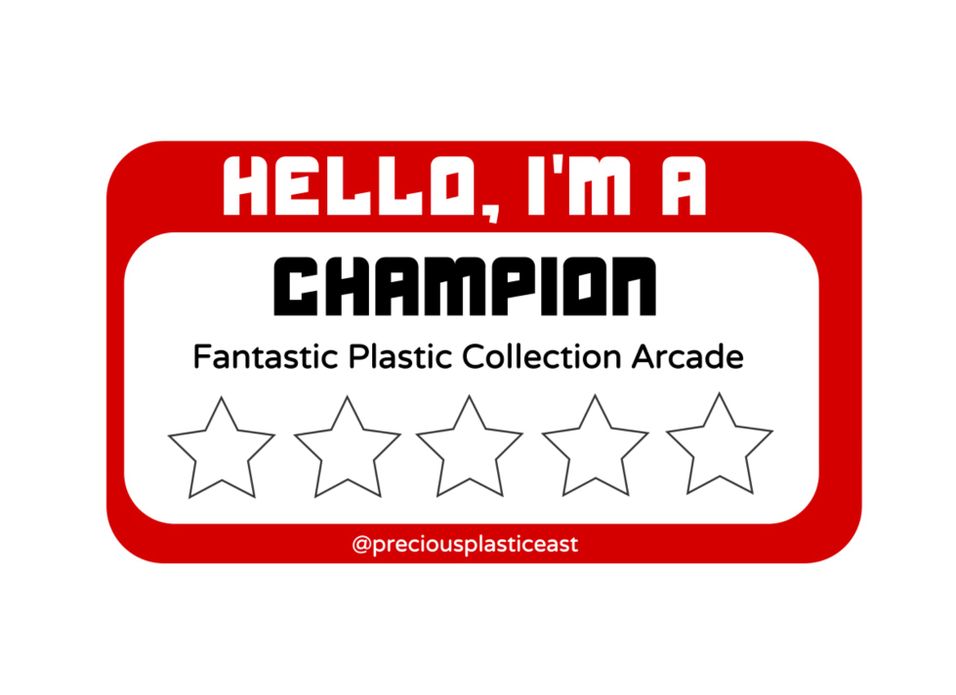
In an effort to encourage participants who keep coming back for another game, we have used paper stickers with spaces for stars as prizes that don't involve any single use plastic. There is a PDF for the sticker design in the files.
16
Incentivise volunteering within your community
During 2023 we took our Litter Arcade to a whole range of local events and engaged over 5000 people with it across the year. There was so much interest in playing the litter sorting game that you've just built that we often had queues of people waiting for their turn to play. We used this high level of interest in playing to incentivise volunteering.
Here are three ways that you might explore doing the same things:
1. Instead of charging people to play, like a traditional amusement arcade would, you could invite people to do a 2 minute litter pick of the event in exchange for 1 CREDIT to play the game.
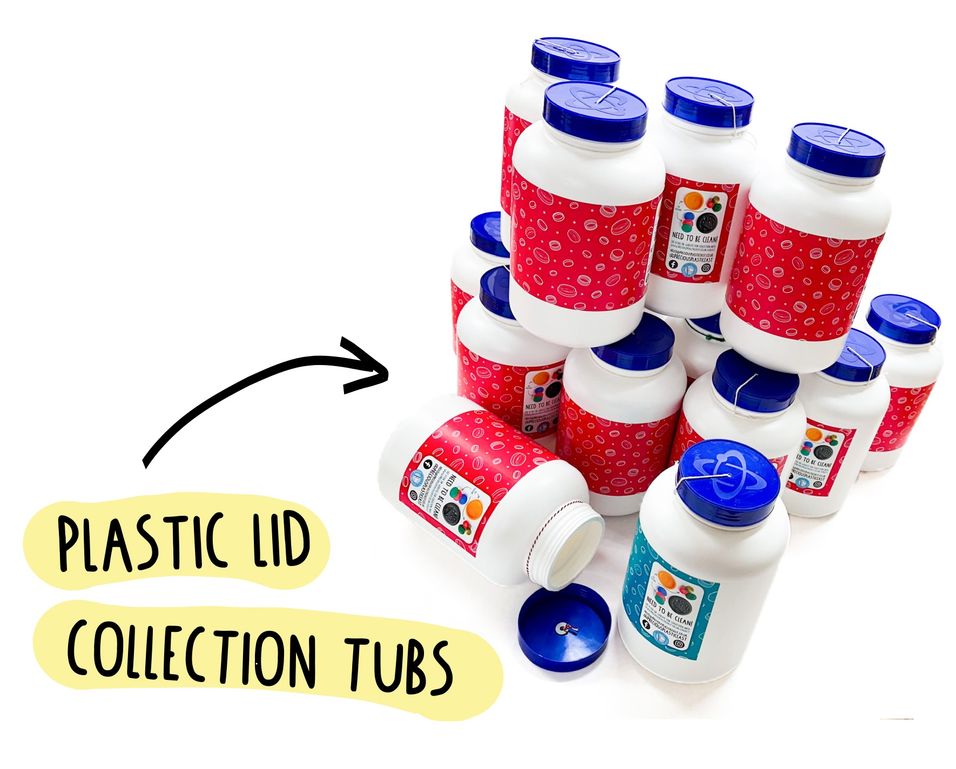
2. Bring bottle lid collection tubs to distribute to interested players in exchange for 5 CREDITS to play the game.
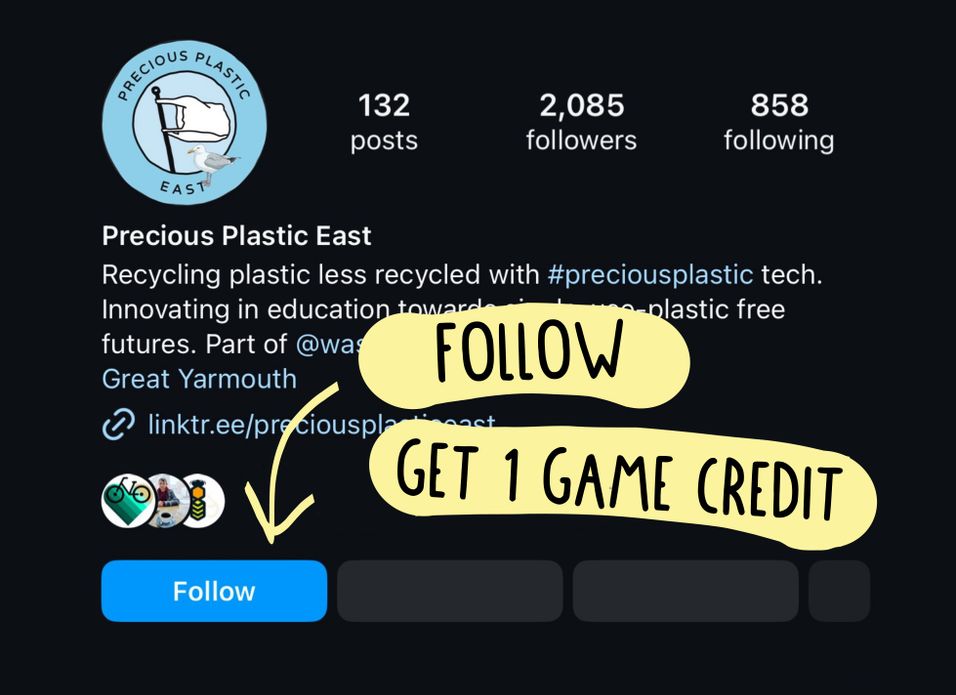
3. Offer 1 CREDIT to play the game in exchange for a social media follow or a post tagging your account if they're already following you.
We'd love to hear any other ideas that you have for using this Litter Arcade 'machine' to incentivise volunteering!
%20--%3e%3csvg%20version='1.1'%20id='Layer_1'%20xmlns='http://www.w3.org/2000/svg'%20xmlns:xlink='http://www.w3.org/1999/xlink'%20x='0px'%20y='0px'%20viewBox='0%200%2064%2063'%20style='enable-background:new%200%200%2064%2063;'%20xml:space='preserve'%3e%3cstyle%20type='text/css'%3e%20.st0{fill:%2320B7EB;}%20.st1{fill:%23E9475A;}%20.st2{fill:%23FECE4E;}%20%3c/style%3e%3cdesc%3eCreated%20with%20Sketch.%3c/desc%3e%3cg%20id='Page-1'%3e%3cg%20id='OA-Logo-Black-Background'%3e%3cpath%20id='Shape'%20class='st0'%20d='M14.1,30.1c-1.5-0.8-8.6-3.8-14.1-7.8c1.8-3.4,3.1-5.6,5-9.1c2.7,1.1,1.9,0.5,4.6,1.7%20c0.8,0.4,10.1,4.5,13.8,6.2c2.4,1.1,4.7,2.2,7,3.3L43,30.5l8.1,3.9c4,2,7.2,3.5,11.3,5.5c0.5,0.3-3.7,9.4-3.7,9.4%20c-1.7-0.6-3.9-1.8-5.5-2.5c-4.7-2.1-9-3.9-13.7-6c-4-1.8-6.7-2.9-10.8-4.5C25,34.9,17.1,31.6,14.1,30.1z'/%3e%3cpath%20id='Shape_1_'%20class='st1'%20d='M12.1,54.9c-0.8,0.6-1.6,1.2-2.5,1.6c-0.4-0.5-0.9-1-1.3-1.5c-0.3-1.2-2.3-4.9-2.7-6.2%20c-0.1-0.4-0.7-2.2-0.8-2.6c0,0,5-3.4,8.2-5.9c3.2-2.6,6.2-5,9.3-7.5c1.4-1.1,3.9-2.5,5.3-3.5c2.5-1.7,13-9.1,15.6-10.5%20c5.4-3.3,11.1-6.3,16.8-9c1.7,3.5,1.8,3,3.8,6.9c0,0-17.8,13.5-22.7,17.1c-3.8,2.8-7.5,5.7-11.3,8.5c-1.7,1.3-3.5,2.4-5.2,3.7'/%3e%3cpath%20id='Shape_2_'%20class='st2'%20d='M20.8,2.9l-0.2-0.8C25,0,31.2-0.3,31.4,0.2c0.4,1.1,0.9,2.2,1.2,3.4c1.4,4.4,2.7,8.7,4,13.1%20c0.4,1.4,2.8,10,2.9,10.5c0.5,2.8,1.2,5.6,1.6,8.4c0.8,4.7,1.4,8.6,2.3,13.3c0.6,3.1,1.3,6.3,2.3,11.3c0,0-5.8,1.4-7.5,1.8%20c-0.8,0.2-1.5,0.4-2.4,0.6c-0.3-1.1-0.2-1.2-0.5-2.1c-0.9-3.7-1.8-7.3-2.6-11c-1.5-6.4-3-12.9-4.4-19.3%20c-1.2-5.4-2.6-10.7-4.4-15.9c-1-3.1-1.8-6.3-2.7-9.5C21.1,3.8,21,3.8,20.8,2.9z'/%3e%3c/g%3e%3c/g%3e%3c/svg%3e)