

Bike-Powered Plastic Shredder: Built and Tested
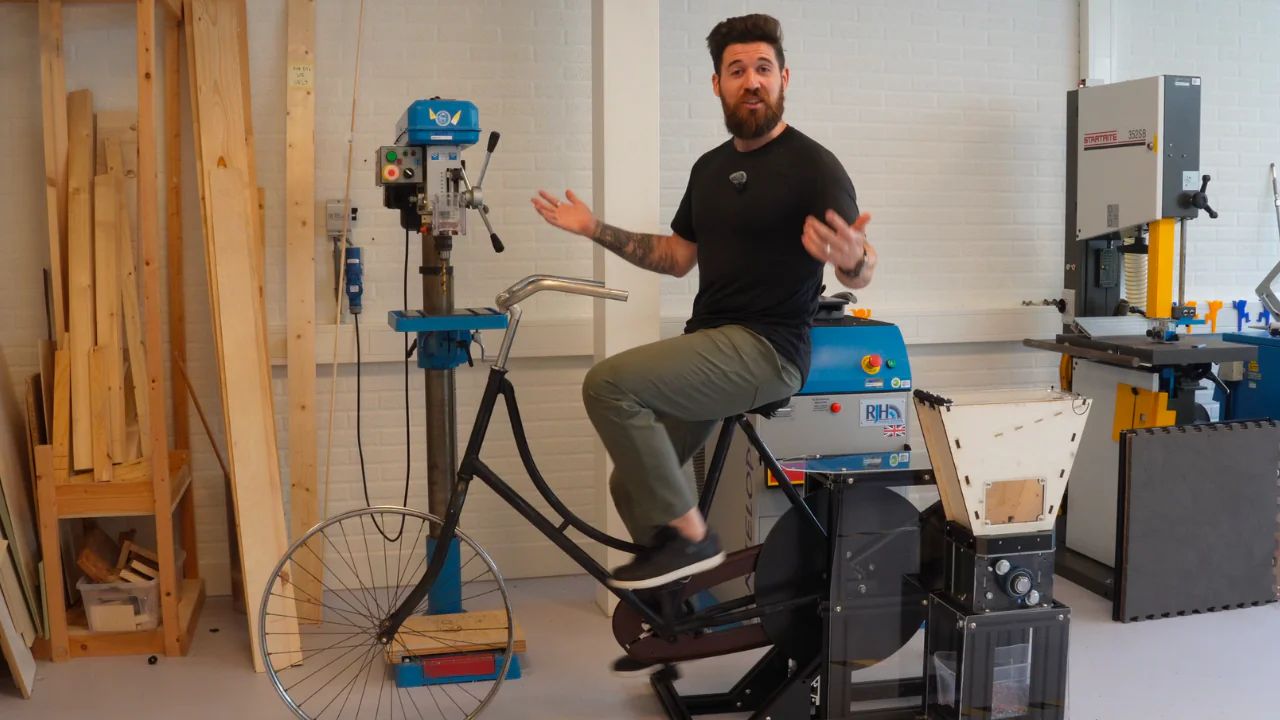
A full build of the Precious Plastics 3.3 shredder, modified for bike power and iterated for real-world use. This project was iterated upon a previous precious plastic project here, and makes the frame a whole lot safer and more stable: https://community.preciousplastic.com/library/build-a-bicycle-powered-shredder Step 1 is a build video of the process, and Step 2 includes all the files for CAD/assembly & the BOM.

%20--%3e%3csvg%20version='1.1'%20id='Layer_1'%20xmlns='http://www.w3.org/2000/svg'%20xmlns:xlink='http://www.w3.org/1999/xlink'%20x='0px'%20y='0px'%20viewBox='0%200%2044.6%2043.9'%20style='enable-background:new%200%200%2044.6%2043.9;'%20xml:space='preserve'%3e%3cstyle%20type='text/css'%3e%20.st0{fill:%231D1D1B;}%20%3c/style%3e%3ctitle%3eicon%20time%20needed%3c/title%3e%3cg%20id='Calque_1'%3e%3cpath%20class='st0'%20d='M20.5,0.5c-5.8,1.1-11,4.2-14.7,8.7c-3.4,4.3-6.3,11.5-5.7,17.1C1.5,40.9,15,45,27.8,43.6%20c10.3-1.2,17.5-15.5,16.8-25C43.7,7.2,31.9-2.2,20.5,0.5c-1.6,0.4-0.9,2.8,0.7,2.4c11.1-2.6,21.6,7.7,21,18.6%20c-0.3,4.3-1.9,8.4-4.4,11.8c-3.5,4.9-7.2,7.8-13.5,8c-10.6,0.4-22.3-4.4-21.8-17C3.2,13.8,10.8,5,21.1,2.9%20C22.7,2.6,22,0.2,20.5,0.5z'/%3e%3cpath%20class='st0'%20d='M19.9,6.7c0.1,5.2,0.4,10.5,0.9,15.7c0.1,1.6,2.6,1.6,2.5,0c-0.5-5.2-0.8-10.4-0.9-15.7c0-0.7-0.6-1.2-1.2-1.2%20S19.9,6,19.9,6.7z'/%3e%3cpath%20class='st0'%20d='M21.2,23.3c2.1,1.8,4.3,3.4,6.6,4.9c1.4,0.8,2.7-1.4,1.3-2.1c-2.1-1.3-4.2-2.8-6.1-4.5%20C21.7,20.6,20,22.3,21.2,23.3L21.2,23.3z'/%3e%3c/g%3e%3c/svg%3e) 3-4 weeks
3-4 weeks Hard
Hardother machineshredderhack
%20--%3e%3csvg%20version='1.1'%20id='Calque_1'%20xmlns='http://www.w3.org/2000/svg'%20xmlns:xlink='http://www.w3.org/1999/xlink'%20x='0px'%20y='0px'%20viewBox='0%200%2027.2%2027.8'%20style='enable-background:new%200%200%2027.2%2027.8;'%20xml:space='preserve'%3e%3ctitle%3eicon%20redirect%20new%3c/title%3e%3cg%3e%3cpath%20d='M27.2,26.5c-0.1-5-0.3-10-0.4-15c0-0.7-0.6-1.2-1.2-1.2s-1.2,0.6-1.2,1.2c0.1,4.6,0.3,9.1,0.4,13.7%20c-3.9-0.2-7.7-0.6-11.6-0.4c-3.3,0.2-6.7,0.5-10,0.4C2.8,19.5,2.7,13.7,2.5,8c2.9-0.1,5.8-0.8,8.6-0.7c1.6,0.1,1.6-2.4,0-2.5%20C7.8,4.6,4.5,5.7,1.2,5.5c-0.6,0-1,0.3-1.1,0.7C0,6.3,0,6.4,0,6.6c0,0,0,0.1,0,0.1c0,0,0,0,0,0.1c0.2,6.6,0.4,13.2,0.5,19.7%20c0,0.6,0.4,1.3,1.2,1.4c3.8,0.1,7.5-0.2,11.3-0.4c4.4-0.3,8.6,0.2,12.9,0.4c0.6,0,1-0.3,1.1-0.7C27.1,26.9,27.2,26.7,27.2,26.5z'/%3e%3cpath%20d='M12,12.6c-0.2,0.7,0.2,1.4,0.9,1.5c0.7,0.2,1.4-0.2,1.5-0.9v0c0.6-2.2,1.4-4.5,3.1-6c1.3-1.2,3-1.9,4.7-2.7%20c-0.4,1.3-0.8,2.6-1.4,3.8c-0.6,1.5,1.8,2.1,2.4,0.7c0.8-1.9,1.5-3.9,2-5.9c0-0.1,0-0.2,0-0.3c0.3-0.6,0.1-1.5-0.7-1.8%20C22.3,0.4,20,0,17.7,0c-0.7,0-1.2,0.6-1.2,1.2s0.6,1.2,1.2,1.2c0.9,0,1.7,0.1,2.6,0.2c-1.7,0.8-3.4,1.7-4.8,3%20C13.6,7.6,12.7,10.1,12,12.6z'/%3e%3c/g%3e%3c/svg%3e)
More Information

%20--%3e%3csvg%20version='1.1'%20id='Layer_1'%20xmlns='http://www.w3.org/2000/svg'%20xmlns:xlink='http://www.w3.org/1999/xlink'%20x='0px'%20y='0px'%20viewBox='0%200%2064%2063'%20style='enable-background:new%200%200%2064%2063;'%20xml:space='preserve'%3e%3cstyle%20type='text/css'%3e%20.st0{fill:%23231F20;}%20%3c/style%3e%3cdesc%3eCreated%20with%20Sketch.%3c/desc%3e%3cg%20id='Page-1'%3e%3cg%20id='OA-Logo-Black-Background'%3e%3cpath%20id='Shape'%20class='st0'%20d='M14.1,30.1c-1.5-0.8-8.6-3.8-14.1-7.8c1.8-3.4,3.1-5.6,5-9.1c2.7,1.1,1.9,0.5,4.6,1.7%20c0.8,0.4,10.1,4.5,13.8,6.2c2.4,1.1,4.7,2.2,7,3.3L43,30.5l8.1,3.9c4,2,7.2,3.5,11.3,5.5c0.5,0.3-3.7,9.4-3.7,9.4%20c-1.7-0.6-3.9-1.8-5.5-2.5c-4.7-2.1-9-3.9-13.7-6c-4-1.8-6.7-2.9-10.8-4.5C25,34.9,17.1,31.6,14.1,30.1z'/%3e%3cpath%20id='Shape_1_'%20class='st0'%20d='M12.1,54.9c-0.8,0.6-1.6,1.2-2.5,1.6c-0.4-0.5-0.9-1-1.3-1.5c-0.3-1.2-2.3-4.9-2.7-6.2%20c-0.1-0.4-0.7-2.2-0.8-2.6c0,0,5-3.4,8.2-5.9c3.2-2.6,6.2-5,9.3-7.5c1.4-1.1,3.9-2.5,5.3-3.5c2.5-1.7,13-9.1,15.6-10.5%20c5.4-3.3,11.1-6.3,16.8-9c1.7,3.5,1.8,3,3.8,6.9c0,0-17.8,13.5-22.7,17.1c-3.8,2.8-7.5,5.7-11.3,8.5c-1.7,1.3-3.5,2.4-5.2,3.7'/%3e%3cpath%20id='Shape_2_'%20class='st0'%20d='M20.8,2.9l-0.2-0.8C25,0,31.2-0.3,31.4,0.2c0.4,1.1,0.9,2.2,1.2,3.4c1.4,4.4,2.7,8.7,4,13.1%20c0.4,1.4,2.8,10,2.9,10.5c0.5,2.8,1.2,5.6,1.6,8.4c0.8,4.7,1.4,8.6,2.3,13.3c0.6,3.1,1.3,6.3,2.3,11.3c0,0-5.8,1.4-7.5,1.8%20c-0.8,0.2-1.5,0.4-2.4,0.6c-0.3-1.1-0.2-1.2-0.5-2.1c-0.9-3.7-1.8-7.3-2.6-11c-1.5-6.4-3-12.9-4.4-19.3%20c-1.2-5.4-2.6-10.7-4.4-15.9c-1-3.1-1.8-6.3-2.7-9.5C21.1,3.8,21,3.8,20.8,2.9z'/%3e%3c/g%3e%3c/g%3e%3c/svg%3e)


1
Watch the Build Video
The video walks through the full assembly process, key design decisions, what we modified from the base PP 3.3 design, and what we learned through iteration. Watch this before you order anything. It'll save you time and give you a clear picture of what you're building before you commit to parts.
2
Download the CAD & Purchase BOM
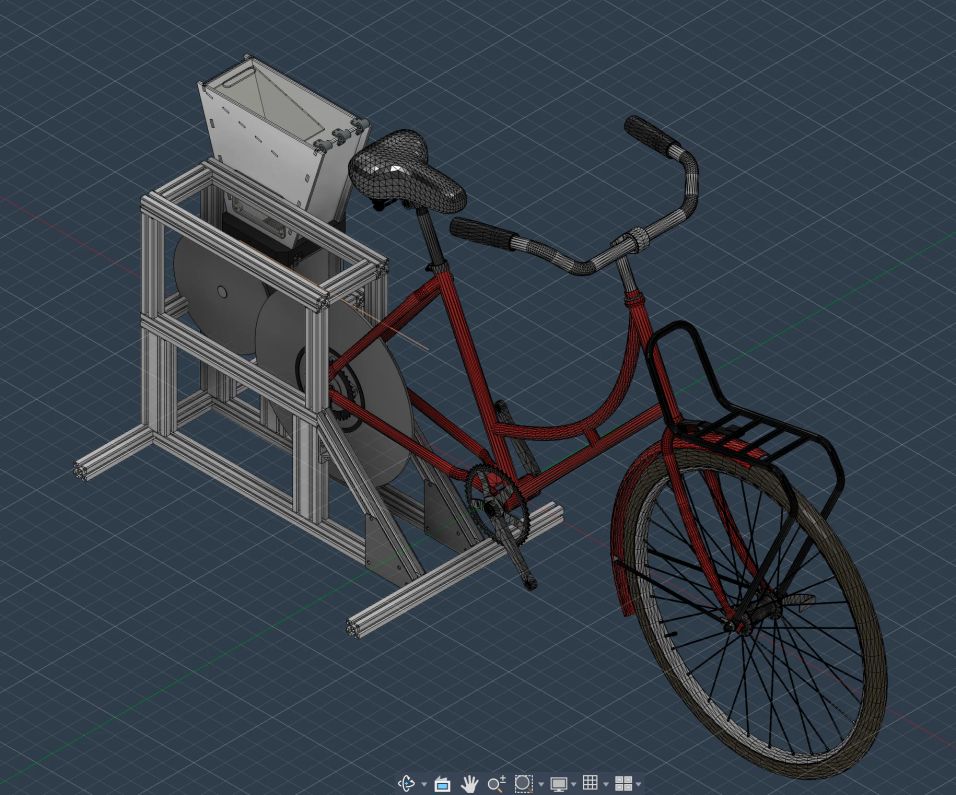
Download the full STEP files and the complete BOM with specs and sourcing notes.
https://drive.google.com/drive/folders/1sLNrfrv-DeH-Gd9XqJ6TolQJ2PJYwZQX?usp=sharing
3
Source a Bike
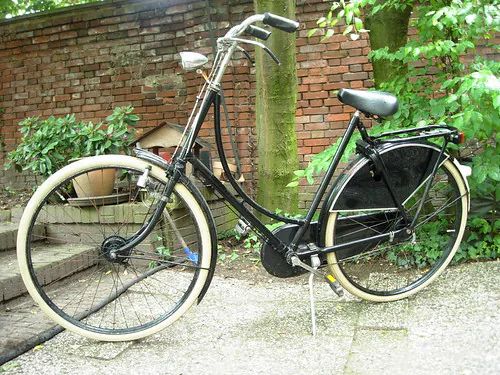
You'll likely need to source an old second hand bike from somewhere before continuing. We got ours donated from a repair shop at a local school.
4
Start With the PP 3.3 Shredder Box
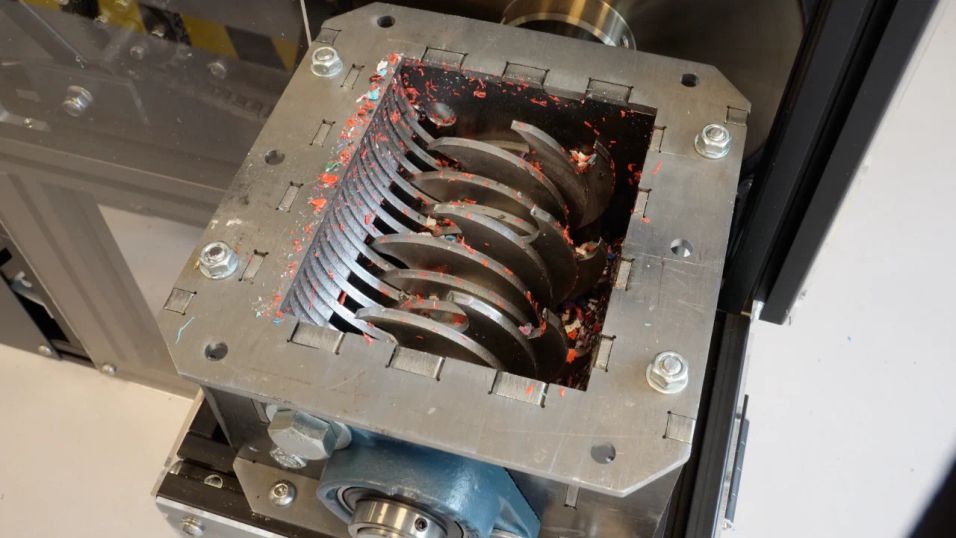
The base is the standard Precious Plastics 3.3 shredder. Build it from the official plans or source one from the Bazar (https://bazar.preciousplastic.com/) . We didn't modify the box itself, so any correctly built 3.3 box will work as the starting point. You can either build this or buy it.s
5
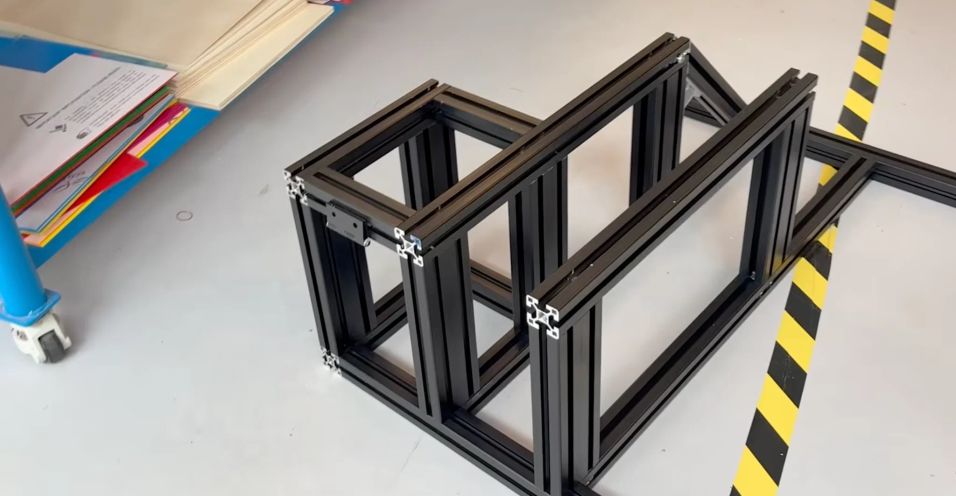
Build the Frame and Stand
The frame does two jobs: holds the shredder at working height and gives the bike a fixed mount point. Height matters here. You need enough clearance below the shredder output for a collection bin, and the bike needs to sit level with correct chain alignment. The STEP files have the full frame geometry.
6
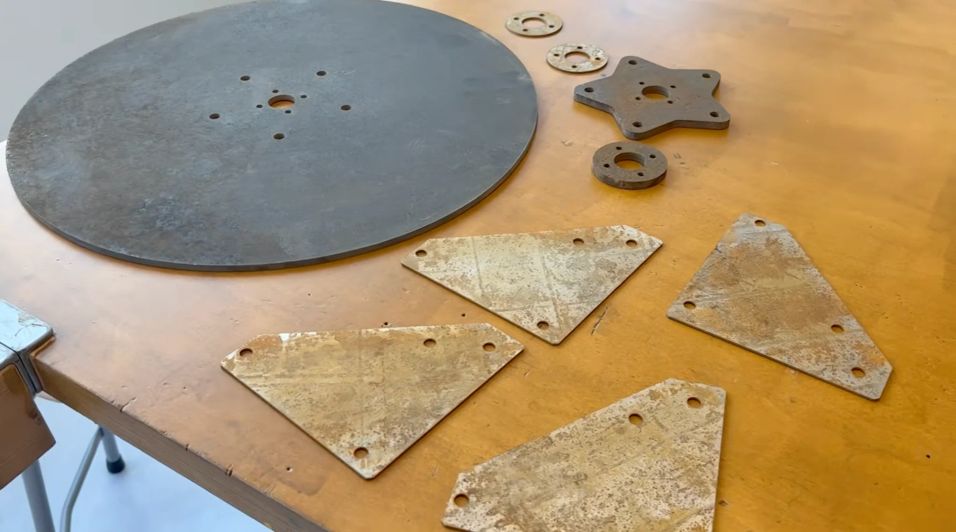
Machine the Flywheel + Driveshaft
The project uses a custom steel flywheel + driveshaft for the rear wheel. You can get these plasma cut, lasercut, waterjet, or CNC'd. You could also make this out of stacked 2mm plates of steel, or a single 8mm sheet. Both work well.
7
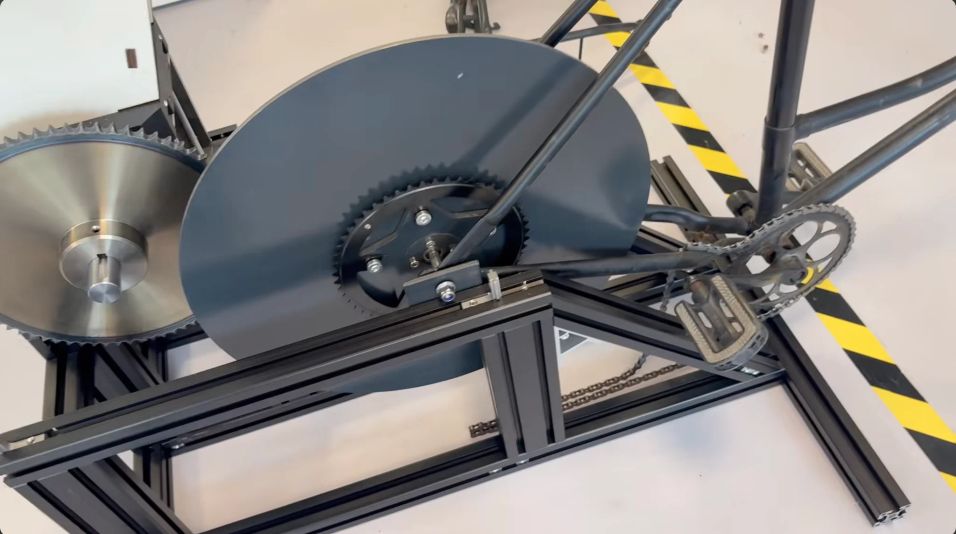
Mount the Bike & Flywheel
The rear wheel drives the system via the existing bike chain, through a steel flywheel, extended to reach the shredder input shaft. The bike mounts to the rear of the frame with the rear axle fixed. Getting consistent chain tension is the fiddliest part of the whole build. A derailleur tensioner helps significantly. Details on the exact setup are in the BOM and build video.
8
Shred
Run a few test pieces before committing to a full session. Check chain tension under load. Once it's dialed, it runs consistently. The full build video above shows it running so you can see what normal operation looks and sounds like before you start troubleshooting your own.