
Phonecase mould from a resin printer
Published 2y. Edited 1yPublished almost 3 years ago. Last edit over 1 year ago
This guide provides instructions on how to design and print a phone cover mould using a resin printer. You will see the steps involved in creating a phone cover mould, as well as some useful tips on mould design, resin printing, and manufacturing.
I hope you find this guide useful and that it inspires you to create your own resin mould soon! 😊
The zip file contains:
1. 3D files - SLA phone cover mould (step)
2. 3D files - SLA phone cover mould (stl)
3. Readme with links to the resin and printer I use (txt)
4. Technical drawing of the mould (pdf)
researchinjectionPP
%20--%3e%3csvg%20version='1.1'%20id='Calque_1'%20xmlns='http://www.w3.org/2000/svg'%20xmlns:xlink='http://www.w3.org/1999/xlink'%20x='0px'%20y='0px'%20viewBox='0%200%2027.2%2027.8'%20style='enable-background:new%200%200%2027.2%2027.8;'%20xml:space='preserve'%3e%3ctitle%3eicon%20redirect%20new%3c/title%3e%3cg%3e%3cpath%20d='M27.2,26.5c-0.1-5-0.3-10-0.4-15c0-0.7-0.6-1.2-1.2-1.2s-1.2,0.6-1.2,1.2c0.1,4.6,0.3,9.1,0.4,13.7%20c-3.9-0.2-7.7-0.6-11.6-0.4c-3.3,0.2-6.7,0.5-10,0.4C2.8,19.5,2.7,13.7,2.5,8c2.9-0.1,5.8-0.8,8.6-0.7c1.6,0.1,1.6-2.4,0-2.5%20C7.8,4.6,4.5,5.7,1.2,5.5c-0.6,0-1,0.3-1.1,0.7C0,6.3,0,6.4,0,6.6c0,0,0,0.1,0,0.1c0,0,0,0,0,0.1c0.2,6.6,0.4,13.2,0.5,19.7%20c0,0.6,0.4,1.3,1.2,1.4c3.8,0.1,7.5-0.2,11.3-0.4c4.4-0.3,8.6,0.2,12.9,0.4c0.6,0,1-0.3,1.1-0.7C27.1,26.9,27.2,26.7,27.2,26.5z'/%3e%3cpath%20d='M12,12.6c-0.2,0.7,0.2,1.4,0.9,1.5c0.7,0.2,1.4-0.2,1.5-0.9v0c0.6-2.2,1.4-4.5,3.1-6c1.3-1.2,3-1.9,4.7-2.7%20c-0.4,1.3-0.8,2.6-1.4,3.8c-0.6,1.5,1.8,2.1,2.4,0.7c0.8-1.9,1.5-3.9,2-5.9c0-0.1,0-0.2,0-0.3c0.3-0.6,0.1-1.5-0.7-1.8%20C22.3,0.4,20,0,17.7,0c-0.7,0-1.2,0.6-1.2,1.2s0.6,1.2,1.2,1.2c0.9,0,1.7,0.1,2.6,0.2c-1.7,0.8-3.4,1.7-4.8,3%20C13.6,7.6,12.7,10.1,12,12.6z'/%3e%3c/g%3e%3c/svg%3e)
More Information

%20--%3e%3csvg%20version='1.1'%20id='Layer_1'%20xmlns='http://www.w3.org/2000/svg'%20xmlns:xlink='http://www.w3.org/1999/xlink'%20x='0px'%20y='0px'%20viewBox='0%200%2064%2063'%20style='enable-background:new%200%200%2064%2063;'%20xml:space='preserve'%3e%3cstyle%20type='text/css'%3e%20.st0{fill:%23231F20;}%20%3c/style%3e%3cdesc%3eCreated%20with%20Sketch.%3c/desc%3e%3cg%20id='Page-1'%3e%3cg%20id='OA-Logo-Black-Background'%3e%3cpath%20id='Shape'%20class='st0'%20d='M14.1,30.1c-1.5-0.8-8.6-3.8-14.1-7.8c1.8-3.4,3.1-5.6,5-9.1c2.7,1.1,1.9,0.5,4.6,1.7%20c0.8,0.4,10.1,4.5,13.8,6.2c2.4,1.1,4.7,2.2,7,3.3L43,30.5l8.1,3.9c4,2,7.2,3.5,11.3,5.5c0.5,0.3-3.7,9.4-3.7,9.4%20c-1.7-0.6-3.9-1.8-5.5-2.5c-4.7-2.1-9-3.9-13.7-6c-4-1.8-6.7-2.9-10.8-4.5C25,34.9,17.1,31.6,14.1,30.1z'/%3e%3cpath%20id='Shape_1_'%20class='st0'%20d='M12.1,54.9c-0.8,0.6-1.6,1.2-2.5,1.6c-0.4-0.5-0.9-1-1.3-1.5c-0.3-1.2-2.3-4.9-2.7-6.2%20c-0.1-0.4-0.7-2.2-0.8-2.6c0,0,5-3.4,8.2-5.9c3.2-2.6,6.2-5,9.3-7.5c1.4-1.1,3.9-2.5,5.3-3.5c2.5-1.7,13-9.1,15.6-10.5%20c5.4-3.3,11.1-6.3,16.8-9c1.7,3.5,1.8,3,3.8,6.9c0,0-17.8,13.5-22.7,17.1c-3.8,2.8-7.5,5.7-11.3,8.5c-1.7,1.3-3.5,2.4-5.2,3.7'/%3e%3cpath%20id='Shape_2_'%20class='st0'%20d='M20.8,2.9l-0.2-0.8C25,0,31.2-0.3,31.4,0.2c0.4,1.1,0.9,2.2,1.2,3.4c1.4,4.4,2.7,8.7,4,13.1%20c0.4,1.4,2.8,10,2.9,10.5c0.5,2.8,1.2,5.6,1.6,8.4c0.8,4.7,1.4,8.6,2.3,13.3c0.6,3.1,1.3,6.3,2.3,11.3c0,0-5.8,1.4-7.5,1.8%20c-0.8,0.2-1.5,0.4-2.4,0.6c-0.3-1.1-0.2-1.2-0.5-2.1c-0.9-3.7-1.8-7.3-2.6-11c-1.5-6.4-3-12.9-4.4-19.3%20c-1.2-5.4-2.6-10.7-4.4-15.9c-1-3.1-1.8-6.3-2.7-9.5C21.1,3.8,21,3.8,20.8,2.9z'/%3e%3c/g%3e%3c/g%3e%3c/svg%3e)


1
Download a phone model
Before you start modelling the mould you need to have a 3D model of the actual phonecase you want to create. For this purpose you need to find the phone model online. You can use a online CAD library like GrabCAD for that.
1. Go to GrabCAD and search for the phone model you want to create a phonecover for.
2. Download the model (STEP file works the best).
3. Open the model in your CAD program.
There might be other websites with CAD-libraries, but the one I regulary use is GrabCAD. I can really recommend it. You can find many different products as a 3D file there and once you registered all downloads are completely for free.
Link to GrabCAD: https://grabcad.com/library


2
Design the mould (with Fusion360)
To design a phone cover, you need to download the phone model first. Then, you can use the model to create the shape of the cover and the mould. A recommended software for 3D design is Fusion360, which is suitable for both beginners and experts.
There are two helpful videos that show how to use Fusion360 for this project. You can find the links below.
The first video is by "Product Design Online", a channel that provides detailed tutorials on Fusion360. This video teaches you how to design a phone case model step by step.
Making a phone cover model :https://www.youtube.com/watch?v=1MmjBLYMNWY
The other one is by Lars Christensen's channel, where he creates a mould in a series of three videos.
Lars making a mould in fusion: https://www.youtube.com/watch?v=_hgmwhde1So
Often time you can find finished phone cover models on GrabCad aswell. This then safes you the time of designing it yourself and you can directly start making the mould :)


3
Tips for using Fusion360
Fusion 360 is a powerful software that I have been using since 2018 for various projects. The software is not free, but there are some options to avoid the costly subscription.
One option is to get the educational license if you are a student at a university. This license is free and valid for as long as you are enrolled. You just need to provide a document that proves your student status.
Another option is to use the hobbyist version of Fusion 360, which has some limitations on the file formats you can import and export. I am not very familiar with this version, but the educational license works well for me.
Link to the educational download: https://www.autodesk.com/products/fusion-360/education


4
3D print the mould or give it to a manufacturer
Once the mould is designed, you can 3D print it in a SLA printer. SLA stands for stereolithography, a process that uses light to cure liquid resin into solid layers. If you have no printer available you can assign the job to an online manufacturer.
Make it yourself:
1. Prepare your model and materials. You need to slice your model into layers using a software like ChiTuBox. You need to choose the right resin for your mould. It needs to a high temeperature resin. (I put a link to the resin I use in the readme)
2. Put the resin into the tank start your print. There are many tutorials on how to use a SLA printer for this purpose.
3. Relax and wait for the model to print:)
Assign to an online manufacturer:
I often use Xometry for that. They have reasonable prices and every part, which they manufactured for me so far was really good in quality. My only experience so far is with aluminum but they also offer different resin materials.
Link to Xometry: https://www.xometry.com


5
Things to know when designing a resin mould
The resin material is very different from aluminum. One of the main differences between resin and aluminum moulds is their thermal conductivity, which is a measure of how well a material can transfer heat. Thermal conductivity affects the heating and cooling times, the quality and the cost of the moulded parts.
The resin material transfers heat much worse, that is why you can design thinner walls of your finished part. However, this also means that the resin parts will take longer to cool down.
Depending on the part shape, a resin mould can also be advantageous. Because of the slower cooling, the tensions in the finished parts are generally lower and the risk of cracking or warping is reduced.
On the other hand, the resin material is much more brittle than aluminum and you need to work much more careful with it. Resin moulds are more prone to damage from abrasion or impact, and they may require more frequent maintenance or replacement.


6
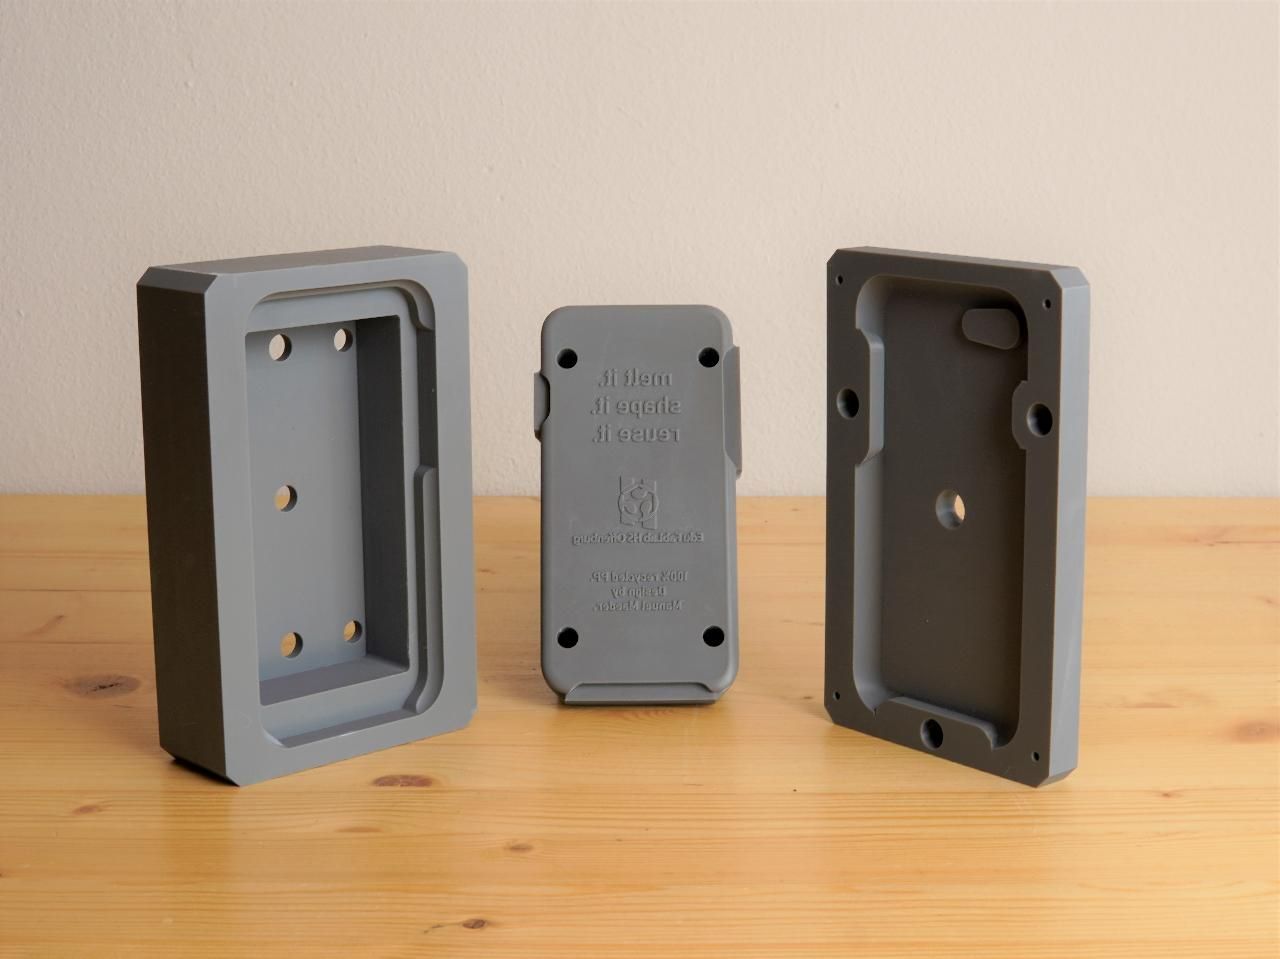
Using the mould for automatic injection molding
I created this resin mould design for an automatic injection molding machine on which I've been working on as my main project. The machine is totally automated, and it uses ejector pins to pop out the finished parts. That's why the insert part of the mould has four holes for the ejector pins.
If you're curious about how it all works, I made a cool YouTube clip showing the ejecting mechanism in action with the pins installed. Take a look!
I hope this How-to was useful for you. If you want to find more information on this mould or other things I do like the automatic recycling machine, feel free to visit my channel.
https://www.instagram.com/sotop_recycling/
Cheers,
Manuel :)
%20--%3e%3csvg%20version='1.1'%20id='Layer_1'%20xmlns='http://www.w3.org/2000/svg'%20xmlns:xlink='http://www.w3.org/1999/xlink'%20x='0px'%20y='0px'%20viewBox='0%200%2064%2063'%20style='enable-background:new%200%200%2064%2063;'%20xml:space='preserve'%3e%3cstyle%20type='text/css'%3e%20.st0{fill:%2320B7EB;}%20.st1{fill:%23E9475A;}%20.st2{fill:%23FECE4E;}%20%3c/style%3e%3cdesc%3eCreated%20with%20Sketch.%3c/desc%3e%3cg%20id='Page-1'%3e%3cg%20id='OA-Logo-Black-Background'%3e%3cpath%20id='Shape'%20class='st0'%20d='M14.1,30.1c-1.5-0.8-8.6-3.8-14.1-7.8c1.8-3.4,3.1-5.6,5-9.1c2.7,1.1,1.9,0.5,4.6,1.7%20c0.8,0.4,10.1,4.5,13.8,6.2c2.4,1.1,4.7,2.2,7,3.3L43,30.5l8.1,3.9c4,2,7.2,3.5,11.3,5.5c0.5,0.3-3.7,9.4-3.7,9.4%20c-1.7-0.6-3.9-1.8-5.5-2.5c-4.7-2.1-9-3.9-13.7-6c-4-1.8-6.7-2.9-10.8-4.5C25,34.9,17.1,31.6,14.1,30.1z'/%3e%3cpath%20id='Shape_1_'%20class='st1'%20d='M12.1,54.9c-0.8,0.6-1.6,1.2-2.5,1.6c-0.4-0.5-0.9-1-1.3-1.5c-0.3-1.2-2.3-4.9-2.7-6.2%20c-0.1-0.4-0.7-2.2-0.8-2.6c0,0,5-3.4,8.2-5.9c3.2-2.6,6.2-5,9.3-7.5c1.4-1.1,3.9-2.5,5.3-3.5c2.5-1.7,13-9.1,15.6-10.5%20c5.4-3.3,11.1-6.3,16.8-9c1.7,3.5,1.8,3,3.8,6.9c0,0-17.8,13.5-22.7,17.1c-3.8,2.8-7.5,5.7-11.3,8.5c-1.7,1.3-3.5,2.4-5.2,3.7'/%3e%3cpath%20id='Shape_2_'%20class='st2'%20d='M20.8,2.9l-0.2-0.8C25,0,31.2-0.3,31.4,0.2c0.4,1.1,0.9,2.2,1.2,3.4c1.4,4.4,2.7,8.7,4,13.1%20c0.4,1.4,2.8,10,2.9,10.5c0.5,2.8,1.2,5.6,1.6,8.4c0.8,4.7,1.4,8.6,2.3,13.3c0.6,3.1,1.3,6.3,2.3,11.3c0,0-5.8,1.4-7.5,1.8%20c-0.8,0.2-1.5,0.4-2.4,0.6c-0.3-1.1-0.2-1.2-0.5-2.1c-0.9-3.7-1.8-7.3-2.6-11c-1.5-6.4-3-12.9-4.4-19.3%20c-1.2-5.4-2.6-10.7-4.4-15.9c-1-3.1-1.8-6.3-2.7-9.5C21.1,3.8,21,3.8,20.8,2.9z'/%3e%3c/g%3e%3c/g%3e%3c/svg%3e)