
Modular Interconnecting Formwork
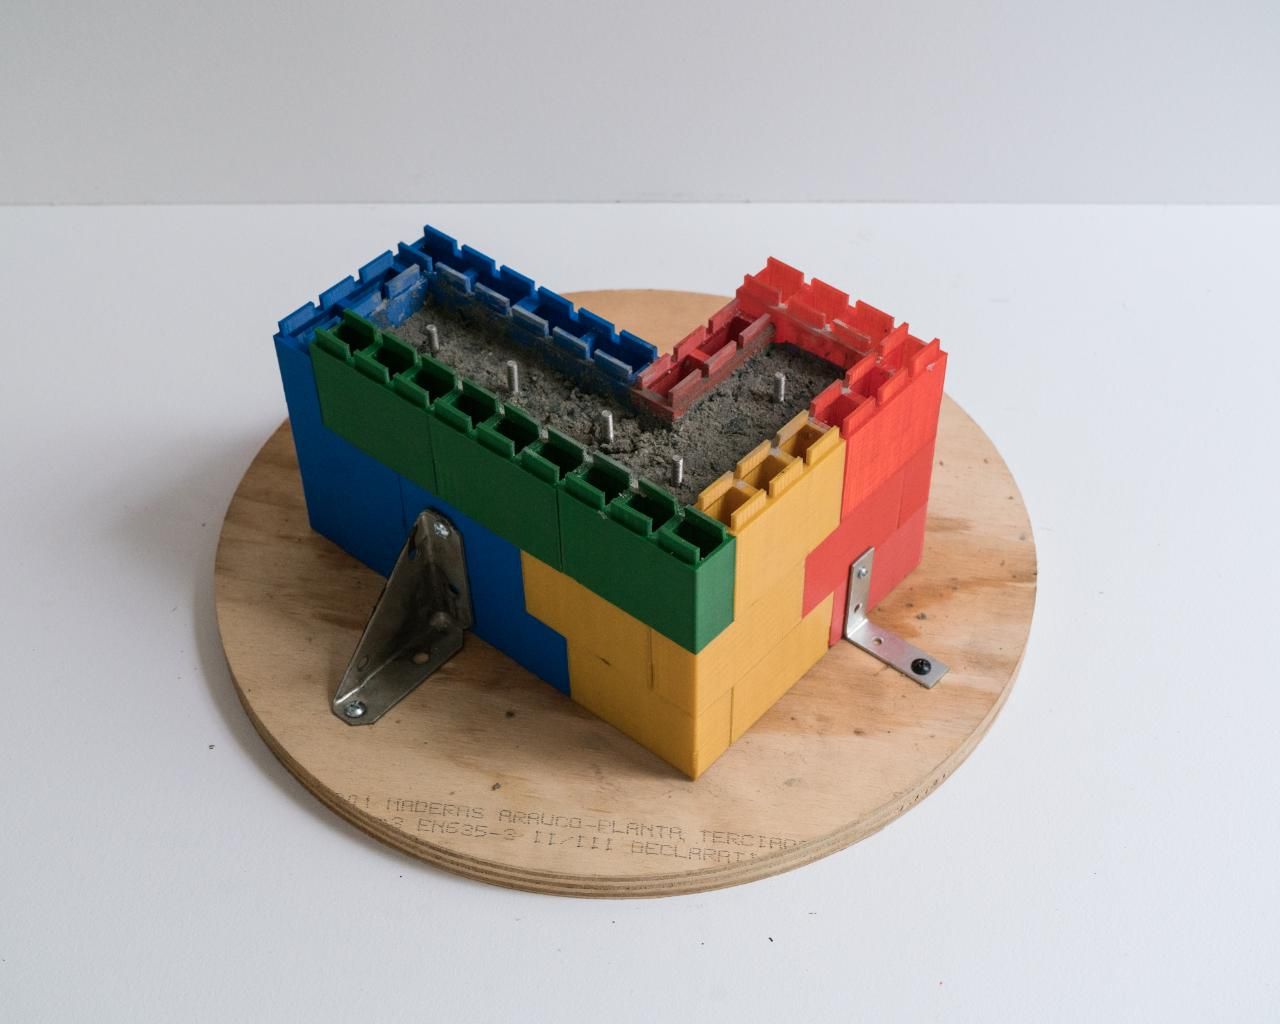
This tutorial will explain, in general terms, how to use recycled plastic bricks to build a formwork for construction with concrete. Formwork functions as a mould for poured mediums in the construction, and in this case, the bricks function as a removable and reusable tool for building that form.productHDPEhackcompression
%20--%3e%3csvg%20version='1.1'%20id='Calque_1'%20xmlns='http://www.w3.org/2000/svg'%20xmlns:xlink='http://www.w3.org/1999/xlink'%20x='0px'%20y='0px'%20viewBox='0%200%2027.2%2027.8'%20style='enable-background:new%200%200%2027.2%2027.8;'%20xml:space='preserve'%3e%3ctitle%3eicon%20redirect%20new%3c/title%3e%3cg%3e%3cpath%20d='M27.2,26.5c-0.1-5-0.3-10-0.4-15c0-0.7-0.6-1.2-1.2-1.2s-1.2,0.6-1.2,1.2c0.1,4.6,0.3,9.1,0.4,13.7%20c-3.9-0.2-7.7-0.6-11.6-0.4c-3.3,0.2-6.7,0.5-10,0.4C2.8,19.5,2.7,13.7,2.5,8c2.9-0.1,5.8-0.8,8.6-0.7c1.6,0.1,1.6-2.4,0-2.5%20C7.8,4.6,4.5,5.7,1.2,5.5c-0.6,0-1,0.3-1.1,0.7C0,6.3,0,6.4,0,6.6c0,0,0,0.1,0,0.1c0,0,0,0,0,0.1c0.2,6.6,0.4,13.2,0.5,19.7%20c0,0.6,0.4,1.3,1.2,1.4c3.8,0.1,7.5-0.2,11.3-0.4c4.4-0.3,8.6,0.2,12.9,0.4c0.6,0,1-0.3,1.1-0.7C27.1,26.9,27.2,26.7,27.2,26.5z'/%3e%3cpath%20d='M12,12.6c-0.2,0.7,0.2,1.4,0.9,1.5c0.7,0.2,1.4-0.2,1.5-0.9v0c0.6-2.2,1.4-4.5,3.1-6c1.3-1.2,3-1.9,4.7-2.7%20c-0.4,1.3-0.8,2.6-1.4,3.8c-0.6,1.5,1.8,2.1,2.4,0.7c0.8-1.9,1.5-3.9,2-5.9c0-0.1,0-0.2,0-0.3c0.3-0.6,0.1-1.5-0.7-1.8%20C22.3,0.4,20,0,17.7,0c-0.7,0-1.2,0.6-1.2,1.2s0.6,1.2,1.2,1.2c0.9,0,1.7,0.1,2.6,0.2c-1.7,0.8-3.4,1.7-4.8,3%20C13.6,7.6,12.7,10.1,12,12.6z'/%3e%3c/g%3e%3c/svg%3e)
More Information

%20--%3e%3csvg%20version='1.1'%20id='Layer_1'%20xmlns='http://www.w3.org/2000/svg'%20xmlns:xlink='http://www.w3.org/1999/xlink'%20x='0px'%20y='0px'%20viewBox='0%200%2064%2063'%20style='enable-background:new%200%200%2064%2063;'%20xml:space='preserve'%3e%3cstyle%20type='text/css'%3e%20.st0{fill:%23231F20;}%20%3c/style%3e%3cdesc%3eCreated%20with%20Sketch.%3c/desc%3e%3cg%20id='Page-1'%3e%3cg%20id='OA-Logo-Black-Background'%3e%3cpath%20id='Shape'%20class='st0'%20d='M14.1,30.1c-1.5-0.8-8.6-3.8-14.1-7.8c1.8-3.4,3.1-5.6,5-9.1c2.7,1.1,1.9,0.5,4.6,1.7%20c0.8,0.4,10.1,4.5,13.8,6.2c2.4,1.1,4.7,2.2,7,3.3L43,30.5l8.1,3.9c4,2,7.2,3.5,11.3,5.5c0.5,0.3-3.7,9.4-3.7,9.4%20c-1.7-0.6-3.9-1.8-5.5-2.5c-4.7-2.1-9-3.9-13.7-6c-4-1.8-6.7-2.9-10.8-4.5C25,34.9,17.1,31.6,14.1,30.1z'/%3e%3cpath%20id='Shape_1_'%20class='st0'%20d='M12.1,54.9c-0.8,0.6-1.6,1.2-2.5,1.6c-0.4-0.5-0.9-1-1.3-1.5c-0.3-1.2-2.3-4.9-2.7-6.2%20c-0.1-0.4-0.7-2.2-0.8-2.6c0,0,5-3.4,8.2-5.9c3.2-2.6,6.2-5,9.3-7.5c1.4-1.1,3.9-2.5,5.3-3.5c2.5-1.7,13-9.1,15.6-10.5%20c5.4-3.3,11.1-6.3,16.8-9c1.7,3.5,1.8,3,3.8,6.9c0,0-17.8,13.5-22.7,17.1c-3.8,2.8-7.5,5.7-11.3,8.5c-1.7,1.3-3.5,2.4-5.2,3.7'/%3e%3cpath%20id='Shape_2_'%20class='st0'%20d='M20.8,2.9l-0.2-0.8C25,0,31.2-0.3,31.4,0.2c0.4,1.1,0.9,2.2,1.2,3.4c1.4,4.4,2.7,8.7,4,13.1%20c0.4,1.4,2.8,10,2.9,10.5c0.5,2.8,1.2,5.6,1.6,8.4c0.8,4.7,1.4,8.6,2.3,13.3c0.6,3.1,1.3,6.3,2.3,11.3c0,0-5.8,1.4-7.5,1.8%20c-0.8,0.2-1.5,0.4-2.4,0.6c-0.3-1.1-0.2-1.2-0.5-2.1c-0.9-3.7-1.8-7.3-2.6-11c-1.5-6.4-3-12.9-4.4-19.3%20c-1.2-5.4-2.6-10.7-4.4-15.9c-1-3.1-1.8-6.3-2.7-9.5C21.1,3.8,21,3.8,20.8,2.9z'/%3e%3c/g%3e%3c/g%3e%3c/svg%3e)


1
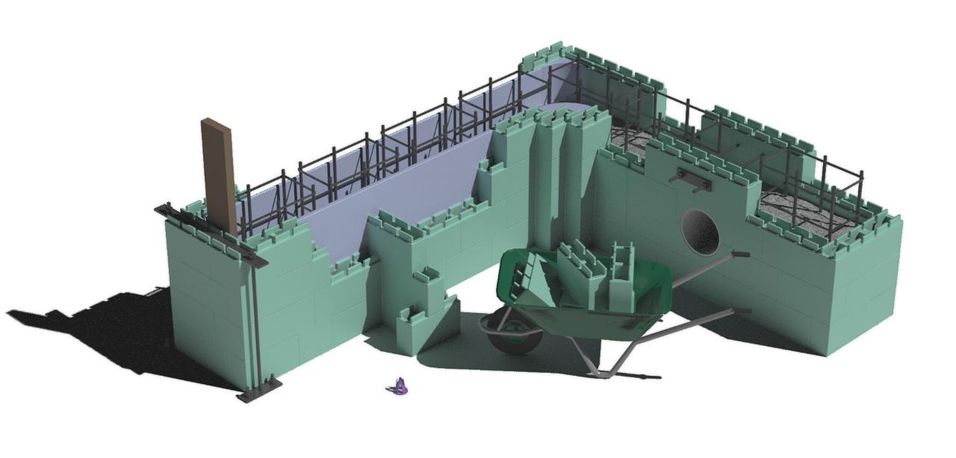
Understanding formwork as a mould for construction
Formwork is used to create frames to pour concrete,rammed earth or other mediums in the construction industry. These are traditionally made out of wood but we can also make them from recycled plastic 🙂
We suggest to start small, learn how it works, iterate and expand your ideas. Costs can vary greatly depending on your build.
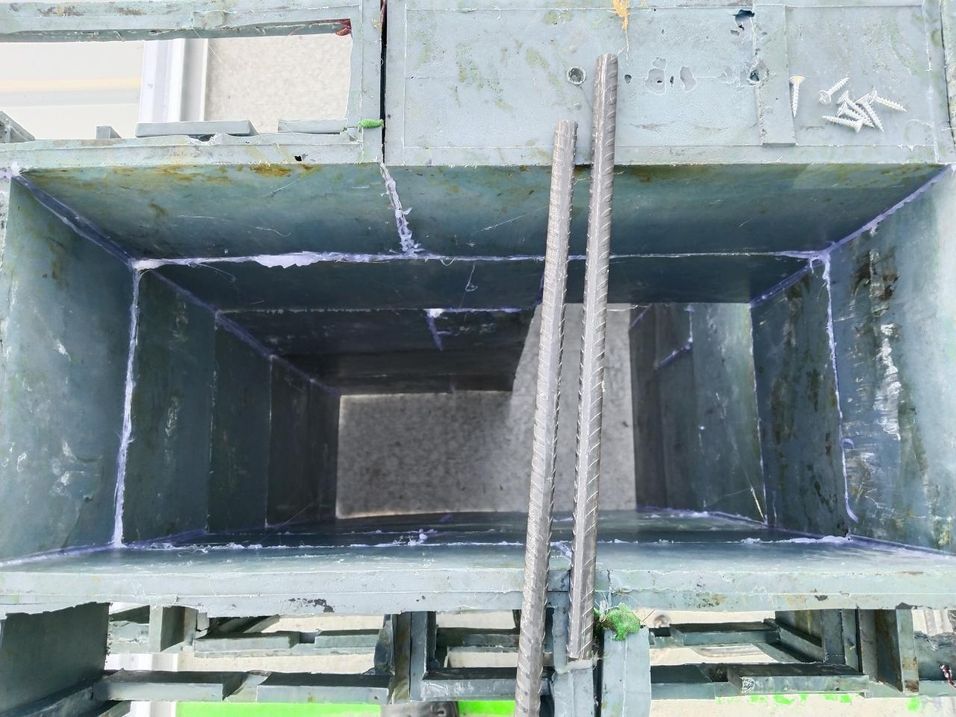
The existing Precious Plastic brick designs, combined with thin sheets made on the sheetpress will allow you to start formworking. However drawings of a mould for a brick that's optimised for formworking are available at the Thingiverse link, and a How To describing how to machine this will be coming shortly.
2
Tools, skills & materials required
Hearing & eye protection
Safety boots
Dust mask
Skills in the operation of powertools, in particular drills
A safety induction into construction in your jurisdiction
Experience in mixing and pouring concrete
Enough bricks to build your desired formwork
Cement, sand & aggregate
Building design drawings
Impact driver & drill
Masonry drill bits & optional masonry drill
Self tapping timber screws
Reinforcing bar (rebar)*
Rebar ties & rebar tie tool
Starter bars, safety caps
Anchoring adhesive & applicating gun
Concrete mixer & plastic tubs
Concrete shovels
Steel brackets**
Concrete vibrator
Trowel
Hot glue gun & hot glue sticks
Stringline, chalk and/or construction spraypaint
Tape measure
Wire brush
* You may need a tool to cut rebar to size. We used a reciprocating saw, but a grinder will also work.
** You will need a way to secure your steel brackets to the ground around your formwork. We used a combination of timber screws, formwork stakes & powder actuated fasteners.
3
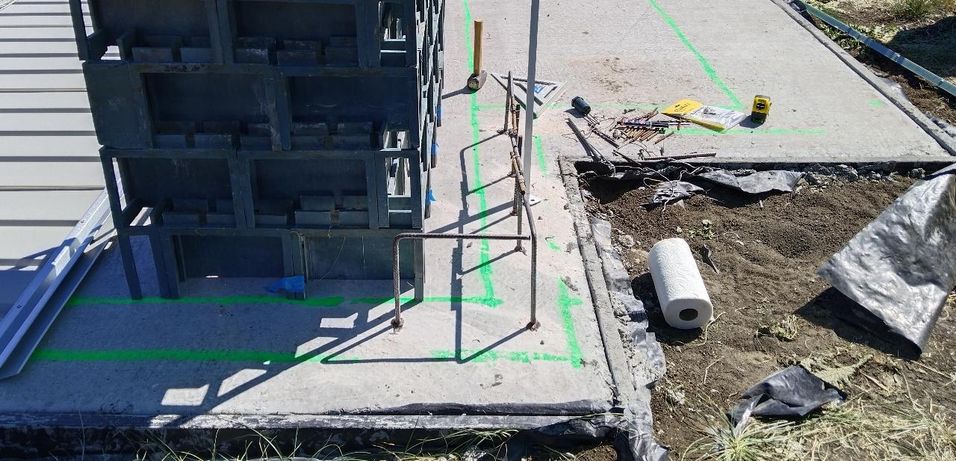
Mark out your wall
Using chalk, stringline, and/or spray paint and a drawing of the relevant parts of your structure, mark out where the wall you intend to build will be erected.
We marked out our walls with green paint.
4
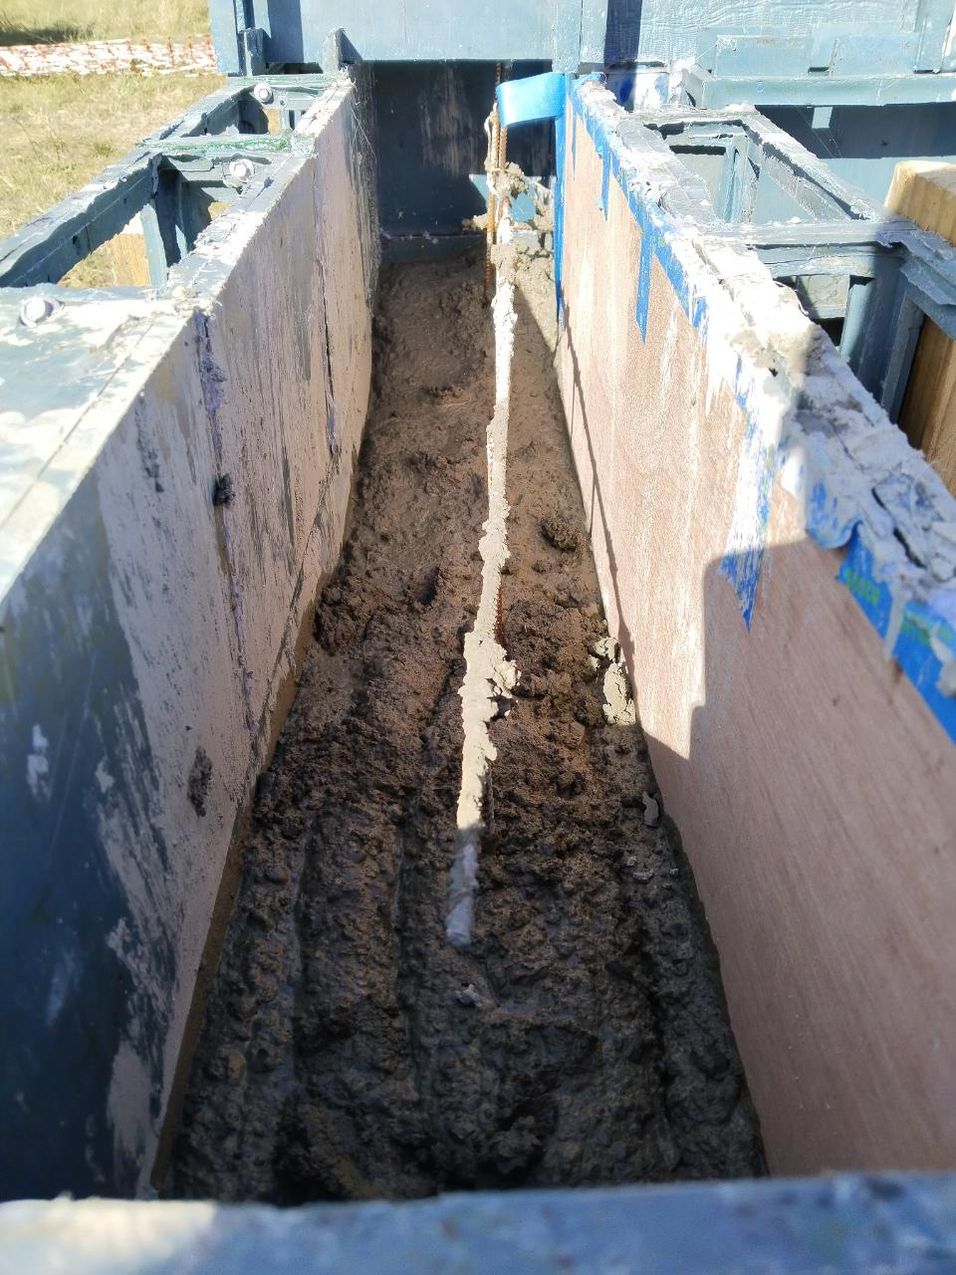
Install starter bars & rebar
Drill holes in the slab to the thickness specified by your anchoring adhesive. Clear the holes of concrete dust. Inject the anchoring adhesive into the holes, and then install your starter bars. Be careful to follow the instructions of your adhesive. You may need to wait up to 24 hours for the adhesive to set. Take care to cover the starter bars with safety caps when they are unattended.
Where required, install additional rebar for your wall using rebar ties and a rebar tie tool.
5
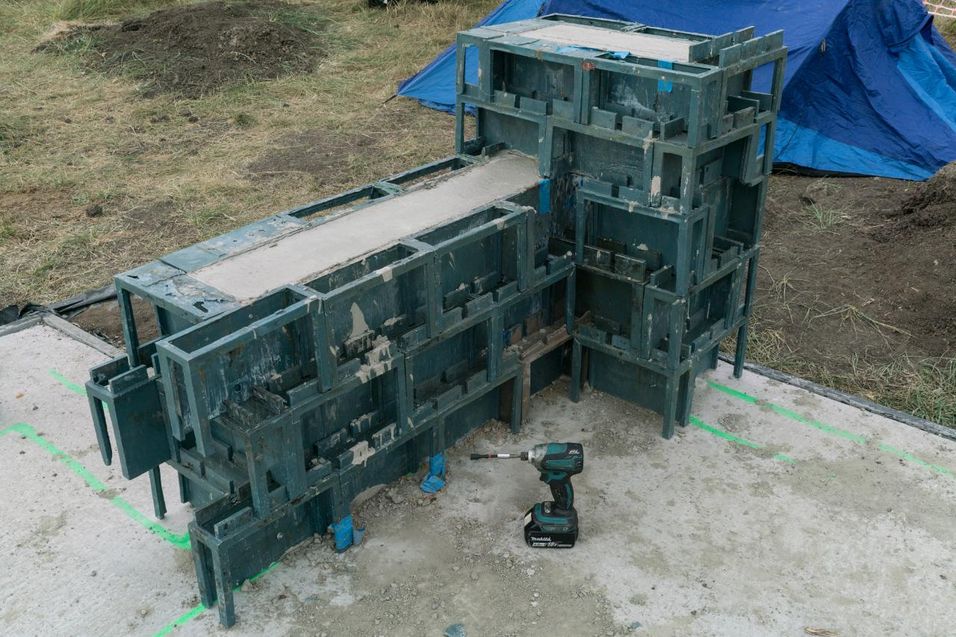
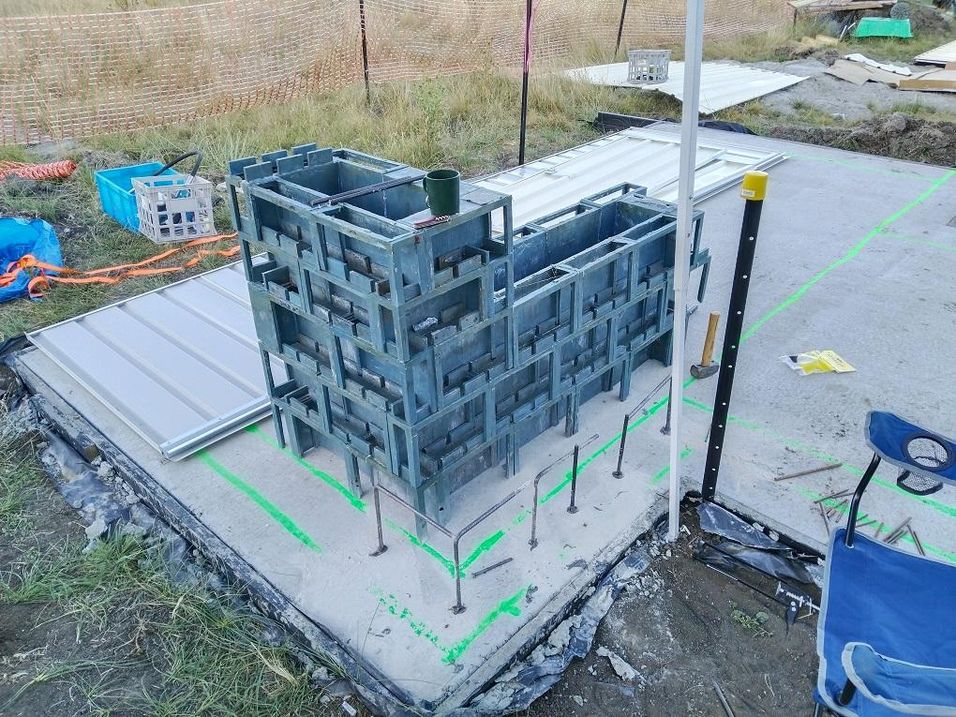
Erect initial form
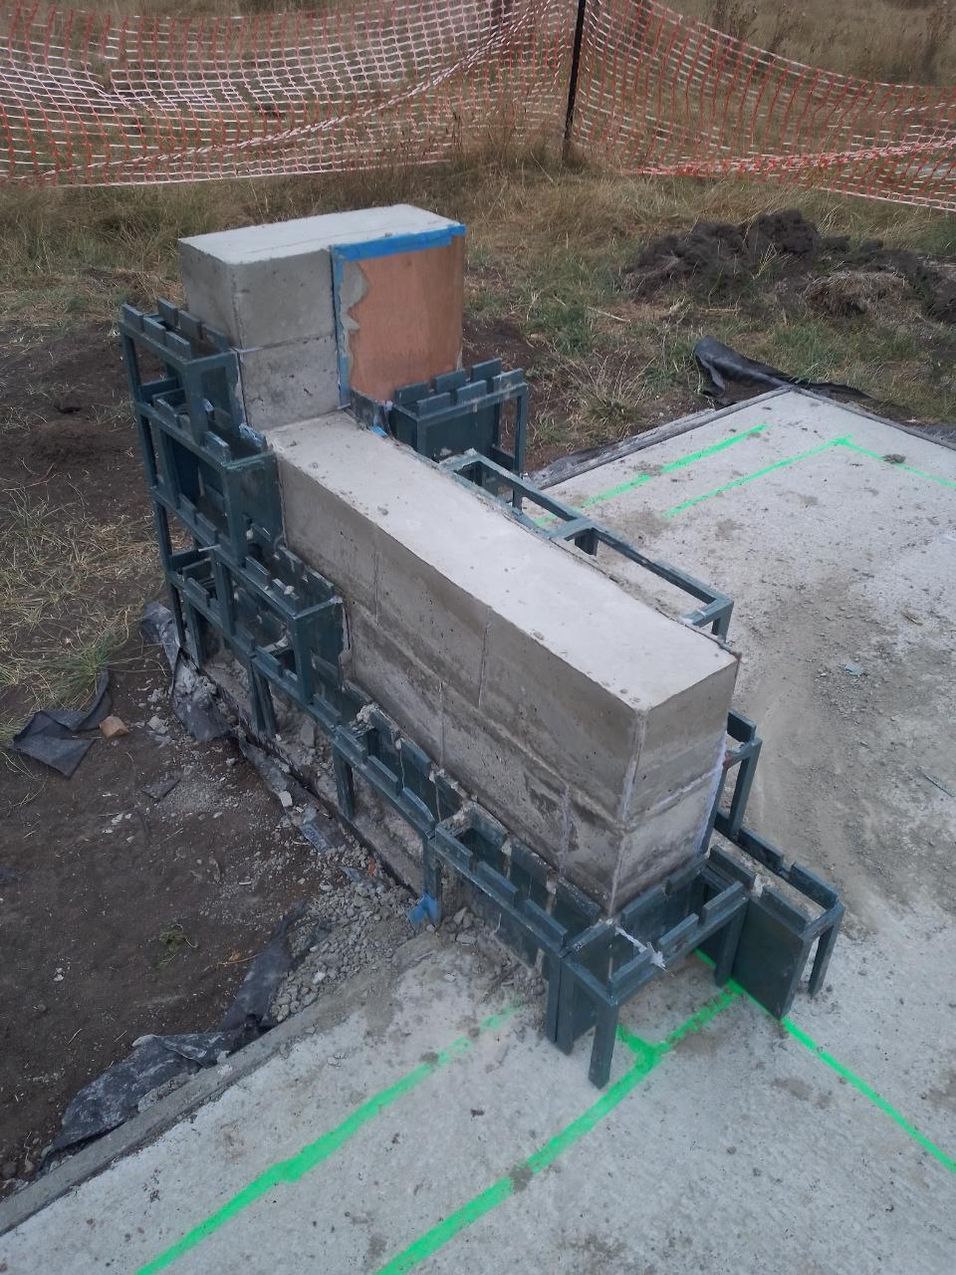
Following the outside of the wall that was marked out in step #5, lay bricks in rows. If you have large seams between your bricks you may want to fill those with hot glue while you erect the formwork. A trowel and a piece of pipe will allow you to clean up your hot glue as you add it to the seams. Alternatively, you can use a thin sheet, potentially produced on a sheetpress, to cover the bricks. This can be taped to the bricks. It does not need to be secured particularly strongly, as the concrete will press it against the bricks tightly when poured.
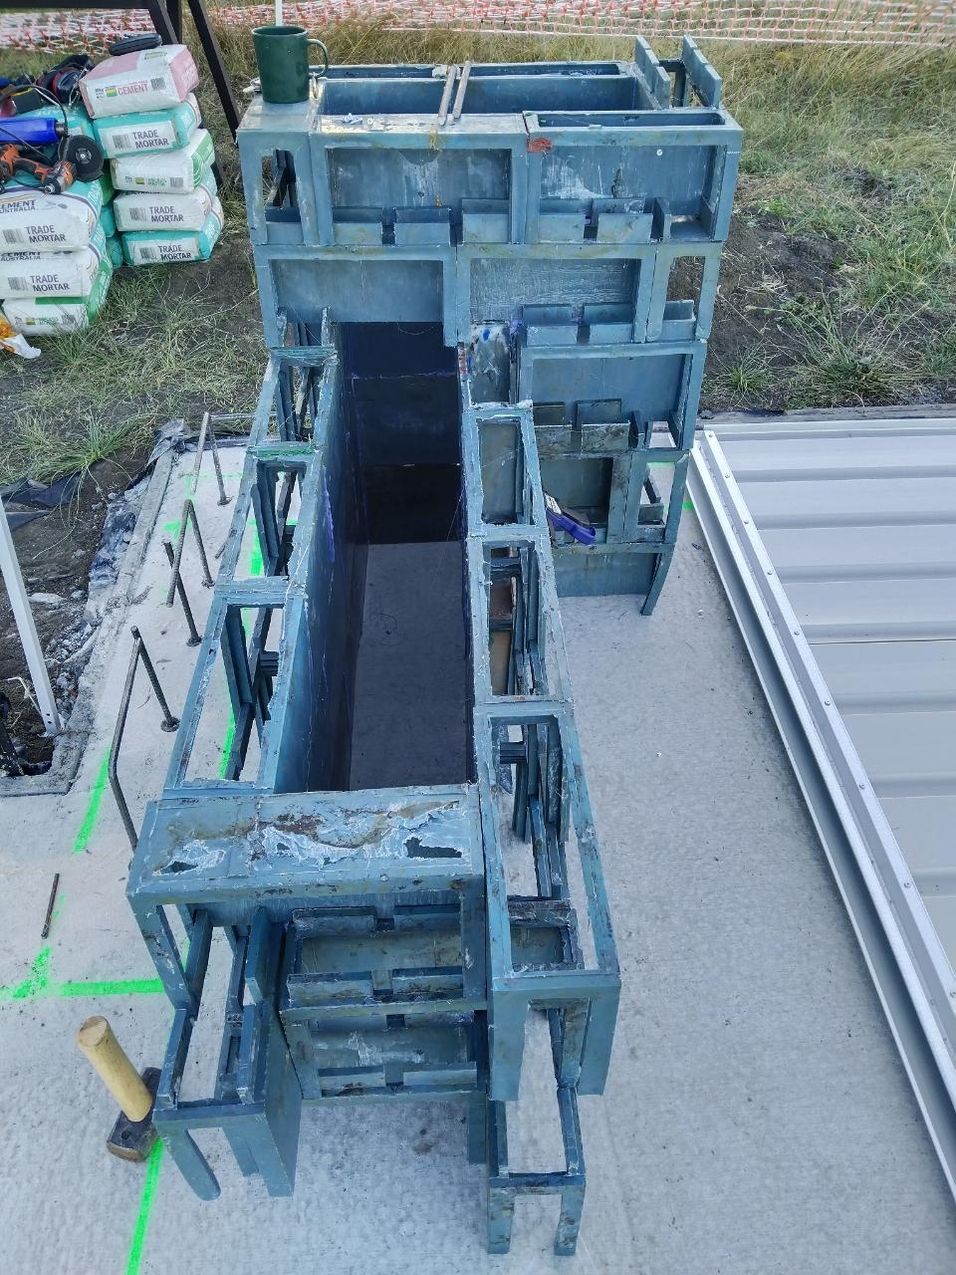
6
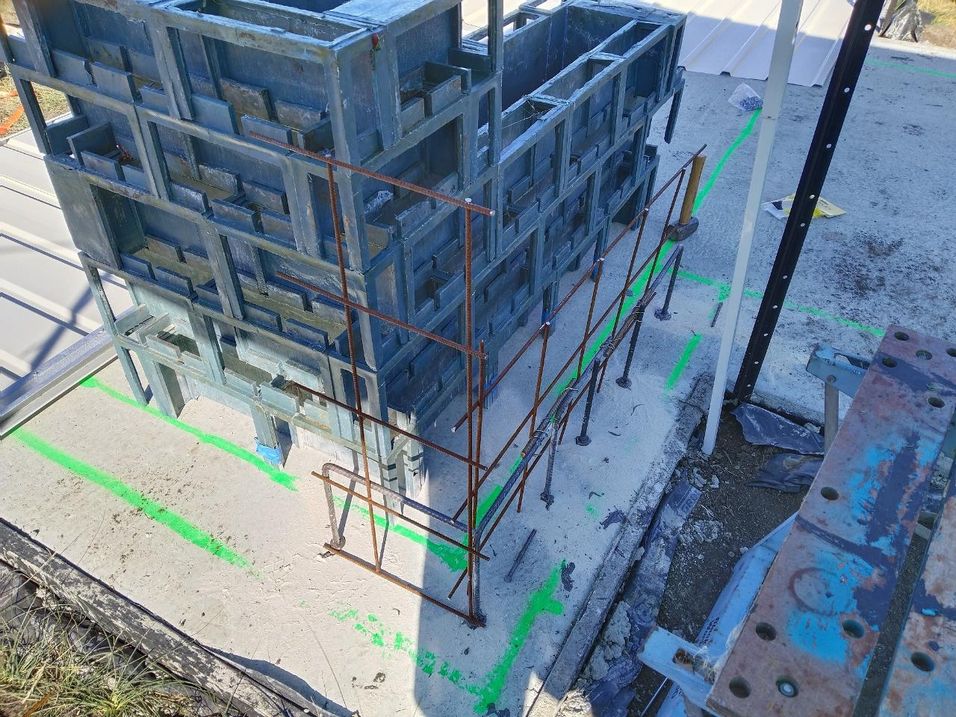
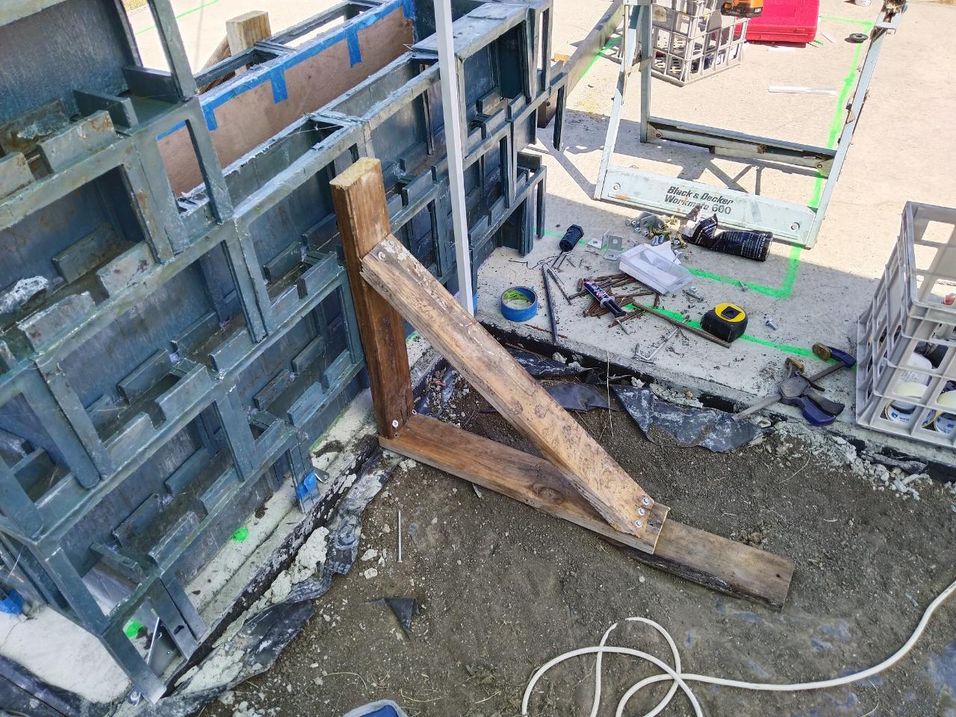
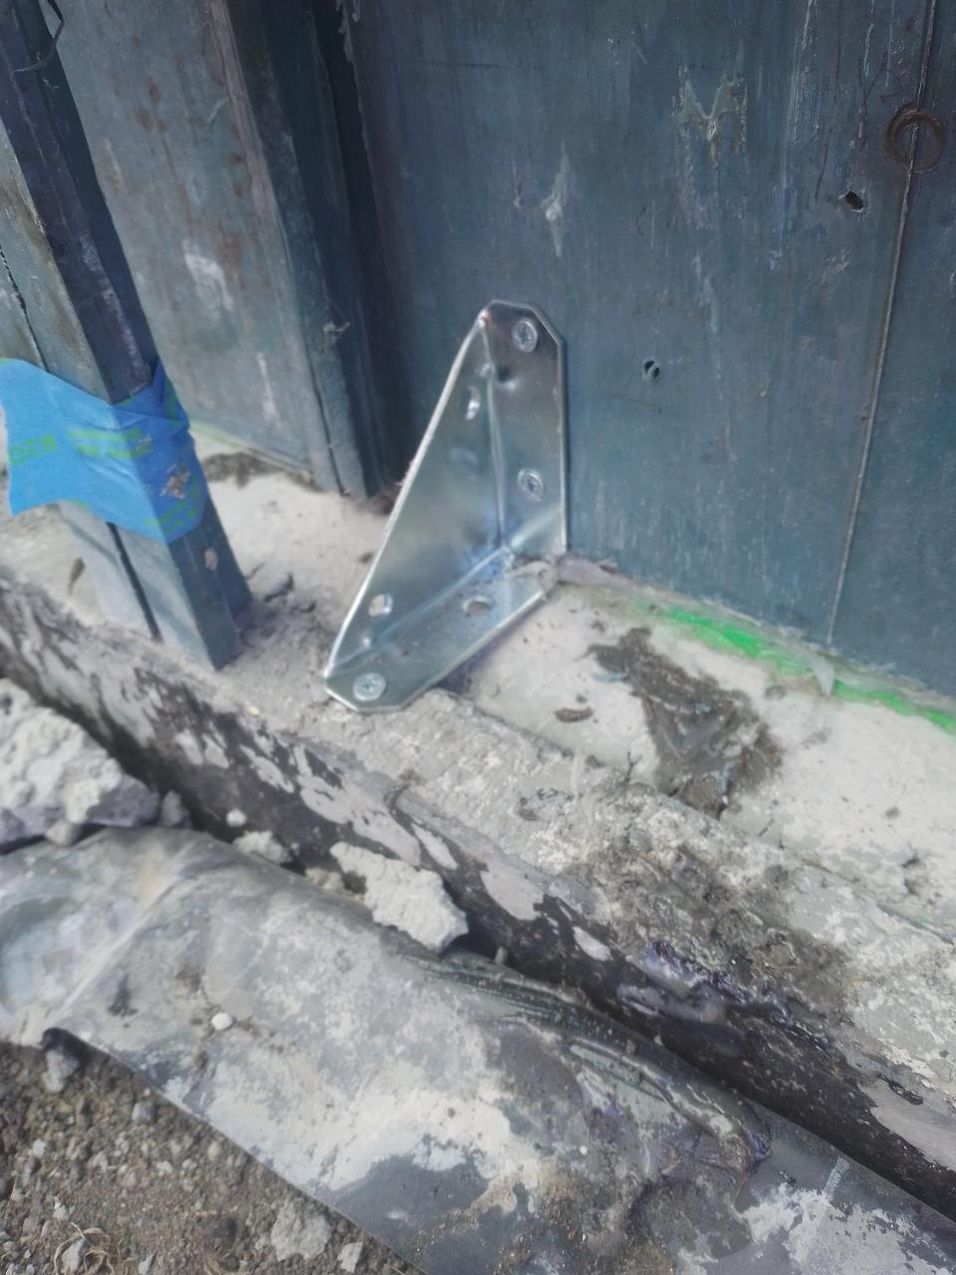
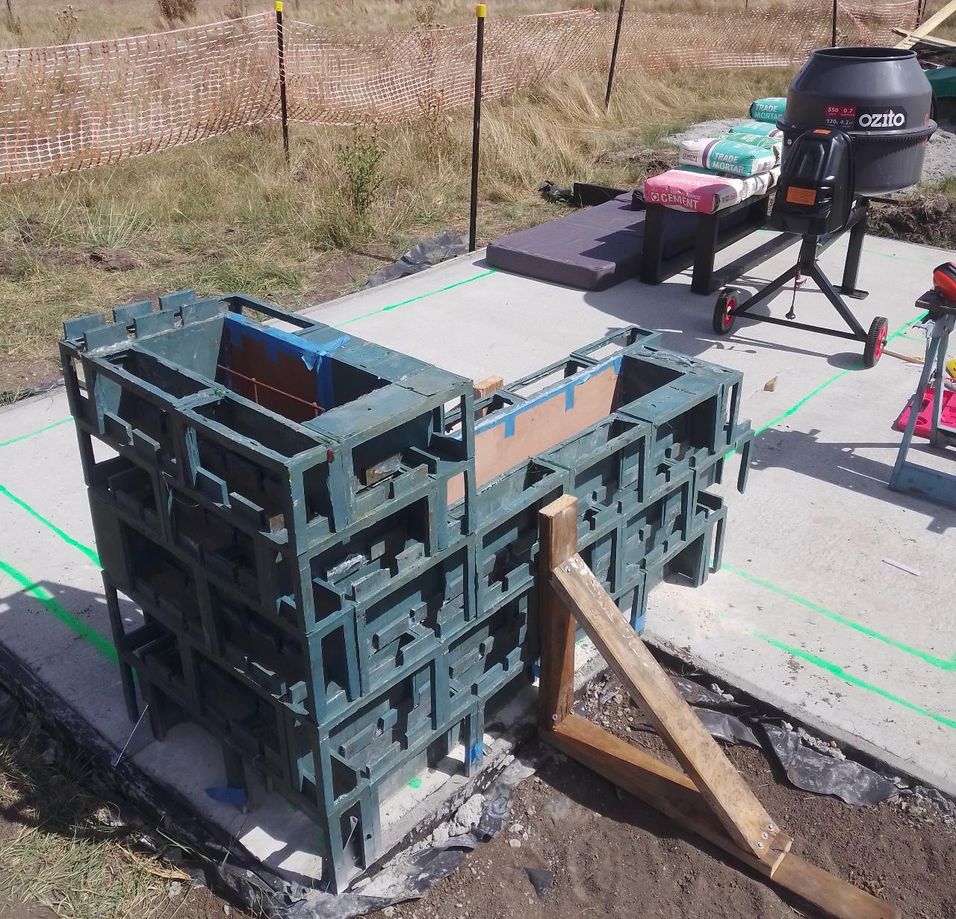
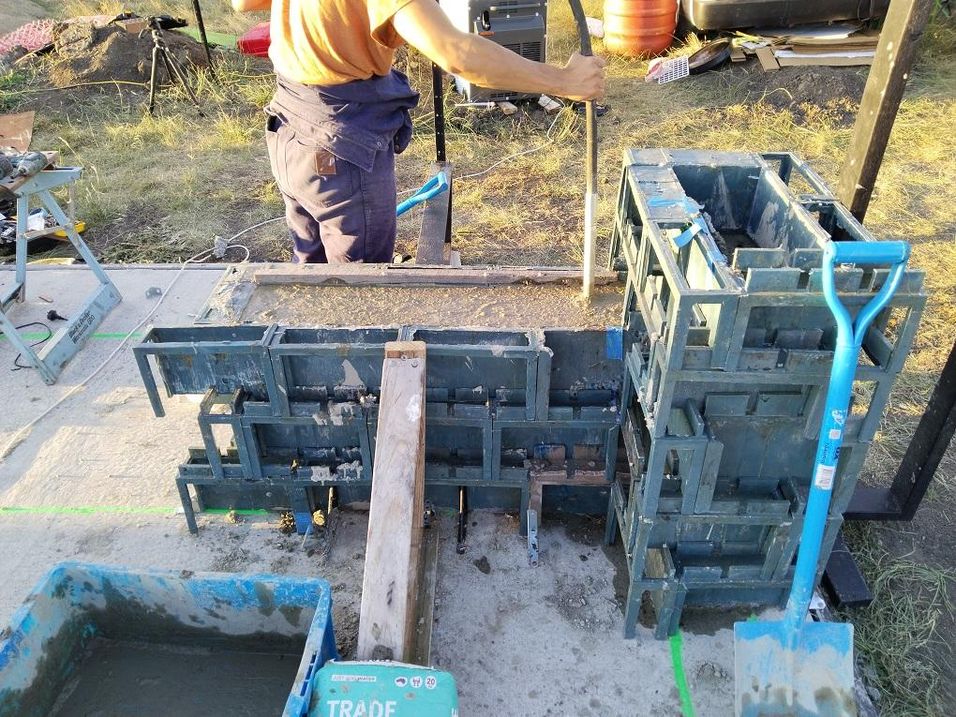
Secure and brace form
How you achieve this step will be dependent on your building site, and preferences, but our suggestion is to use small steel brackets, where you can screw them to timber, or nail them to a concrete slab. These brackets will serve the dual purpose of preventing the formwork from lifting from the ground, and preventing individual bricks from blowing outwards due to the static load of the poured concrete.
Every brick at ground level must be supported from directly behind its main, concrete facing surface. And at least every third brick must be bolted to the ground to prevent the formwork rising. Every brick on the top row of your formwork should also be secured in some way to it’s neighbour. Both the top and the bottom row of your formwork are not supported by the teeth of other bricks, meaning that they will blow out if not secured via alternative means.
Alternatives to steel brackets could include using simple chocks placed against the back of the main concrete facing surface. These c
7
Prepare to pour
Before pouring concrete, it is crucial to inspect your formwork thoroughly for potential issues that could arise. Improperly secured bricks, large seams and a misaligned formwork will all result in a failure to build the wall that you intend. Concrete blowouts can be dangerous, and are nearly impossible to stop once they start due to the mass of the material involved.
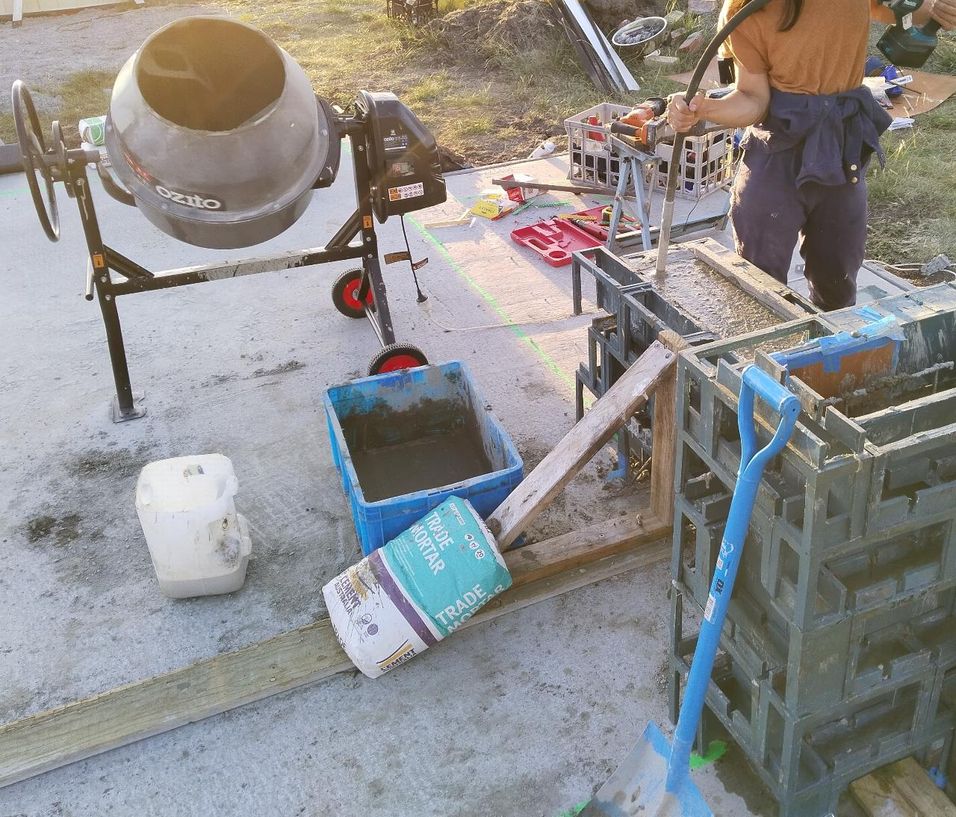
Once you are certain your formwork is secured, from top to bottom, arrange your concrete mixer, and concrete ingredients in a way that will allow you to easily pour the material into the form.
Ensure you have enough time in the day to complete the pour before starting.
8
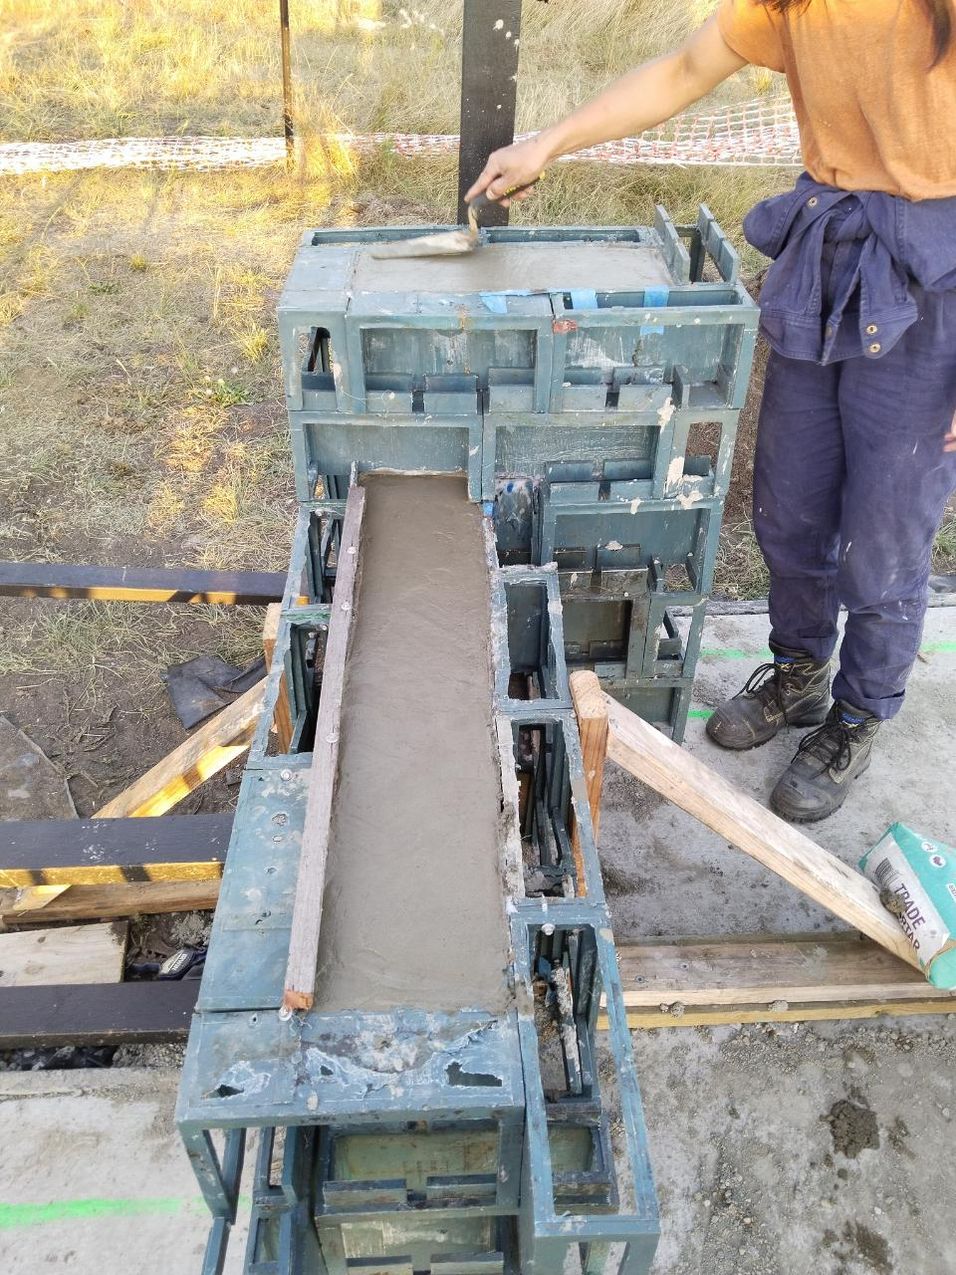
Begin pouring
To start with, mix enough concrete to build around 20-40mm of your wall. Shovel it into the formwork, and vibrate it into the corners. As you go, inspect the outer side of your formwork for concrete attempting to come out the bottom. Mix and pour slowly, while inspecting the bottom of your form as you go until you get to around 150mm above ground level. At this point you have cleared the first major hurdle. Let the concrete that you have already poured set for 90 minutes, as this will allow it to support the weight of subsequent pours, without as much risk of a blowout.
9
Complete your pour
Once the first run of concrete is hardening, you can increase the cadence of your pours. Ensure that you continue to inspect the formwork as you go higher. In our case we poured approximately 60L of concrete every half an hour after the first part of our wall, remembering to vibrate the air pockets out as we went. A faster cadence could be possible when using rapid set cement, however this would not be advisable on your first try as it may set either before you’ve vibrated it thoroughly, or in the case you have a blow out, it will be substantially harder to rectify the site.
Once you reach the top of your formwork, use a trowel to make a nice surface at the top. Edging tools will allow you to create nice bevels on the corners of your wall.
10
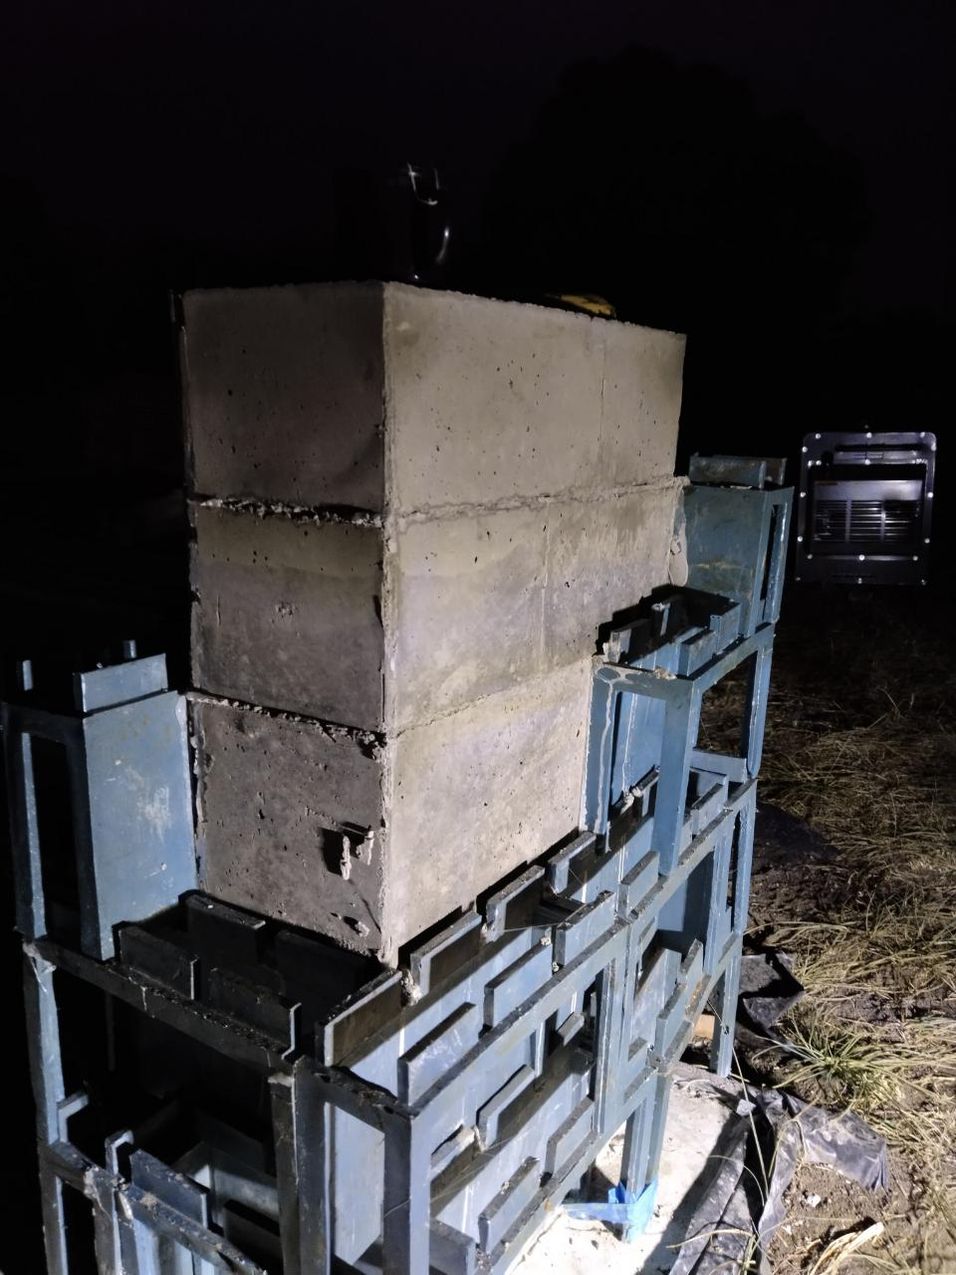
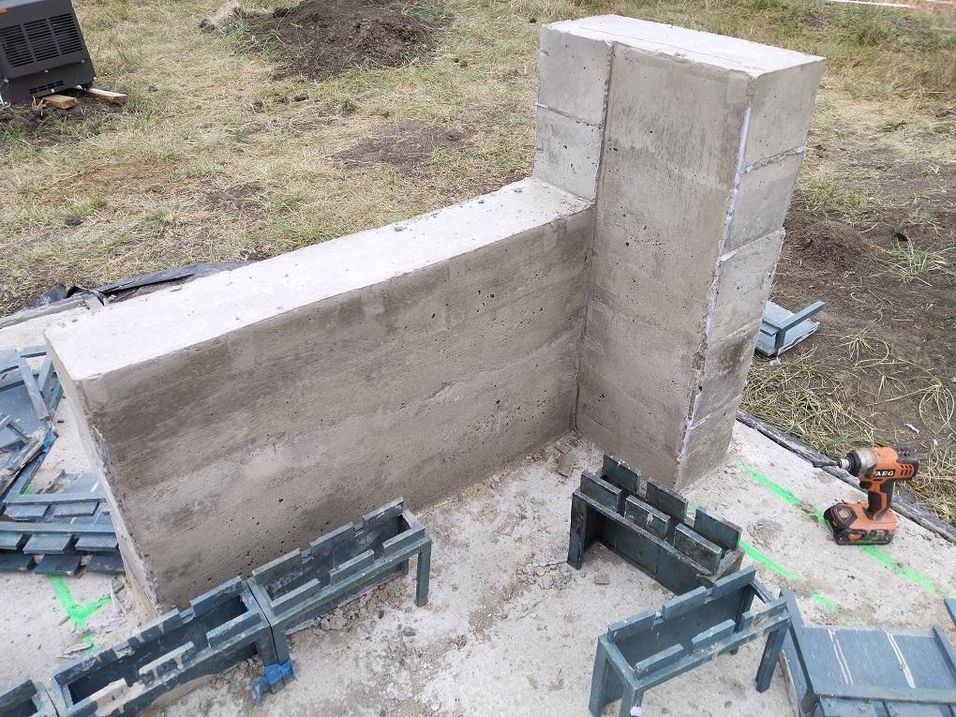
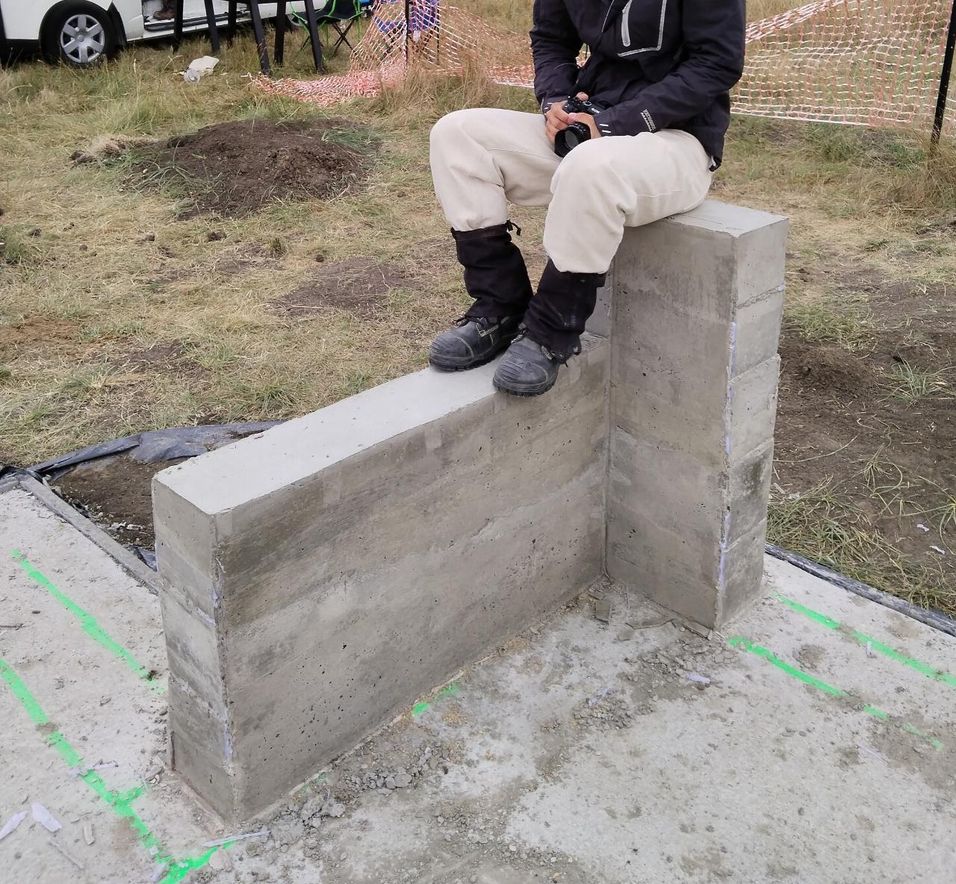
Demould!
Once the concrete starts to turn to a lighter grey, it is getting close to hard enough to remove your formwork. We waited for 36 hours so as to be sure it was set well enough to remain standing, but you may want to refer to the manufacturer’s specifications for the cement that you use, as well as details like the ambient temperature, which will affect the speed with which it sets. If in doubt, wait longer before starting this step.
To demould, we started by undoing any fasteners we had at the top layer, and removing the bracing. Bricks were easily removed by rocking them back and forth, to lift them off the teeth underneath. Hot glue where used will break off easily.
11
Cleanup
In our case, some of the seams were not well filled with hot glue, so concrete got into them. This can be avoided, but in case it’s an issue for you too, it’s a good idea to clean your bricks right after you’ve finished demoulding, as the concrete will still be weak and crumbly. Wear safety glasses and rub those bricks with a wire brush.
If you had to screw into your bricks, holes can be filled with a hot glue gun, and sticks of the plastic you used to make your bricks. It’s not a bad idea to do this while you’re still on site, as next time when you use the bricks you might forget to inspect for cavities.
In general, it’s a good idea to maintain a neat construction site, as any subsequent work carried out there can be affected by hazards you leave behind. So clean up your tools and materials once you’re done!
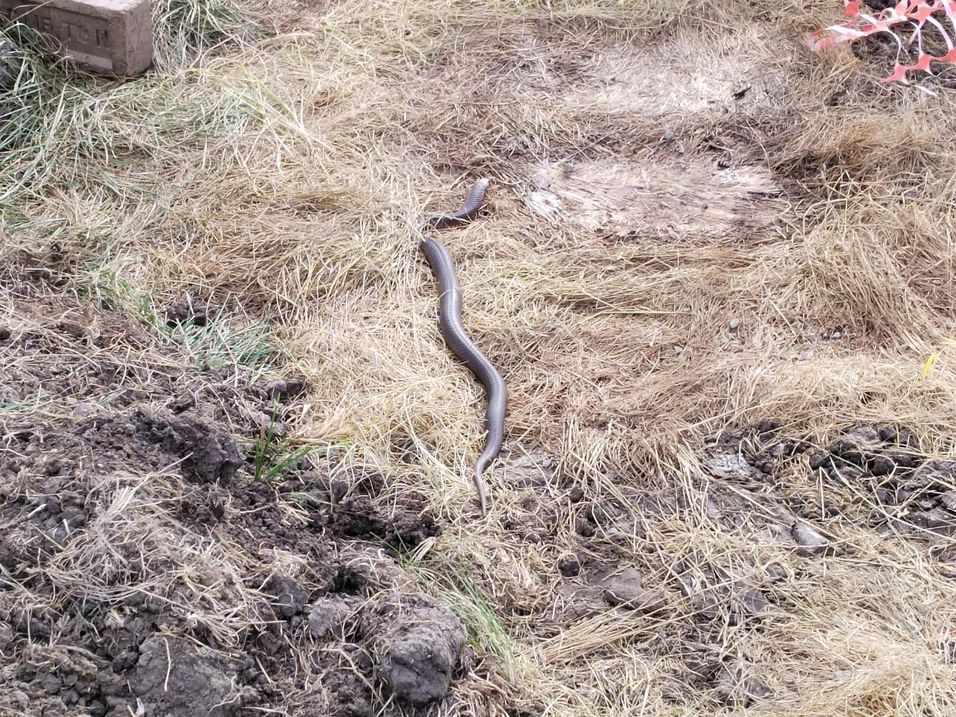
Also, if relevant, remember to feed the horse. And to avoid the tiger snake.

%20--%3e%3csvg%20version='1.1'%20id='Layer_1'%20xmlns='http://www.w3.org/2000/svg'%20xmlns:xlink='http://www.w3.org/1999/xlink'%20x='0px'%20y='0px'%20viewBox='0%200%2064%2063'%20style='enable-background:new%200%200%2064%2063;'%20xml:space='preserve'%3e%3cstyle%20type='text/css'%3e%20.st0{fill:%2320B7EB;}%20.st1{fill:%23E9475A;}%20.st2{fill:%23FECE4E;}%20%3c/style%3e%3cdesc%3eCreated%20with%20Sketch.%3c/desc%3e%3cg%20id='Page-1'%3e%3cg%20id='OA-Logo-Black-Background'%3e%3cpath%20id='Shape'%20class='st0'%20d='M14.1,30.1c-1.5-0.8-8.6-3.8-14.1-7.8c1.8-3.4,3.1-5.6,5-9.1c2.7,1.1,1.9,0.5,4.6,1.7%20c0.8,0.4,10.1,4.5,13.8,6.2c2.4,1.1,4.7,2.2,7,3.3L43,30.5l8.1,3.9c4,2,7.2,3.5,11.3,5.5c0.5,0.3-3.7,9.4-3.7,9.4%20c-1.7-0.6-3.9-1.8-5.5-2.5c-4.7-2.1-9-3.9-13.7-6c-4-1.8-6.7-2.9-10.8-4.5C25,34.9,17.1,31.6,14.1,30.1z'/%3e%3cpath%20id='Shape_1_'%20class='st1'%20d='M12.1,54.9c-0.8,0.6-1.6,1.2-2.5,1.6c-0.4-0.5-0.9-1-1.3-1.5c-0.3-1.2-2.3-4.9-2.7-6.2%20c-0.1-0.4-0.7-2.2-0.8-2.6c0,0,5-3.4,8.2-5.9c3.2-2.6,6.2-5,9.3-7.5c1.4-1.1,3.9-2.5,5.3-3.5c2.5-1.7,13-9.1,15.6-10.5%20c5.4-3.3,11.1-6.3,16.8-9c1.7,3.5,1.8,3,3.8,6.9c0,0-17.8,13.5-22.7,17.1c-3.8,2.8-7.5,5.7-11.3,8.5c-1.7,1.3-3.5,2.4-5.2,3.7'/%3e%3cpath%20id='Shape_2_'%20class='st2'%20d='M20.8,2.9l-0.2-0.8C25,0,31.2-0.3,31.4,0.2c0.4,1.1,0.9,2.2,1.2,3.4c1.4,4.4,2.7,8.7,4,13.1%20c0.4,1.4,2.8,10,2.9,10.5c0.5,2.8,1.2,5.6,1.6,8.4c0.8,4.7,1.4,8.6,2.3,13.3c0.6,3.1,1.3,6.3,2.3,11.3c0,0-5.8,1.4-7.5,1.8%20c-0.8,0.2-1.5,0.4-2.4,0.6c-0.3-1.1-0.2-1.2-0.5-2.1c-0.9-3.7-1.8-7.3-2.6-11c-1.5-6.4-3-12.9-4.4-19.3%20c-1.2-5.4-2.6-10.7-4.4-15.9c-1-3.1-1.8-6.3-2.7-9.5C21.1,3.8,21,3.8,20.8,2.9z'/%3e%3c/g%3e%3c/g%3e%3c/svg%3e)