
Injection Machine Automatic Connection Upgrade!
Published 3y. Edited 1yPublished almost 4 years ago. Last edit over 1 year ago
This How-To will show you how to upgrade your injection machine and molds to make your injection process faster, safer, and more efficient!
This trick works on any injection mold that have a threaded connection to the machine nozzle. Install a brass garden hose connector and voilà!injectionhackmould
More Information

%20--%3e%3csvg%20version='1.1'%20id='Layer_1'%20xmlns='http://www.w3.org/2000/svg'%20xmlns:xlink='http://www.w3.org/1999/xlink'%20x='0px'%20y='0px'%20viewBox='0%200%2064%2063'%20style='enable-background:new%200%200%2064%2063;'%20xml:space='preserve'%3e%3cstyle%20type='text/css'%3e%20.st0{fill:%23231F20;}%20%3c/style%3e%3cdesc%3eCreated%20with%20Sketch.%3c/desc%3e%3cg%20id='Page-1'%3e%3cg%20id='OA-Logo-Black-Background'%3e%3cpath%20id='Shape'%20class='st0'%20d='M14.1,30.1c-1.5-0.8-8.6-3.8-14.1-7.8c1.8-3.4,3.1-5.6,5-9.1c2.7,1.1,1.9,0.5,4.6,1.7%20c0.8,0.4,10.1,4.5,13.8,6.2c2.4,1.1,4.7,2.2,7,3.3L43,30.5l8.1,3.9c4,2,7.2,3.5,11.3,5.5c0.5,0.3-3.7,9.4-3.7,9.4%20c-1.7-0.6-3.9-1.8-5.5-2.5c-4.7-2.1-9-3.9-13.7-6c-4-1.8-6.7-2.9-10.8-4.5C25,34.9,17.1,31.6,14.1,30.1z'/%3e%3cpath%20id='Shape_1_'%20class='st0'%20d='M12.1,54.9c-0.8,0.6-1.6,1.2-2.5,1.6c-0.4-0.5-0.9-1-1.3-1.5c-0.3-1.2-2.3-4.9-2.7-6.2%20c-0.1-0.4-0.7-2.2-0.8-2.6c0,0,5-3.4,8.2-5.9c3.2-2.6,6.2-5,9.3-7.5c1.4-1.1,3.9-2.5,5.3-3.5c2.5-1.7,13-9.1,15.6-10.5%20c5.4-3.3,11.1-6.3,16.8-9c1.7,3.5,1.8,3,3.8,6.9c0,0-17.8,13.5-22.7,17.1c-3.8,2.8-7.5,5.7-11.3,8.5c-1.7,1.3-3.5,2.4-5.2,3.7'/%3e%3cpath%20id='Shape_2_'%20class='st0'%20d='M20.8,2.9l-0.2-0.8C25,0,31.2-0.3,31.4,0.2c0.4,1.1,0.9,2.2,1.2,3.4c1.4,4.4,2.7,8.7,4,13.1%20c0.4,1.4,2.8,10,2.9,10.5c0.5,2.8,1.2,5.6,1.6,8.4c0.8,4.7,1.4,8.6,2.3,13.3c0.6,3.1,1.3,6.3,2.3,11.3c0,0-5.8,1.4-7.5,1.8%20c-0.8,0.2-1.5,0.4-2.4,0.6c-0.3-1.1-0.2-1.2-0.5-2.1c-0.9-3.7-1.8-7.3-2.6-11c-1.5-6.4-3-12.9-4.4-19.3%20c-1.2-5.4-2.6-10.7-4.4-15.9c-1-3.1-1.8-6.3-2.7-9.5C21.1,3.8,21,3.8,20.8,2.9z'/%3e%3c/g%3e%3c/g%3e%3c/svg%3e)


1
The problems with injection
The injection machine is a great tool to raise awareness about plastic pollution and demonstrate the plastic recycling process.
However if you need to produce many parts, the process can be a little slow and difficult.
Here are the main problems in my opinion:
-Molds are hard to attach to the machine ---> Often get clogged up by molten plastic, making the assembly difficult and require cleaning between each cycle
-Unmolding takes time---> Threaded mold connectors create undercut shapes, making unmolding difficult
Here are the specifications that the upgrade system must achieve:
1- Allow molds to be attached and detached from the machine in 1 movement
2- Reduce uncomfortable position for the operator
3- Reduce production waste
4- Be usable with gloves easily
5- Reduce cycle time
6- Do not require cleaning between each cycle
The trick is to use a brass garden hose connector, available in gardening and home improvement store, to easily connect your mold ans be more efficient!
2
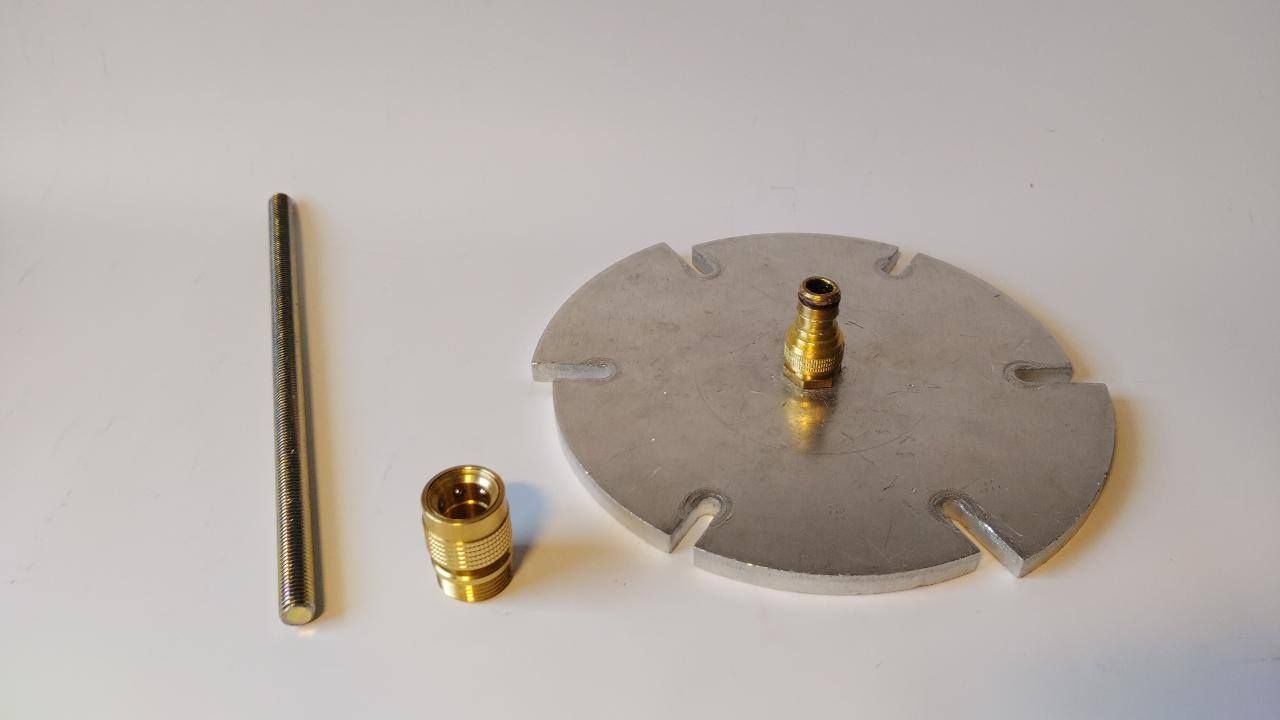
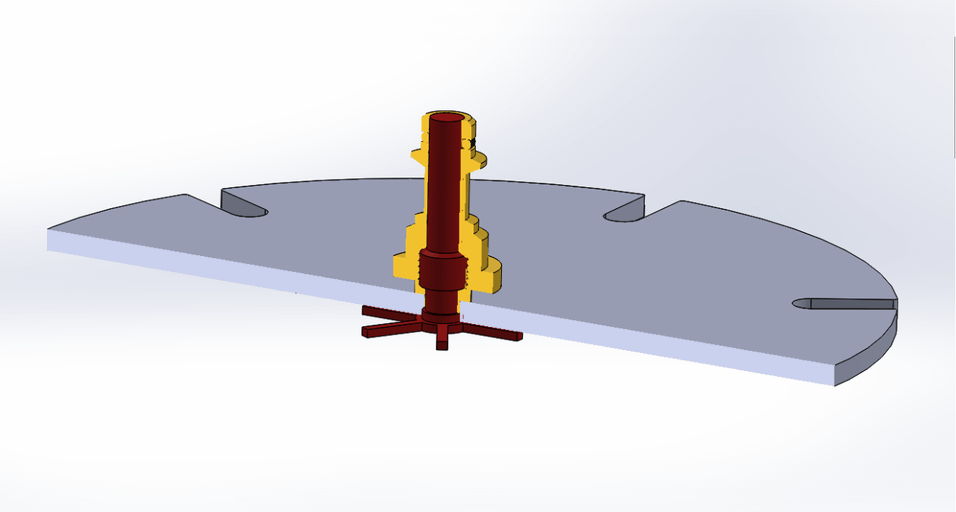
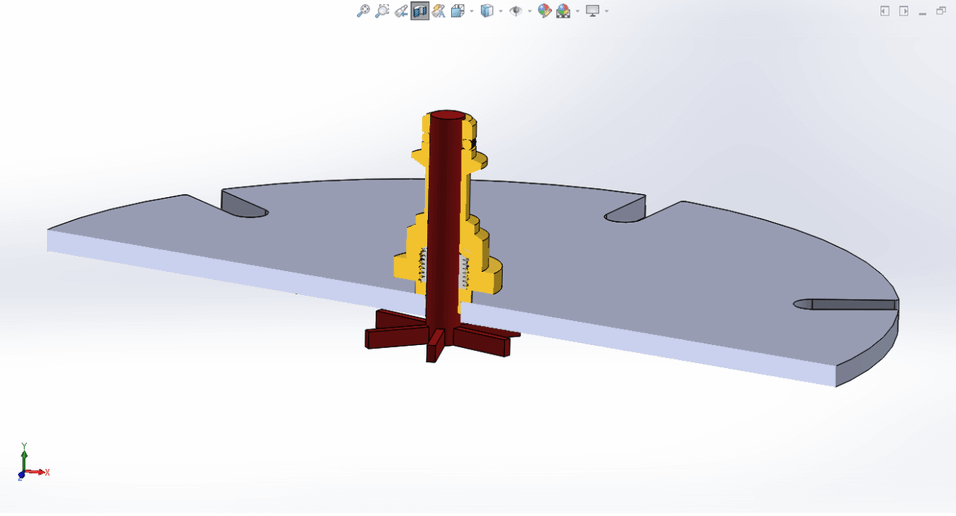
Bill of materials:
You'll need :
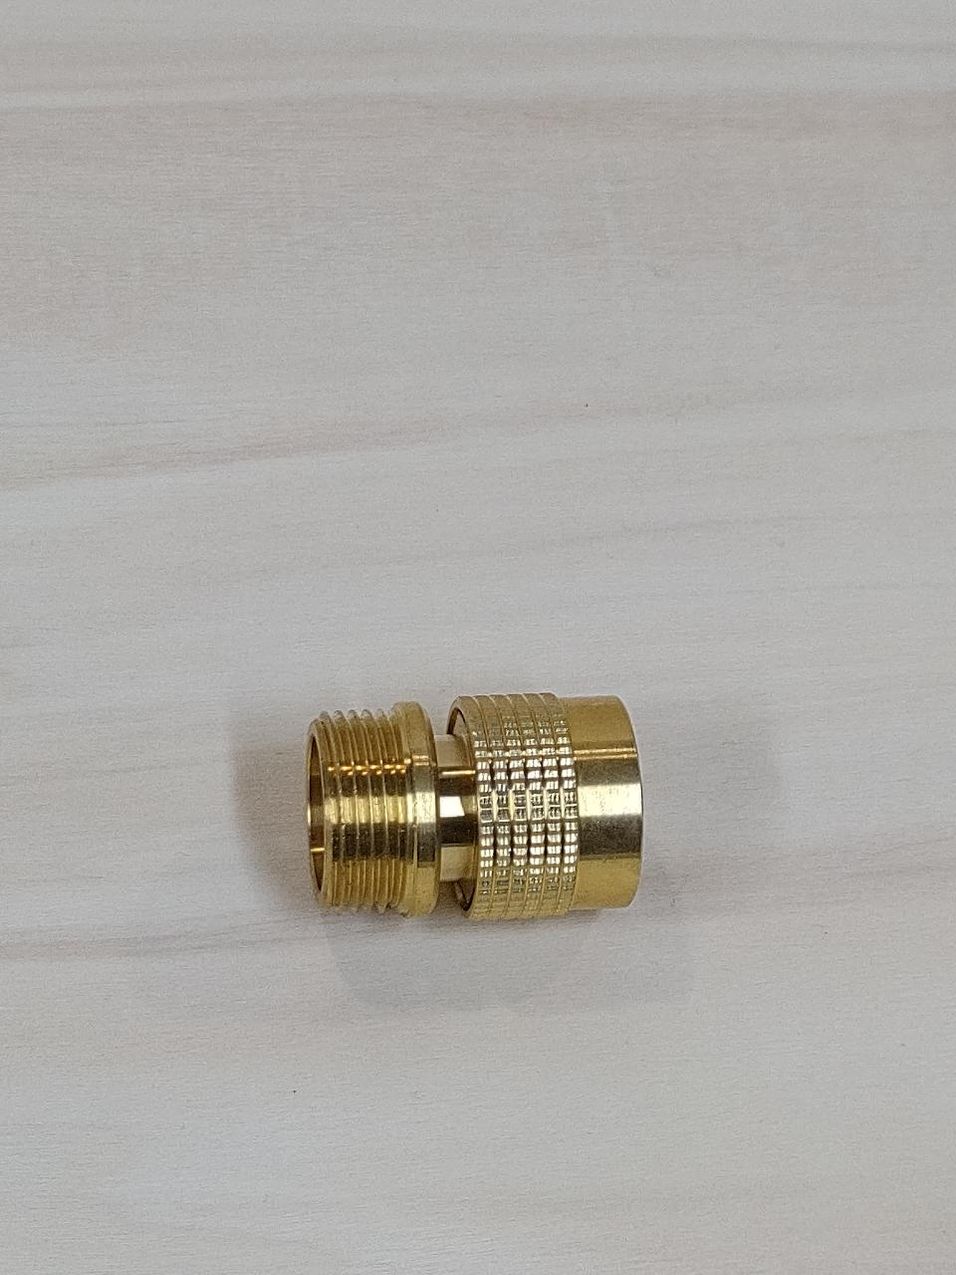
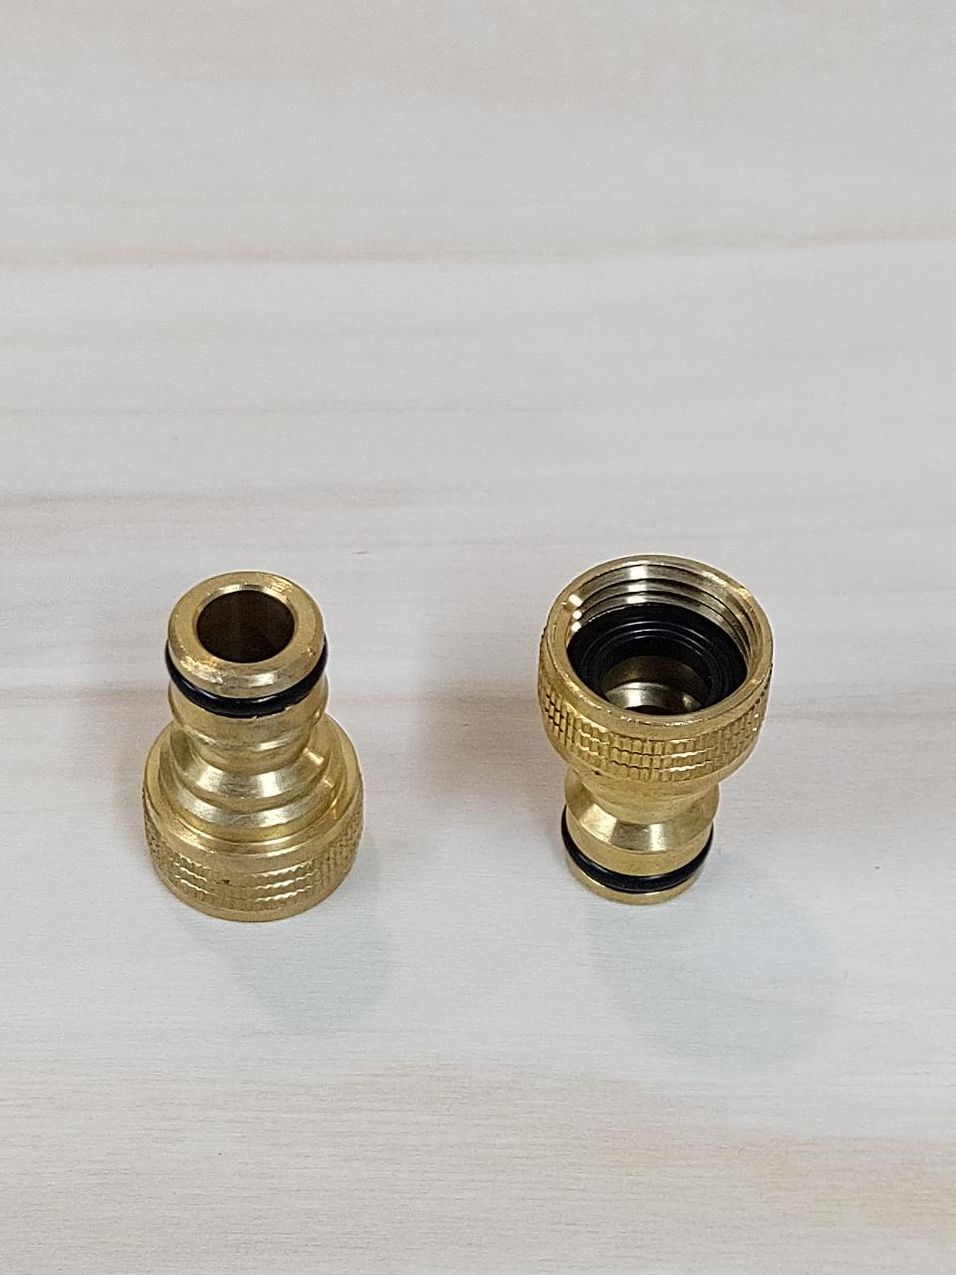
x1 1 inch female brass garden hose connector with EXTERNAL threads (picture n°2)
x2 1/2" inch male brass garden hose connector (or any other size depending on what fits on your mold), with INTERNAL threads (picture n°3)
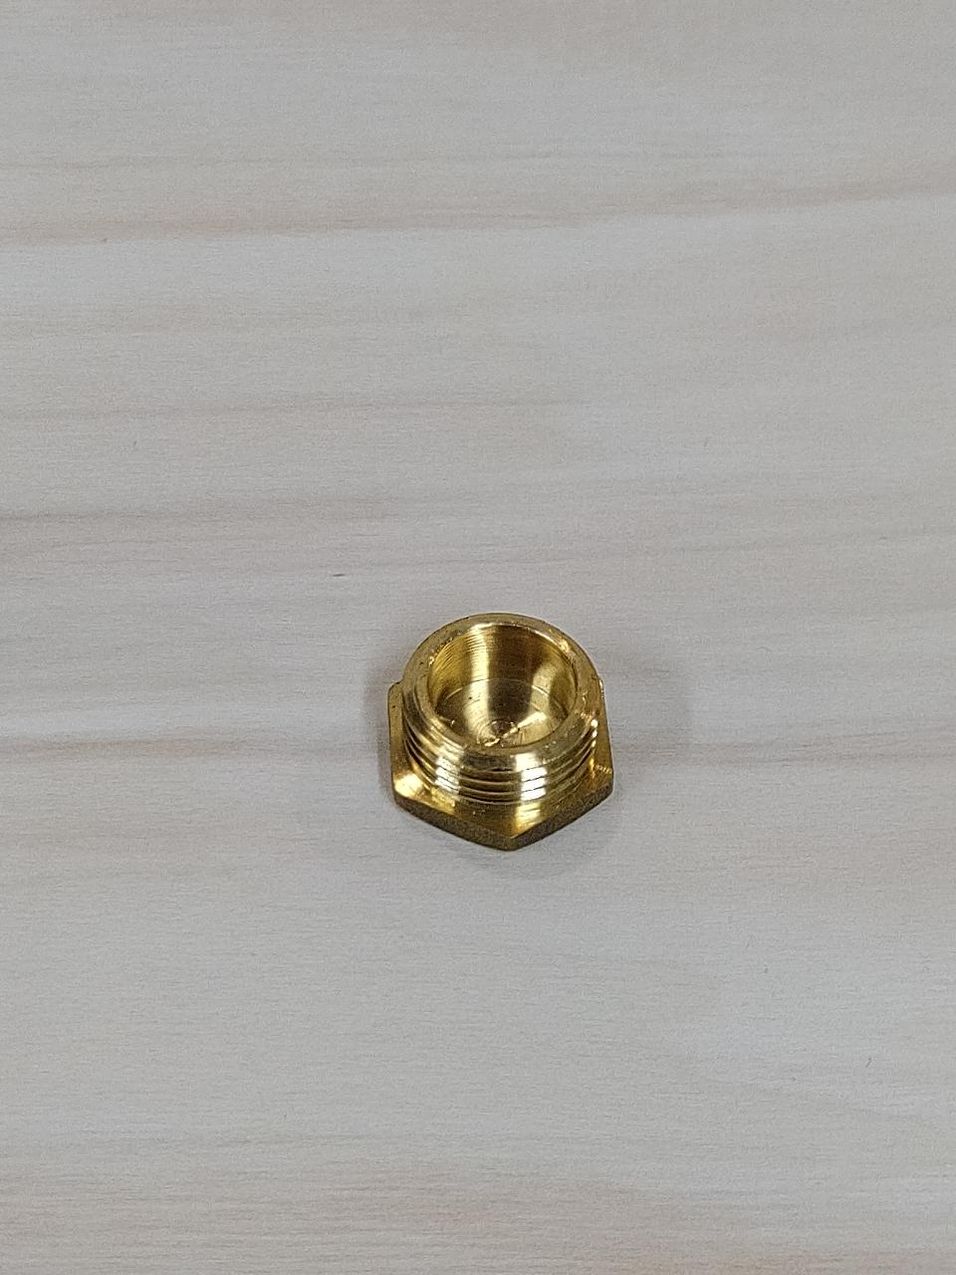
x1 1/2" inch brass endcap (picture n°1)
You'll find all of this in your local hardware/gardening store.
1 - 14mm long piece of M14 threaded rod (or a 14mm diameter round stock (Edit: for this tutorial I used M 14 threaded rod because the exterior diameter is the right size for the application, but you can use any other 14mm round stock you have on hand, the exterior threads are not needed)
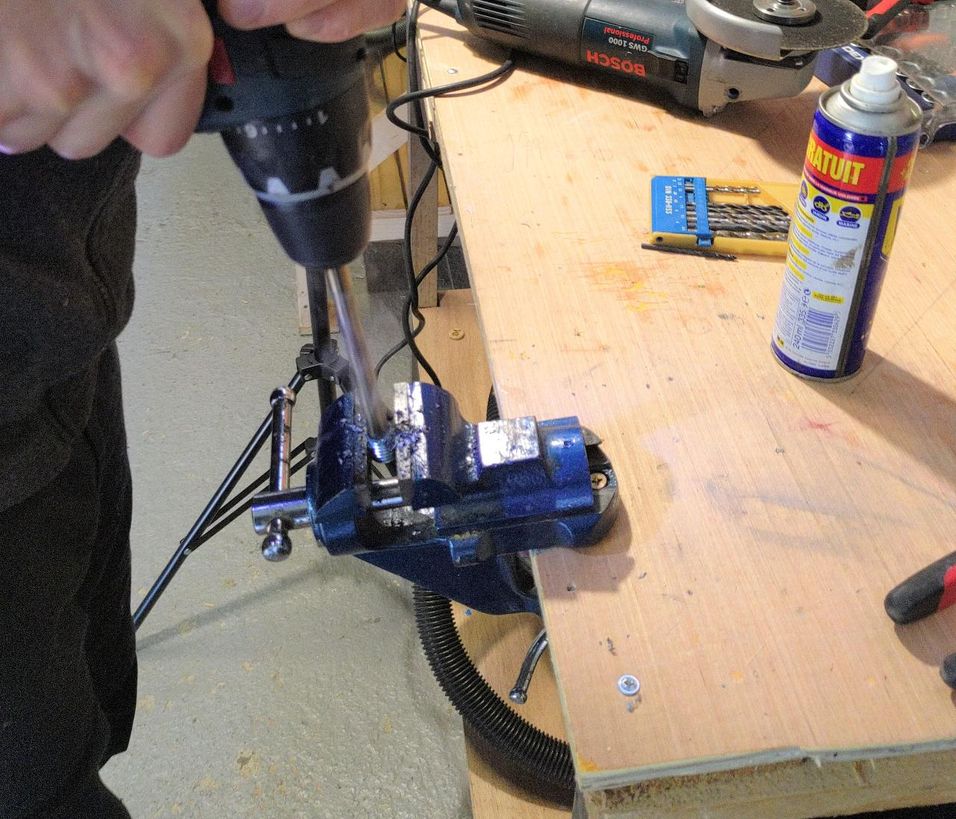
1- 10mm drill bit
A drill and a vise
ATTENTION: Buy the right hardware for your particular machine and mold! Check dimensions
Metric to inch equivalent:
1/2 " = 15x21 threads
3
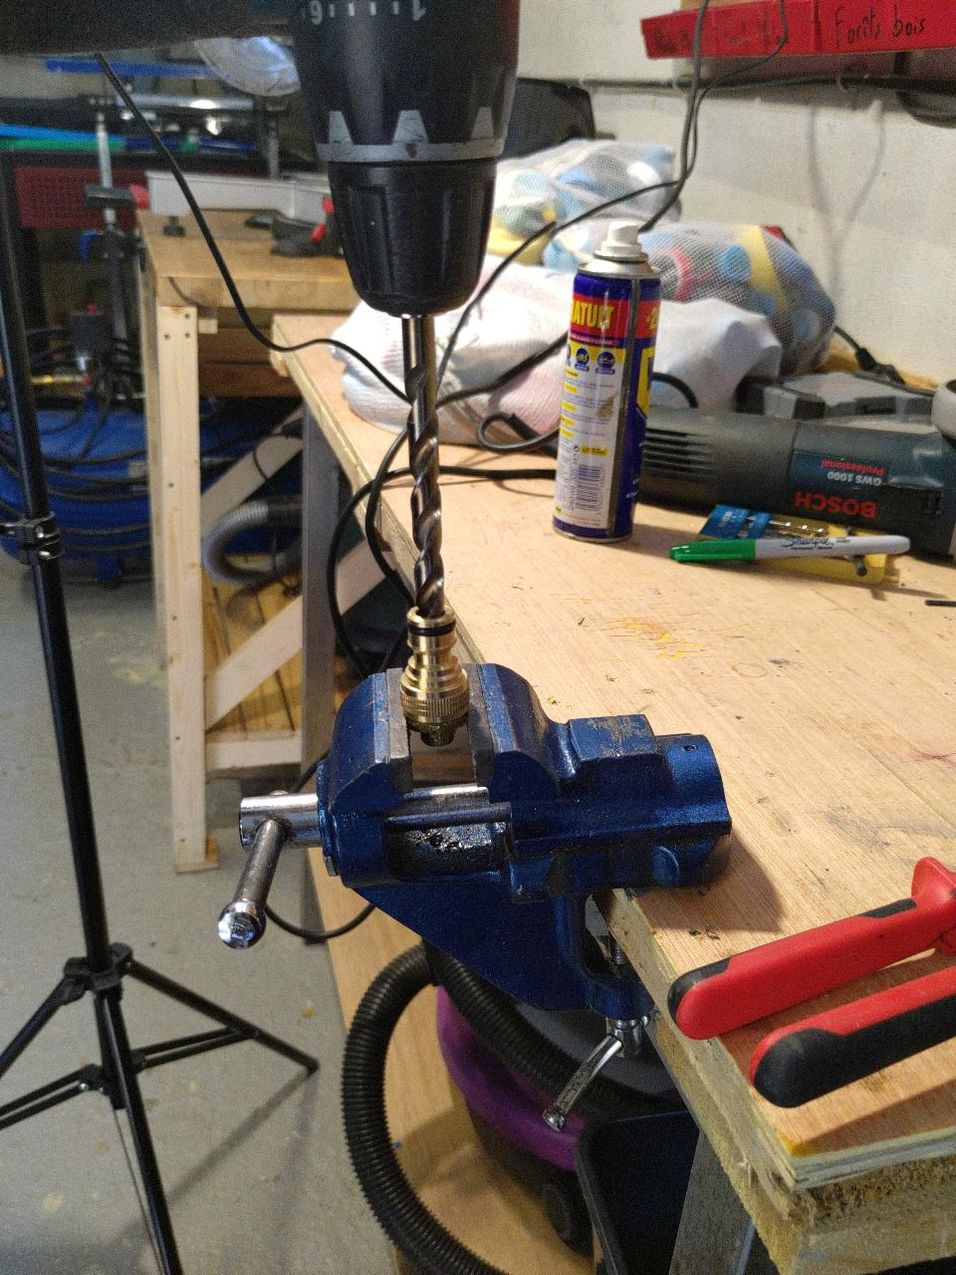
Spacer fabrication
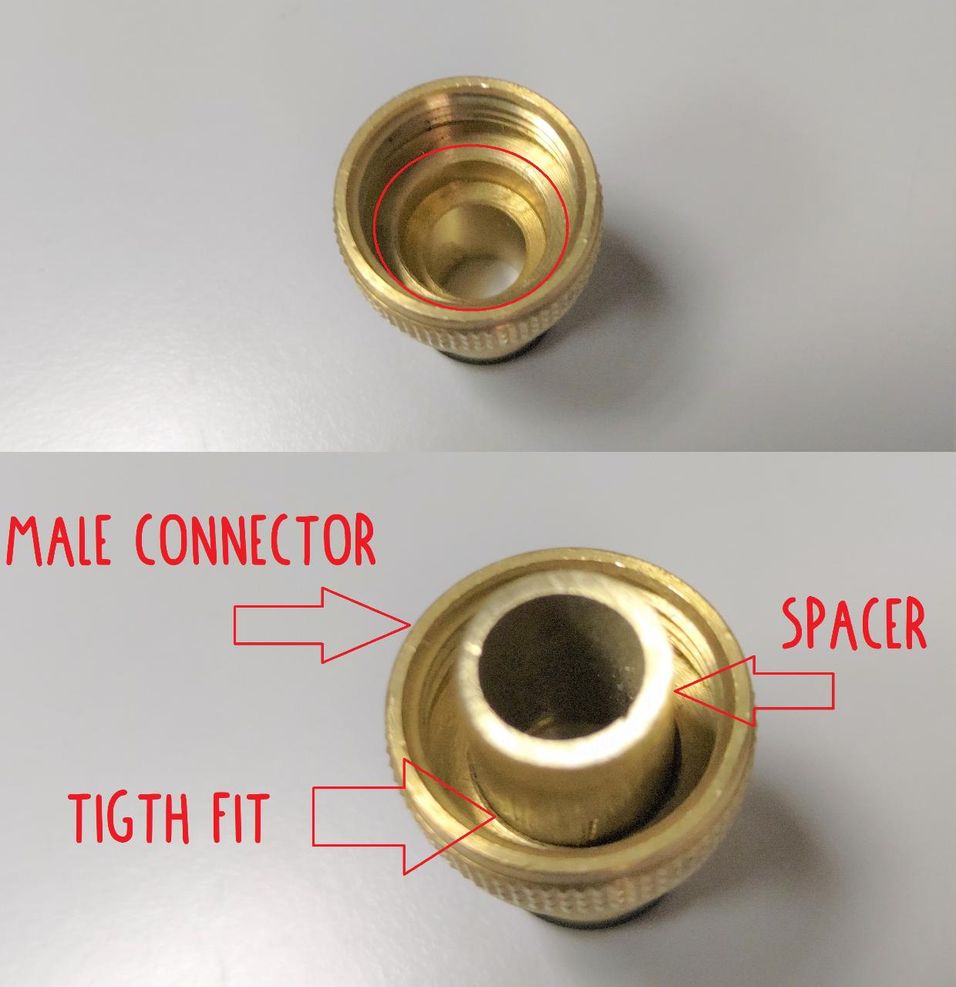
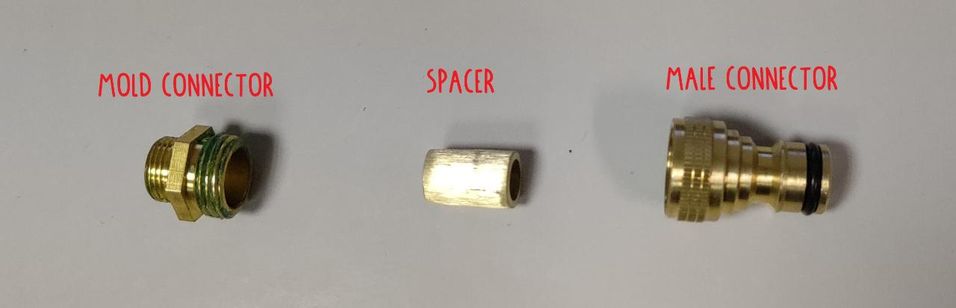
The first step is to fabricate a spacer: basically a 14mm diameter cylinder with a 10 mm hole in the middle (see plans below).
You can use M14 threaded rod a screw as it is easily available, but a 14 mm round stock is ok.
Using a drill and a vise, drill a 10 mm hole trough the hole spacer.
Make sure your spacer fits nicely in both the male connector and the 1/4 inch adaptor to prevent leakage later on.

4
Assembly steps
I-Modify your mold
1- Place the spacer inside your mold's ½ inch connector, it should fit inside snugly and fill the most of the empty space.
2- Screw the male brass connector on top of it
3- Drill with the 10 mm drill trough all the parts to enlarge the hole diameter up to 10 mm.
Be careful to drill right in the center, otherwise you can damage the threads.
You'll have to repeat those steps for each one of your molds (once the mold have been used, it is inconvenient to remove the male connector and spacer inside, it is easier to fit all your molds with male connectors)
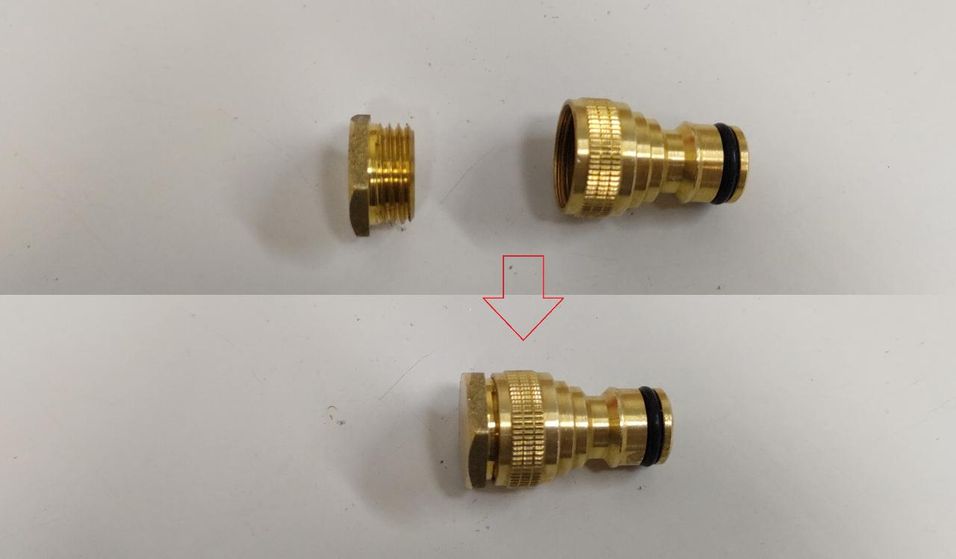
II- Assemble your plug:
- Simply take the second male connector and screw it to the end cap --> Here's your new plug :) (Picture n°1)
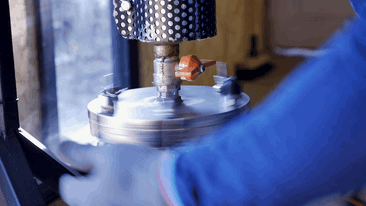
III- Modify your injection machine
-Unscrew the current threaded nozzle of your machine and replace it with the brass female connector!
5
Instructions for operation
1 - Prepare your mold as usual and heat up your machine
2- When you are ready to inject, remove the plug by simply lifting the female connector exterior ring (picture n°2)
3-Push your mold up into the connector, it will automatically latch onto it and make a nice "click" sound
4- Inject your mold
5- To remove the mold, just lift the female connector exterior ring and get your mold, then place the plug back inside.
6-Repeat :)
Using this method, I was able to pull out about 15 injections/ hour, which is way more than I used to.
-181f27dd395.jpg?width=956&resize=contain)
-181f27e055d.jpg?width=956&resize=contain)
6
No more undercut shapes!
The piece of rod is here to fill the void inside the male connector. The molten plastic can then flows through the 10 mm round channel, and the sprue can be pulled out from the mold easily (Picture N°1)
ATTENTION: Don't forget the spacer, otherwise you are going to have a bad time unmold (picture n°2).
%20--%3e%3csvg%20version='1.1'%20id='Layer_1'%20xmlns='http://www.w3.org/2000/svg'%20xmlns:xlink='http://www.w3.org/1999/xlink'%20x='0px'%20y='0px'%20viewBox='0%200%2064%2063'%20style='enable-background:new%200%200%2064%2063;'%20xml:space='preserve'%3e%3cstyle%20type='text/css'%3e%20.st0{fill:%2320B7EB;}%20.st1{fill:%23E9475A;}%20.st2{fill:%23FECE4E;}%20%3c/style%3e%3cdesc%3eCreated%20with%20Sketch.%3c/desc%3e%3cg%20id='Page-1'%3e%3cg%20id='OA-Logo-Black-Background'%3e%3cpath%20id='Shape'%20class='st0'%20d='M14.1,30.1c-1.5-0.8-8.6-3.8-14.1-7.8c1.8-3.4,3.1-5.6,5-9.1c2.7,1.1,1.9,0.5,4.6,1.7%20c0.8,0.4,10.1,4.5,13.8,6.2c2.4,1.1,4.7,2.2,7,3.3L43,30.5l8.1,3.9c4,2,7.2,3.5,11.3,5.5c0.5,0.3-3.7,9.4-3.7,9.4%20c-1.7-0.6-3.9-1.8-5.5-2.5c-4.7-2.1-9-3.9-13.7-6c-4-1.8-6.7-2.9-10.8-4.5C25,34.9,17.1,31.6,14.1,30.1z'/%3e%3cpath%20id='Shape_1_'%20class='st1'%20d='M12.1,54.9c-0.8,0.6-1.6,1.2-2.5,1.6c-0.4-0.5-0.9-1-1.3-1.5c-0.3-1.2-2.3-4.9-2.7-6.2%20c-0.1-0.4-0.7-2.2-0.8-2.6c0,0,5-3.4,8.2-5.9c3.2-2.6,6.2-5,9.3-7.5c1.4-1.1,3.9-2.5,5.3-3.5c2.5-1.7,13-9.1,15.6-10.5%20c5.4-3.3,11.1-6.3,16.8-9c1.7,3.5,1.8,3,3.8,6.9c0,0-17.8,13.5-22.7,17.1c-3.8,2.8-7.5,5.7-11.3,8.5c-1.7,1.3-3.5,2.4-5.2,3.7'/%3e%3cpath%20id='Shape_2_'%20class='st2'%20d='M20.8,2.9l-0.2-0.8C25,0,31.2-0.3,31.4,0.2c0.4,1.1,0.9,2.2,1.2,3.4c1.4,4.4,2.7,8.7,4,13.1%20c0.4,1.4,2.8,10,2.9,10.5c0.5,2.8,1.2,5.6,1.6,8.4c0.8,4.7,1.4,8.6,2.3,13.3c0.6,3.1,1.3,6.3,2.3,11.3c0,0-5.8,1.4-7.5,1.8%20c-0.8,0.2-1.5,0.4-2.4,0.6c-0.3-1.1-0.2-1.2-0.5-2.1c-0.9-3.7-1.8-7.3-2.6-11c-1.5-6.4-3-12.9-4.4-19.3%20c-1.2-5.4-2.6-10.7-4.4-15.9c-1-3.1-1.8-6.3-2.7-9.5C21.1,3.8,21,3.8,20.8,2.9z'/%3e%3c/g%3e%3c/g%3e%3c/svg%3e)