
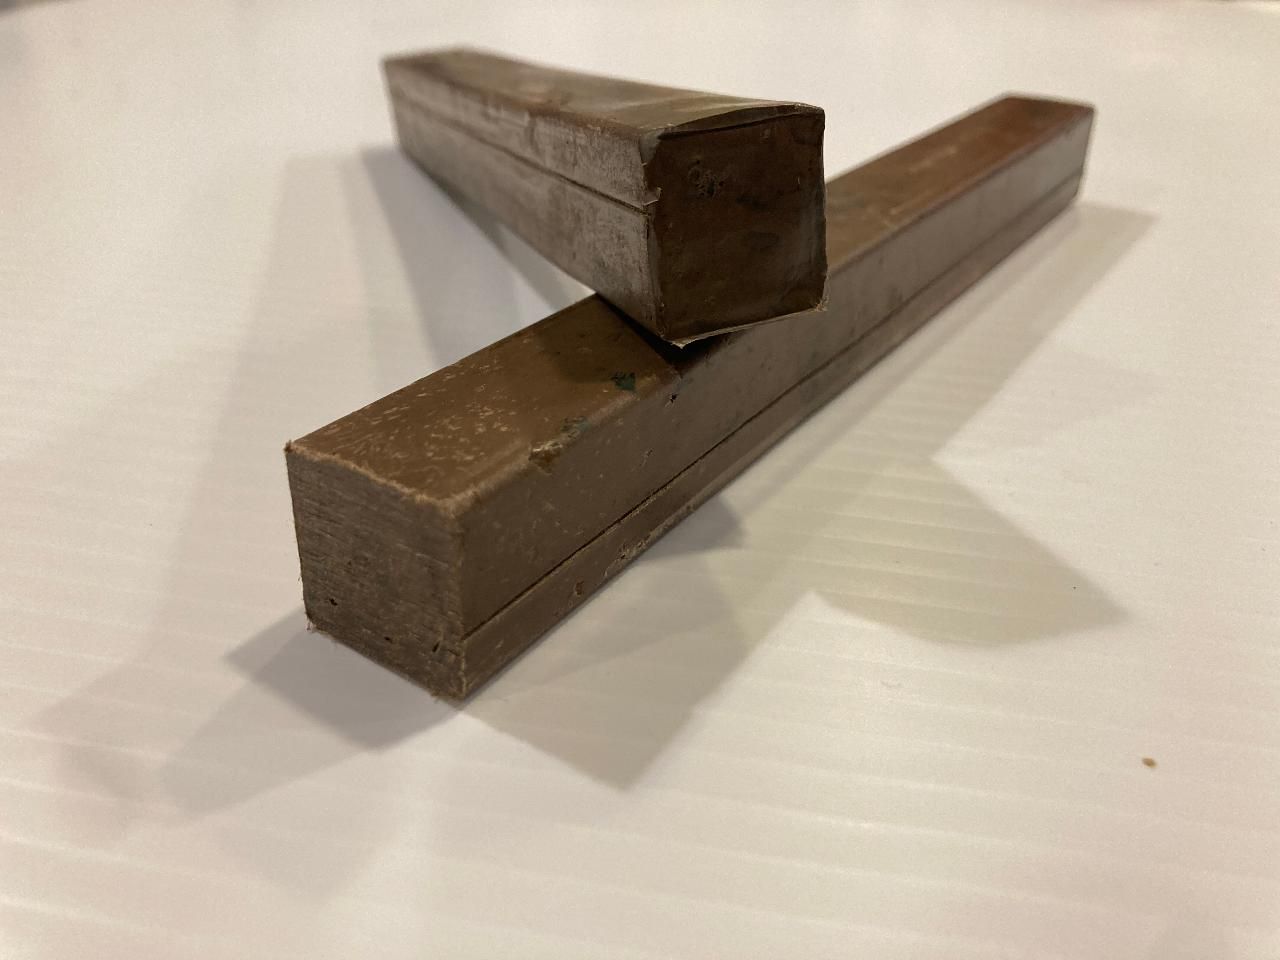
Creating Beams out of HDPE plastic bags
In this guide, I will walk you through the steps to make HDPE plastic bags into beams. This process is also done without fancy machinery such as a shredder or injection machine. If you have access to a long clamp I recommend following the steps at the bottom to make a better beam.injectionHDPEmeltingcompression
More Information

%20--%3e%3csvg%20version='1.1'%20id='Layer_1'%20xmlns='http://www.w3.org/2000/svg'%20xmlns:xlink='http://www.w3.org/1999/xlink'%20x='0px'%20y='0px'%20viewBox='0%200%2064%2063'%20style='enable-background:new%200%200%2064%2063;'%20xml:space='preserve'%3e%3cstyle%20type='text/css'%3e%20.st0{fill:%23231F20;}%20%3c/style%3e%3cdesc%3eCreated%20with%20Sketch.%3c/desc%3e%3cg%20id='Page-1'%3e%3cg%20id='OA-Logo-Black-Background'%3e%3cpath%20id='Shape'%20class='st0'%20d='M14.1,30.1c-1.5-0.8-8.6-3.8-14.1-7.8c1.8-3.4,3.1-5.6,5-9.1c2.7,1.1,1.9,0.5,4.6,1.7%20c0.8,0.4,10.1,4.5,13.8,6.2c2.4,1.1,4.7,2.2,7,3.3L43,30.5l8.1,3.9c4,2,7.2,3.5,11.3,5.5c0.5,0.3-3.7,9.4-3.7,9.4%20c-1.7-0.6-3.9-1.8-5.5-2.5c-4.7-2.1-9-3.9-13.7-6c-4-1.8-6.7-2.9-10.8-4.5C25,34.9,17.1,31.6,14.1,30.1z'/%3e%3cpath%20id='Shape_1_'%20class='st0'%20d='M12.1,54.9c-0.8,0.6-1.6,1.2-2.5,1.6c-0.4-0.5-0.9-1-1.3-1.5c-0.3-1.2-2.3-4.9-2.7-6.2%20c-0.1-0.4-0.7-2.2-0.8-2.6c0,0,5-3.4,8.2-5.9c3.2-2.6,6.2-5,9.3-7.5c1.4-1.1,3.9-2.5,5.3-3.5c2.5-1.7,13-9.1,15.6-10.5%20c5.4-3.3,11.1-6.3,16.8-9c1.7,3.5,1.8,3,3.8,6.9c0,0-17.8,13.5-22.7,17.1c-3.8,2.8-7.5,5.7-11.3,8.5c-1.7,1.3-3.5,2.4-5.2,3.7'/%3e%3cpath%20id='Shape_2_'%20class='st0'%20d='M20.8,2.9l-0.2-0.8C25,0,31.2-0.3,31.4,0.2c0.4,1.1,0.9,2.2,1.2,3.4c1.4,4.4,2.7,8.7,4,13.1%20c0.4,1.4,2.8,10,2.9,10.5c0.5,2.8,1.2,5.6,1.6,8.4c0.8,4.7,1.4,8.6,2.3,13.3c0.6,3.1,1.3,6.3,2.3,11.3c0,0-5.8,1.4-7.5,1.8%20c-0.8,0.2-1.5,0.4-2.4,0.6c-0.3-1.1-0.2-1.2-0.5-2.1c-0.9-3.7-1.8-7.3-2.6-11c-1.5-6.4-3-12.9-4.4-19.3%20c-1.2-5.4-2.6-10.7-4.4-15.9c-1-3.1-1.8-6.3-2.7-9.5C21.1,3.8,21,3.8,20.8,2.9z'/%3e%3c/g%3e%3c/g%3e%3c/svg%3e)


1
Making bags into denser plastic for melting.
In this step, I will walk you through the steps to prepare your plastic bags.
Materials Needed:
• Textile Iron or panini press
• Wax Paper
• HDPE Plastic Bags
• Preferably a carbon activator gas mask.
Steps:
Step 1: Take a single bag and fold it in half long ways.
Step 2: Role the bag as best you can so it’s thin enough to fit into the beam later on.
Note: The bag will shrink considerably, so don’t spend too much time folding it.
Step 3: Put wax paper under and above the folded bag.
Step 4: Do 2-3 quick passes with the iron while applying minimal pressure. This should be less than 10 seconds for each side. If you uses a panini press just press down.
Step 5: Flip and repeat
Step 6: Let your semi-firm plastic bag cool under a heavy object so it’s unable to curl up, this will make it easier to push into the mold later.
Note: A single standard-size bag fills about 0.4 inches in a 1-inch by 1-inch beam so ensure you have a considerable amount of bags processed before the next step.
2
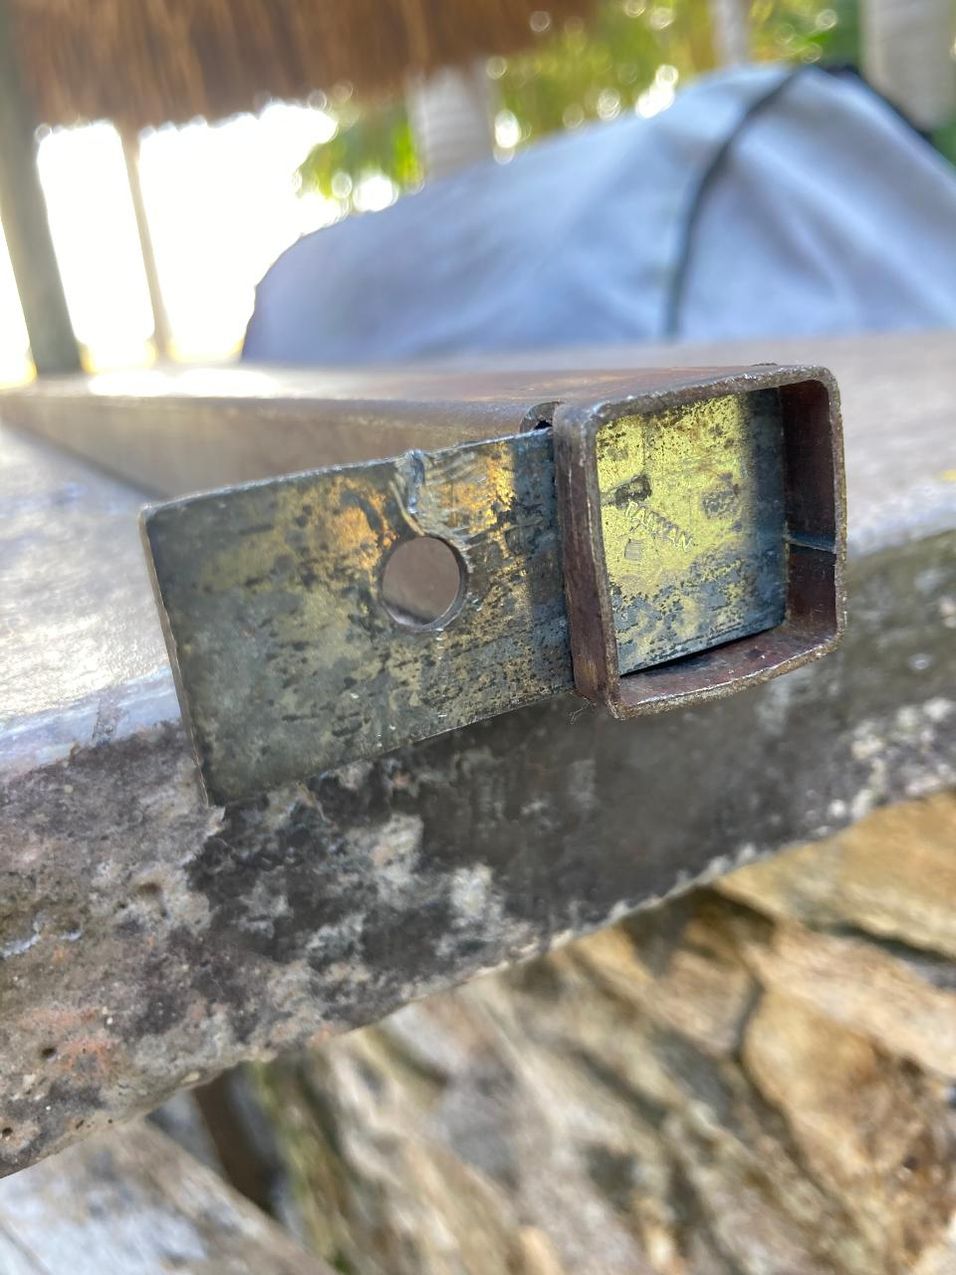
Creating your mold/beam.
Your beam/mold will need a quick-release mechanism so you can remove it before your plastic cools overtop preventing access to the bottom. In this step, I will show the steps needed to accomplish this.
Materials needed.
• Metal grinder
• Preferably a hot rolled steel beam.
• A small metal scrape to be used as a slider and bottom of your mold.
• Eye protection
Steps:
Step 1: Measure 1/16th of an inch on one side of the beam and draw a marking for your cut. If your beam is aluminum or extremely thin you may want to consider increasing this distance but beware further in you go harder it will be to remove your plastic beam.
Step 2: Flip the beam around and repeat step 1.
Step 3: Use the metal grinder to cut the slots on both sides so that the scrap metal can slide through. Ensure your cuts align with each other, if not your slider may not fit.
Step 4: Choose a scrap metal piece that can be cut to size and fit accordingly to leave a limited number of gaps and provide a tight fit.
3
Melting plastic into a Beam using a clamp. Part 1
This method is considerably easier than the manual method and will give you a much denser beam. I highly suggest this method if you have a 5+ foot clamp.
Materials Needed:
• Outdoor fire pit or an alternate heat source that can reach constant temperatures above 250 Celsius.
• Carbon activator gas mask
• Mold – Out of my three mold attempts the hot rolled steel tube worked the best. Local hardware stores carry these for about 25 USD.
• Heat resistance gloves
• Pushing stick – Some sort of solid wood or metal with the same inner dimensions as your beam.
• Fire-making materials, lighter wood, etc.
• Pliers
• +-5 foot metal clamp
4
Melting plastic into a Beam using a clamp. Part 2
Steps
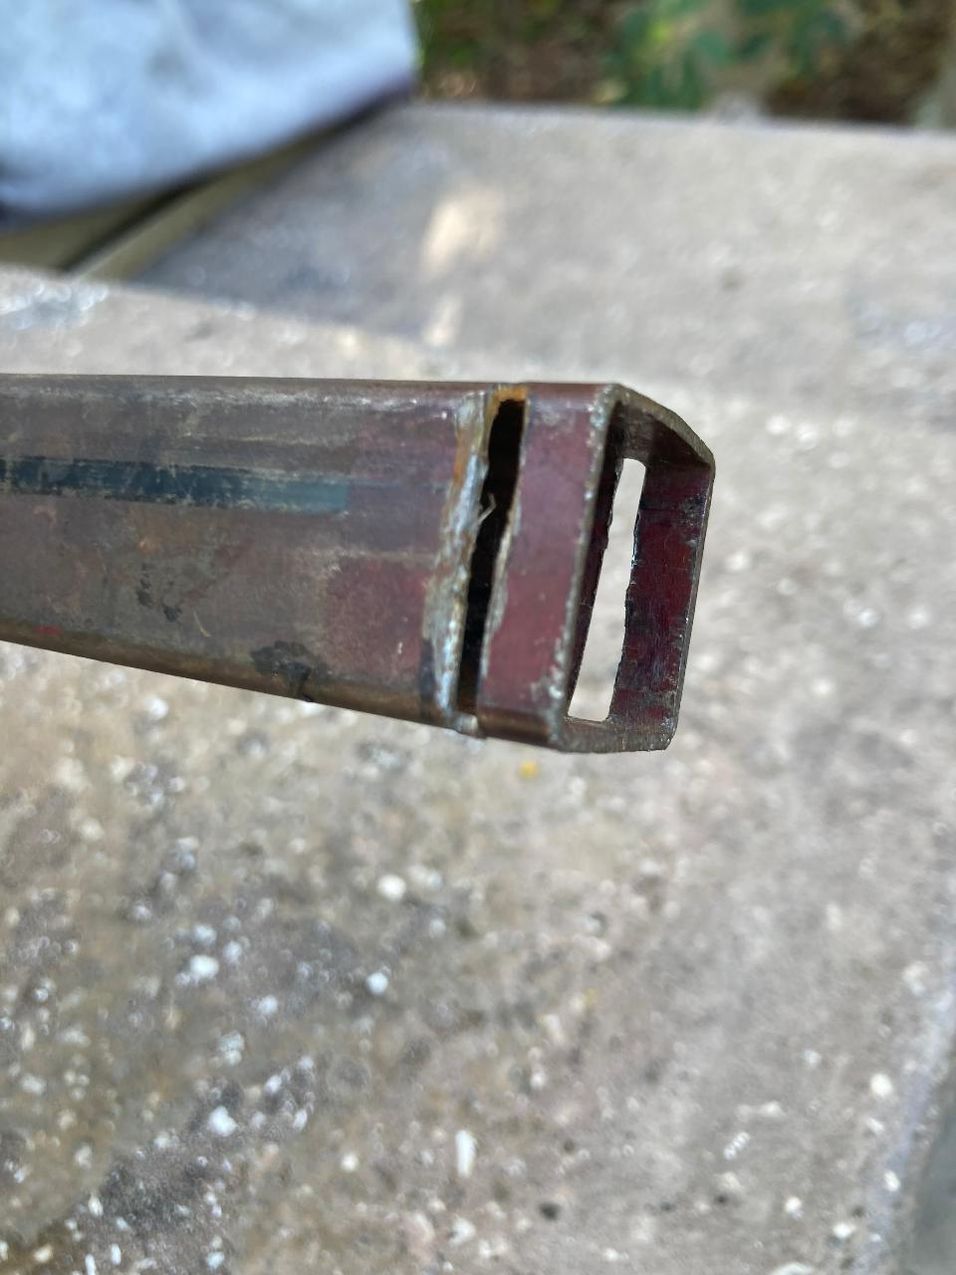
Step 1: Insert metal peace at the bottom of the mold and ensure it's secure but removable with pliers. This is your quick-release mechanism to open the bottom up for removal later.
Step 2: Load a few plastic bags into the mold and compress them with the push stick before starting a fire, I recommend adding more bags using the clamp technique than the manual technique because of the difficulty of adding bags later.
Step 3: Create a fire that can consistently burn; have wood near to stock the fire for at least 30 minutes if problems arise.
5
Melting plastic into a Beam using a clamp. Part 3
Step 4: Hold the beam over the fire without the push stick in and wait for it to heat up.
Step 5: After you have given the plastic enough time to heat up push in the push stick and secure it in the clamp.
Step 6: Tighten the clamp to compress the beam. This process will have to be repeated multiple times to make your beam solid.
Note: You may have reset your clamp depending on the type your using todo so slide the stationary side closer to give more compression length.
Note: If needed your able to add more plastic bags after the first compression and continue doing so to get your desired length. I don't recommend any length over 10 inches because it will get increasing more difficult to remove.
6
Removing the beam with the clamp technique
With this method, you should be able to remove the beam directly after formation and before it cools, either with force or by using the clamp without the stopper at the bottom.
Step 1: Remove the stopper from the bottom with a pair of pliers.
Step 2: Try and remove the beam by pressing the push stick in while applying consistent force.
Note: If this works congratulations you are done! If not, no worries continue reading.
Step 3: Put your beam back into the rig just like before but without the stopper at the bottom.
Step 4: Tighten your clamp in while the plastic is still hot, once it starts to move you can take the mold out of the beam and finish the process with the push stick.
7
Melting the prepared plastic into a beam. Part 1
Now that you have built your mold and prepared your plastic bags we can start melting your bags into beams! The manual method will have much more air pockets than using the newly invented clamping technique, so if you have access to a 5+ foot metal clamp I encourage you to try the process above.
Materials Needed:
• Outdoor fire pit or an alternate heat source that can reach constant temperatures above 250 Celsius.
• Carbon activator gas mask
• Mold – Out of my three mold attempts the hot rolled steel tube worked the best. Local hardware stores carry these for about 25 USD.
• Heat resistance gloves
• Pushing stick – Some sort of solid wood or metal with the same inner dimensions as your beam.
• Fire-making materials, lighter wood, etc.
• Pliers
8
Melting the prepared plastic into a beam. Part 2
Step 1: Insert metal piece at the bottom of the mold and ensure it's secure, but removable with pliers. This is your quick-release mechanism to open the bottom for removal later.
Step 2: Load a few plastic bags into the mold and compress with the push stick before starting a fire.
Note: Be careful not to fill the entire mold up, or more than eight bags at once. You will need to hand compress these as best you can to ensure your final product is solid.
Step 3: Create a fire that can consistently burn; have wood near to stock the fire for at least 30 minutes in case problems arise.
9
Melting the prepared plastic into a beam. Part 3
Step 4: Hold mold over the fire and rotate, have your push stick ready to compress in a few moments. If the fire is well built it will only take about 30 seconds to become a malleable substance.
Step 5: Compress the plastic using the push stick. Be sure to apply as much pressure as possible; the more force you can exert the better; this will determine the density of your product.
Step 6: Slowly add extra plastic strips while compressing the beam using the push stick between each one until you’re satisfied with the length.
Note: I recommend adding about an inch extra to compensate for thermal expansion and the removal process.
Step 7: Once the beam is properly compressed use pliers to remove the slider acting as a stop at the bottom and attempt to remove it with the push stick. If the beam is stuck I suggest letting it cool in the mold and later heating the beam up just enough to loosen it.
%20--%3e%3csvg%20version='1.1'%20id='Layer_1'%20xmlns='http://www.w3.org/2000/svg'%20xmlns:xlink='http://www.w3.org/1999/xlink'%20x='0px'%20y='0px'%20viewBox='0%200%2064%2063'%20style='enable-background:new%200%200%2064%2063;'%20xml:space='preserve'%3e%3cstyle%20type='text/css'%3e%20.st0{fill:%2320B7EB;}%20.st1{fill:%23E9475A;}%20.st2{fill:%23FECE4E;}%20%3c/style%3e%3cdesc%3eCreated%20with%20Sketch.%3c/desc%3e%3cg%20id='Page-1'%3e%3cg%20id='OA-Logo-Black-Background'%3e%3cpath%20id='Shape'%20class='st0'%20d='M14.1,30.1c-1.5-0.8-8.6-3.8-14.1-7.8c1.8-3.4,3.1-5.6,5-9.1c2.7,1.1,1.9,0.5,4.6,1.7%20c0.8,0.4,10.1,4.5,13.8,6.2c2.4,1.1,4.7,2.2,7,3.3L43,30.5l8.1,3.9c4,2,7.2,3.5,11.3,5.5c0.5,0.3-3.7,9.4-3.7,9.4%20c-1.7-0.6-3.9-1.8-5.5-2.5c-4.7-2.1-9-3.9-13.7-6c-4-1.8-6.7-2.9-10.8-4.5C25,34.9,17.1,31.6,14.1,30.1z'/%3e%3cpath%20id='Shape_1_'%20class='st1'%20d='M12.1,54.9c-0.8,0.6-1.6,1.2-2.5,1.6c-0.4-0.5-0.9-1-1.3-1.5c-0.3-1.2-2.3-4.9-2.7-6.2%20c-0.1-0.4-0.7-2.2-0.8-2.6c0,0,5-3.4,8.2-5.9c3.2-2.6,6.2-5,9.3-7.5c1.4-1.1,3.9-2.5,5.3-3.5c2.5-1.7,13-9.1,15.6-10.5%20c5.4-3.3,11.1-6.3,16.8-9c1.7,3.5,1.8,3,3.8,6.9c0,0-17.8,13.5-22.7,17.1c-3.8,2.8-7.5,5.7-11.3,8.5c-1.7,1.3-3.5,2.4-5.2,3.7'/%3e%3cpath%20id='Shape_2_'%20class='st2'%20d='M20.8,2.9l-0.2-0.8C25,0,31.2-0.3,31.4,0.2c0.4,1.1,0.9,2.2,1.2,3.4c1.4,4.4,2.7,8.7,4,13.1%20c0.4,1.4,2.8,10,2.9,10.5c0.5,2.8,1.2,5.6,1.6,8.4c0.8,4.7,1.4,8.6,2.3,13.3c0.6,3.1,1.3,6.3,2.3,11.3c0,0-5.8,1.4-7.5,1.8%20c-0.8,0.2-1.5,0.4-2.4,0.6c-0.3-1.1-0.2-1.2-0.5-2.1c-0.9-3.7-1.8-7.3-2.6-11c-1.5-6.4-3-12.9-4.4-19.3%20c-1.2-5.4-2.6-10.7-4.4-15.9c-1-3.1-1.8-6.3-2.7-9.5C21.1,3.8,21,3.8,20.8,2.9z'/%3e%3c/g%3e%3c/g%3e%3c/svg%3e)